
Bypassing Google Account With vnROM Bypass For Itel A05s
Bypassing Google Account With vnROM Bypass For Itel A05s
Encountering the need to bypass a Google account can be crucial nowadays. This is especially true during device resets or when locked out due to forgotten credentials. Such a need also arises when users encounter factory resets , buy a second-hand device, or forget their login details. In such scenarios, specialized tools like vnROM Bypass come into play. They offer solutions to bypass Google’s verification process.
This article will provide a detailed review of vnROM Bypass, exploring its efficacy and usability. Additionally, alternatives to this tool will be examined. The aim is to provide users with a comprehensive understanding towards this tool and guide them to use. Ultimately, we will determine the best options for bypassing Google account security.

Part 1. A Comprehensive Introduction to vnROM Bypass and What It Does?
The vnROM Bypass tool is crafted to bypass Google account verification on Android devices. Its primary utility lies in scenarios where users face an FRP lock after a factory reset or forgotten login credentials. The tool operates through the exploitation of Android OS weaknesses. It empowers users to reclaim entry to their devices without needing the Google account details.
The tool provides a straightforward and user-friendly interface. This makes it relatively easy for users to navigate and perform the necessary steps for bypassing the FRP lock . Moreover, it offers compatibility with a range of Android devices. The app specifically targets those running on Android OS versions 5.0 to 8.1.
How To Download vnROM Bypass
Downloading vnROM FRP Bypass involves obtaining the tool from reputable sources online. The following are the steps you need to follow to download vnROM Bypass:
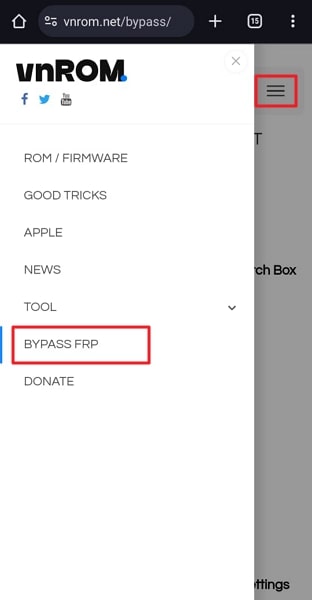
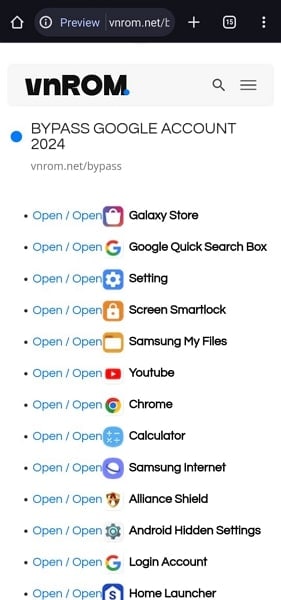
- Step 1. On your Android device, open a web browser and visit the vnROM official website. Now tap the three lines icon from the top left corner and press “Bypass FRP.”
- Step 2. You will be guided to the vnROM Bypass tool, and by tapping “Download,” the download process begins. Ensure you have enabled installations from unknown sources on your device before moving forward.
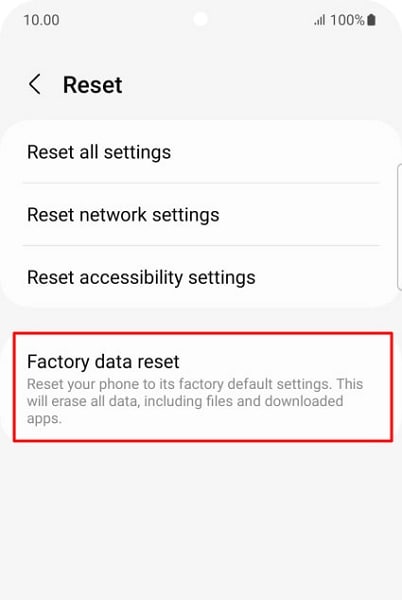
- Step 3. After you’ve downloaded the tool, proceed with its installation. Once installed, open the “Settings” app and find the “General Management” option. Now select the “Reset” option and head to the next step.

- Step 4. Following this, choose “Factory Data Reset.” Confirm the choice by hitting the “Reset” button and afterward restart your device and input your Google account information.
Steps To Use vnROM Bypass
Using the vnROM Bypass on your devices turns out to be a simple procedure. Below are the steps for utilizing the vnROM Bypass:
- Step 1. Access vnROM’s official website via your browser and download the APK file onto a USB drive. This APK serves as the primary application for initiating the bypass. Power up the locked phone and follow the on-screen instructions to set up the mobile device. During the setup process, connect the USB drive to your phone using an OTG cable when prompted to verify your account.
- Step 2. Install the vnROM bypass APK from the USB drive onto the Itel A05s device. Once the APK is installed, navigate to the Itel A05s device’s “Settings” menu and perform a factory reset. Upon completion of the factory reset, the Itel A05s device will automatically restart. Proceed to set up your phone without providing your Google account credentials.
Part 2. Some Prominent Limitations of vnROM Bypass
vnROM Bypass offers a solution for bypassing FRP lock on certain Android devices. Yet, it comes with several notable limitations that necessitate exploring alternative options. The following are some of the limitations of vnROM Bypass:
1. Limited Compatibility
vnROM Bypass primarily supports Android versions 5.0 to 8.1 (Lollipop to Oreo). Hence, it fails to function on devices operating on more recent Android versions. Android 9 through 14 users might encounter compatibility issues and inefficacy when utilizing this tool.
2. Security Risks
Using bypass tools like vnROM Bypass can potentially expose devices to security risks. One significant factor contributing to this situation is the absence of an official website for the tool. Furthermore, it has not received updates for quite a while. This makes it a potential security risk for newer Android models.
3. Functional Restrictions
This tool has not received updates for some time, so its proper functionality cannot be guaranteed. It seems primarily compatible with older Android devices running on versions 5 through 8.1. Moreover, serious concerns exist about the tool’s effectiveness, even for older devices.
4. Complexity and Reliability Issues
The bypass process using vnROM Bypass can be complex. For users unfamiliar with such tools, it could lead to potential errors. The reliability of the tool’s effectiveness varies across different devices and firmware versions. This results in inconsistent outcomes.
Part 3. Listing Some Quick APK Alternatives of vnROM Bypass
In situations requiring the bypassing of FRP lock via APK services, several alternatives to vnROM Bypass exist. They offer unique functionalities and capabilities catering to different user preferences. The following notable alternatives provide users with different approaches to bypassing Google account locks:
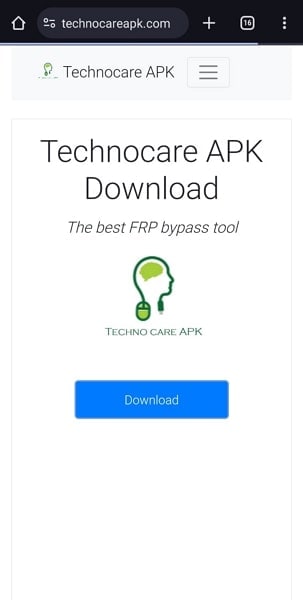
1. Technocare APK
Technocare APK offers a simplified approach to bypassing Google account verification. This tool specializes in bypassing FRP (Factory Reset Protection) locks. It aids users in regaining access to their devices without the original Google account credentials. Its ease of use and compatibility with many Android devices make it notable.

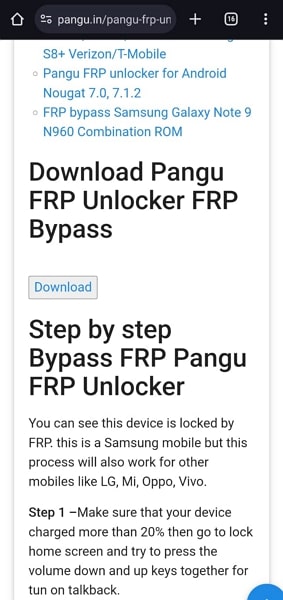
2. Pangu FRP Bypass APK
Pangu FRP Bypass APK provides an effective solution for bypassing Google account verification. This tool bypasses FRP locks caused by factory resets or forgotten credentials. It offers a straightforward process to bypass the FRP lock. The tool’s compatibility with various Android versions makes it a suitable choice. This app is especially handy for users encountering Google account lock issues.
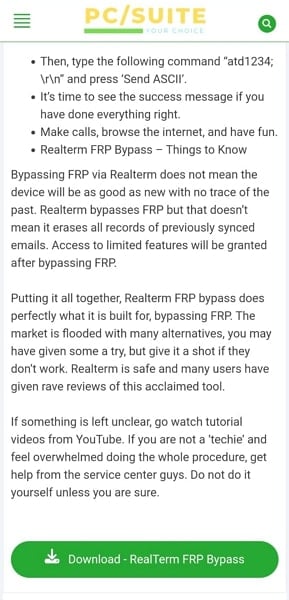
3. Realterm FRP Bypass APK
Realterm FRP Bypass APK offers an alternative method to bypass Google account verification. It does so by leveraging Realterm software. This tool assists users in overcoming FRP locks and gaining access to their Android devices. Yet, it’s important to note that Realterm FRP Bypass might need more technical know-how. This is the case for successful implementation compared to other alternatives.
4. Wondershare Dr.Fone - Screen Unlock (Android)
Wondershare Dr.Fone distinguishes itself as an extensive and easily navigable utility. Crafted to bypass Google account verification and unlock Android devices, it excels as a user-friendly tool. With its intuitive interface, this software assists users in bypassing various screen locks. These include PIN, pattern, password, and Google account locks. Dr.Fone’s effectiveness lies in its compatibility with various Android devices and OS versions.
This guarantees an increased likelihood of bypassing Google account verification successfully. Furthermore, it bypasses the Android FRP lock without requiring a PIN or Google account. Moreover, it supports well-known Android brands such as Samsung, Huawei, LG, Xiaomi, and others. However, Wondershare Dr.Fone – Screen Unlock does not come as an APK but offers a comprehensive platform.

 safe & secure
Part 4. [Effective Alternative] Wondershare Dr.Fone Making Google Account Bypass Easy
Do you own an Android with version higher than 8.1? Or do you have a specific Android brand which cannot be bypassed by vnROM Bypass? At such a stage, you might feel stuck with the need to bypass your Google account. While there seems to be no way, Dr.Fone - Screen Unlock (Android) emerges as the perfect remedy in such a situation. This intuitive toolkit provides a comprehensive system of bypassing FRP lock.
With its diversified OS support, it offers better functionality than tools like vnROM Bypass. Along with that, you can also find dedicated support for a huge variety of Android brands. This provides versatility in bypassing Google FRP (Factory Reset Protection) locks. Its intuitive interface makes it accessible even to users with limited technical expertise.
![]()
Dr.Fone - Screen Unlock (Android)
The Best UnlockJunky Alternative to Bypass FRP and Solve Your Screen Locks
- Remove all Android screen locks (PIN/pattern/fingerprints/face ID) in minutes.
- Bypass Android FRP lock without a PIN or Google account.
- Everyone can handle the lock screen without any tech knowledge.
- Provide specific removal solutions to promise good success rate.

4,008,669 people have downloaded it
Step-by-Step Guide To Bypass Google FRP Account in Dr.Fone
Dr.Fone makes bypassing Google FRP lock a breeze and effortless process. Here are the detailed steps you need to follow to complete this procedure:
How To Bypass FRP on Samsung Devices?
- Step 1. Samsung Device Connection and Google FRP Lock Removal Setup
To begin, initiate Wondershare Dr.Fone on your computer and connect the Samsung device. Next, navigate to “Screen Unlock” in “Toolbox”, and on the next screen, opt for “Android”. Select “Remove Google FRP Lock” on the following screen. Afterward, select “Samsung” and proceed by clicking the “Start” button.
- Step 2. OS Version Selection and Hidden Menu Access
Choose the Android OS version on your Samsung device. If you want to use the quickest way to remove Google Lock, opt for the “All Android versions (One-Click Removal)” option. Now, click “Start”, locate and tap the “Emergency Call” button on your Android device. Then input #0# to access a hidden menu and click “Next”.


- Step 3. Authorization and FRP Lock Removal Confirmation
Next, an activation prompt for USB debugging will appear on your Android screen. Upon allowing this on your Samsung device, click “Authorized.” Subsequently, the following screen on your computer will indicate the removal of the FRP lock from your Android device. A prompt window will confirm completion once the FRP lock removal is successful. Click “Done” to conclude the process.

safe & secure
How To Bypass FRP on Xiaomi/Redmi/OPPO/RealMe/Vivo Devices?
Dr.Fone got you covered if you use a device other than a Samsung device. You can follow these steps to bypass FRP lock on Xiaomi/Redmi/OPPO/RealMe/Vivo Devices:
- Step 1: Unlocking FRP on Android Devices Using Wondershare Dr.Fone
Open Wondershare Dr.Fone on your computer, navigate to the Toolbox and click Screen Unlock. To bypass the FRP lock, opt for the Android option once the screen appears. Then, choose ‘Remove Google FRP Lock’ from the provided options. Next, select your specific Android phone brand from the options displayed on the screen.
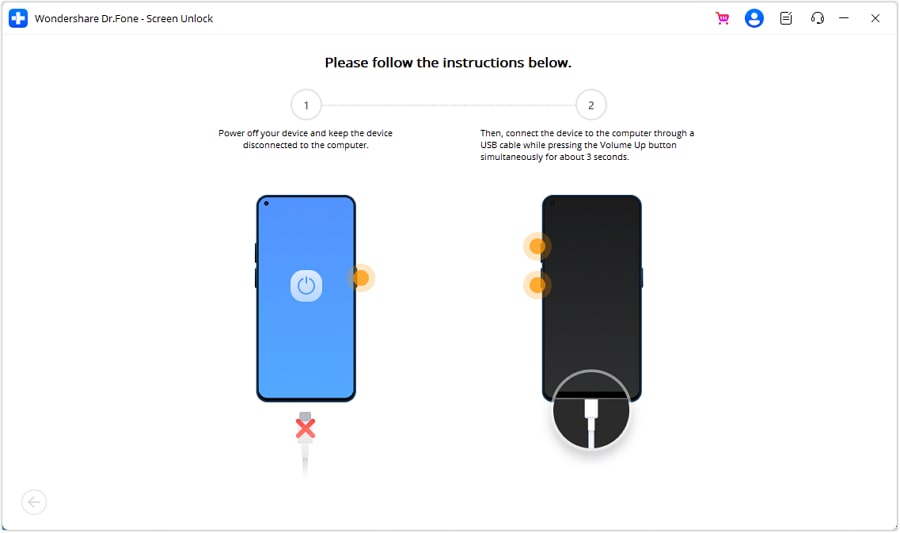
- Step 2: FRP Lock Removal Initialization
Upon selecting your device brand, Dr.Fone initiates the download of the necessary driver. Once downloaded, turn off your device and connect it to the computer. While connecting, press the Volume Up and Down buttons for approximately 3 seconds. The FRP lock removal process will commence and may take a few minutes. Once the lock is removed, simply tap “Done” to finalize the process.
Conclusion
In summary, this article explored bypassing Google account verification on Android devices. We explored vnROM Bypass, highlighting its functionalities and limitations. Additionally, we presented various APK alternatives, emphasizing the need for a more effective solution. Wondershare Dr.Fone - Screen Unlock (Android) emerged as a standout option for its support for all Android versions and user-friendly interface.
How to Reset Gmail Password on Itel A05s Devices
Nowadays, along with Windows or Apple devices, Android devices are starting to take its place as one of the most popular, reliable, and efficient technical equipment brands. As a result, the use of Android as an operating system for both PC and portable tools is becoming an extremely hot trend.
Android devices pride themselves on providing their customers with the best features possible. Not only do they support offline features, but Android devices are also capable of offering users with several services online. One of them is the ability to make use of Gmail - a very famous email site nowadays.
Gmail being used directly by an Android tool is a great advantage, but it still contains some small drawbacks that users may have to go through. According to a recent survey, the majority of Android users were likely to wonder if they were able to reset Gmail password on Android devices.
Luckily for you, this performance is possible. In this article, a very informative and detailed description will be delivered to you to help you solve the problem of resetting your Gmail password.
Part 1: Reset Gmail Password When you Forget it
There will be times when you come into the situation of not knowing what your Gmail password is, or you just simply forget it. You want to change your password but you don’t have access to a computer or laptop to perform this task. Now with the help of Android, you can do it through your own Android devices.
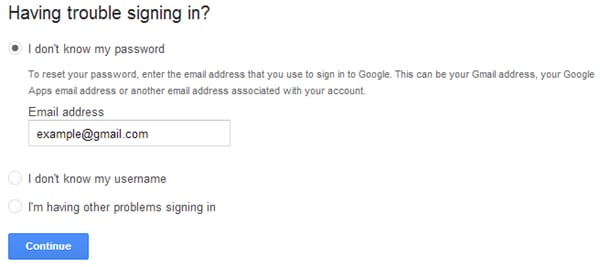
Step 1: Visit the Gmail login page from your Android device. Click on the Need helpline, which is highlighted in blue.

Step 2: After that, you will be moved to the Google Account Recovery page. There will be 3 main options which indicate 3 frequent problems. Select the first one, which is entitled “I don’t know my password”. Once you have chosen it, you will be required to fill in your Gmail address in the bar provided. Click on the Continue button as long as you have made sure to finish all these tasks.
Step 3: In this step, you may be asked to fill in a CAPCHA form. Just simply do it and move to the next page. There you had better type in the last password that you are still able to recall if possible, then click on the Continue button to move. Or else, you can skip this step by clicking on I don’t know button.

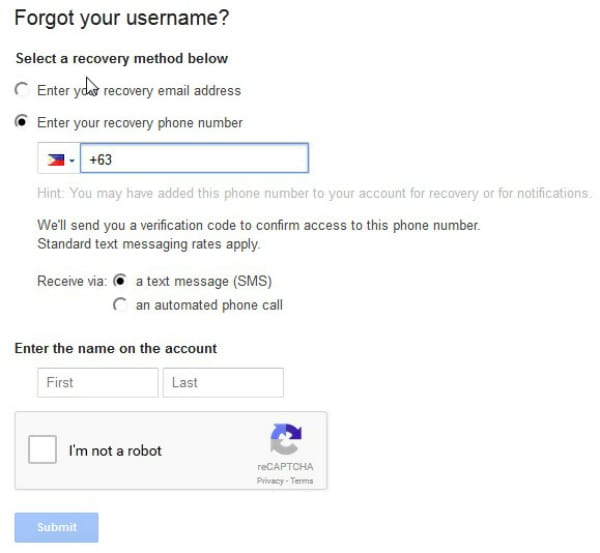
Step 4: Finally, you will be shown a list of options on how to reset your Gmail password on Android devices. You can either use your alternative email address or your phone number to receive a verification code. Bear in mind to fill in any required information and put a check in the CAPCHA box to submit the process.
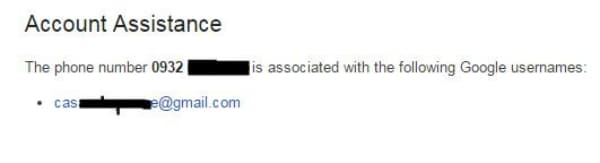
Step 5: In this step, a blank bar will appear and it will demand you to type in your verification code. Just do it carefully to make sure there is no error. Once you have done it, a new screen will appear to tell you.

Step 6: After you have done all the previous steps, you will know how to reset your Gmail password directly from your Android device.
Part 2: Change Gmail Password When You Still Know it
Besides not knowing your password, there are still circumstances when you wish to change your current password for various reasons. Just simply follow these steps.
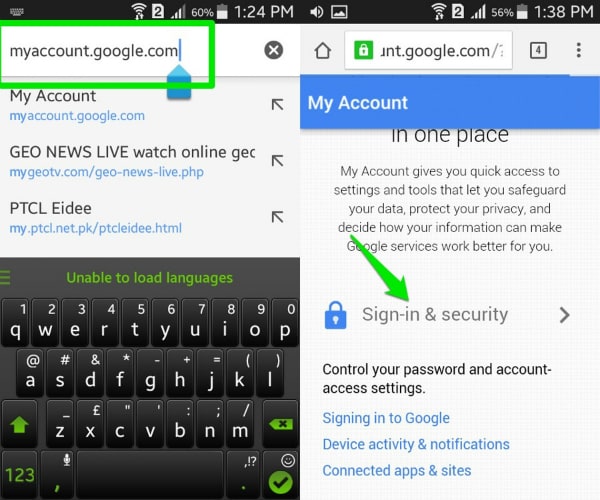
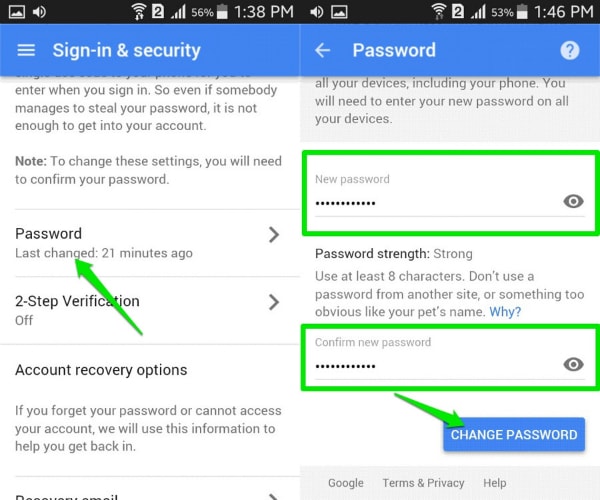
Step 1: Make sure your Android device is connected with the Internet. Then get access to the link myaccount.google.com. After logging into your account (or maybe you have already done this), scroll down, find the Sign-in and security option and choose it.
Step 2: Find the Password option in the list. Tap on it to be moved to another screen. In the menu, type in your new password that you wish to exchange, confirm it and then click on the Change password button.

Part 3: Bonus Tips
Gmail is undoubtedly a marvelous tool to use on Android devices, but have you really understood all the tips and tricks to take the best advantage of it? Below are the 5 most helpful tips that we want to offer you.
- Far from your imagination, Gmail on Android devices is capable of allowing you to make use of several accounts at the same time, even if it’s not a Gmail account. This performance not only helps you to organize your work better, but it also increase the efficiency of your job. Just simply log in your Gmail account on Gmail app, click on the down arrow which is placed next to your avatar and name, then choose Add account. You will be moved to another page, choose Personal (IMAP/POP) choice and follow the detailed guide on the screen.
- If your Android device is used by only one user, and you are guaranteed about the security of it, try to keep the Gmail logged in. It would help you to avoid wasting unnecessary time to sign in your account every time you need, not to mention that it prevent you from being confused of not knowing your account/password.
- You are capable of sorting your mails with a certain level of accuracy once you are fully aware of the features of Gmail app on Android devices. Just click on the email, then choose Settings menu and mark it as “Mark as not important”, “Mark important” or “Report to spam” owing to the priority of your email.
- Gmail app provided you with the ability to have conversations online, and whenever a message comes, there will be a sound. In case you are in a vital conference, or you don’t want to be disturbed by the noise, you can mute it. All you have to do is to tap into the conversation, choose the three dots icon then click on the Mute option in the menu.
- Enhance the speed and the accuracy of your search with the use of certain phrases. Let’s take an instance to see what Gmail can do for you in this case. If you want to search for the mails which have been sent by a certain person, typefrom:(name of the person on Gmail) in the searching bar. And in case you would love to look for a private message from that person, please type is:chat:(name of the person on Gmail) .
Part 4: Video on How to Reset Gmail Password on Android Devices
Top 4 SIM Location Trackers To Easily Find Your Lost Itel A05s Device
Losing your smartphone can be a distressing experience. It’s not just a device; it’s a treasure trove of memories and personal information. Fortunately, technology has come to the rescue with SIM location trackers. These useful tools will help you ensure your lost device is never truly lost.
Whether you call it a SIM location tracker, a SIM card locator, a SIM card finder, or even a SIM card number finder, these smart solutions are your best friends in times of need. So dive in and discover the top 4 SIM location trackers to make device retrieval a breeze.
![]()
Part 1: Why You Need SIM Location Trackers at Your Disposal
In today’s fast-paced world, losing a smartphone happens more often than one would like to admit. Picture this: You’re in a rush, juggling tasks, and suddenly, your phone slips out of your pocket or bag. Panic sets in as you realize it’s nowhere to be found.
![]()
Losing your smartphone can be depressing, not just because of the cost of replacing it. Think about all the photos, messages, and personal information stored on it. It’s like losing a piece of yourself. This is where SIM location trackers come to the rescue.
Common Scenarios of Device Loss
Check out some of the most common scenarios where a phone might get lost:
- Have you ever left your phone in a cab or at a restaurant? It’s surprisingly common.
- Sometimes, it slips out of your pocket during a hectic commute.
- In the worst cases, it might even get stolen.
The Growing Need for SIM Card Finders
With lives deeply intertwined with technology, the demand for easy and effective device tracking is rising. People want solutions that don’t require a tech genius to operate. They want something simple, straightforward, and, as much as possible, free SIM card locators.
Factors To Consider When Choosing a SIM Location Tracker
Now, here are the top factors you need to check when you are about to choose an online SIM location tracker.
- You need a tracker that can pinpoint your device’s location precisely.
- Ensure it works with your device and operating system.
- **User Reviews.**Check what others say about the tracker. Real user experiences matter.
- **Additional Features.**Some trackers offer extra perks like geofencing or remote device control. Consider what suits your needs.
The bottom line is that SIM location trackers offer a lifeline when your device vanishes into thin air. They’re your best shot at getting it back quickly and easily. Plus, in this age of digital privacy, knowing where your personal information is can be a big relief.
In the next part of this journey, this article will delve into the top 4 SIM location trackers that are here to make your life simpler and your devices safer. So, stay tuned and explore these handy tools that bring peace of mind to the palm of your hand.
Part 2: Top 4 SIM Location Trackers
Now that you understand why SIM location trackers are essential let’s dive into the world of these handy tools. This section explores four of the most popular SIM card finder that can help you track your SIM card location online for free.
Hoverwatch
Hoverwatch is your go-to solution for simple and effective SIM location tracking. Designed with user-friendliness in mind, it offers accurate GPS tracking call and SMS monitoring and operates in stealth mode.
![]()
Key Features
Check out Hoverwatch’s essential features below:
- It provides real-time GPS tracking to pinpoint your device’s location accurately.
- You can monitor calls and messages on the target device.
- Hoverwatch operates discreetly, so the user of the tracked device won’t know it’s being monitored.
Pros
Listed below are Hoverwatch’s advantages:
- Easy to set up and use, making it ideal for beginners.
- Supports a wide range of devices and operating systems.
- Affordable pricing plans.
Cons
Below is the drawback of using Hoverwatch:
- Some advanced features may require rooting or jailbreaking the target device.
mSpy
For a comprehensive monitoring solution that includes SIM location tracking, mSpy is a top choice. It not only provides real-time location tracking but also offers geo-fencing and social media monitoring. mSpy is particularly popular among parents who want to ensure their children’s safety online.

![]()
Key Features
Key characteristics of mSpy are as follows.
- Track the target device’s location in real time.
- Set up virtual boundaries and receive alerts when the Itel A05s device enters or leaves these areas.
- Monitor social media activities and messages.
Pros
The benefits of using mSpy are as follows:
- Excellent for parents who want to ensure their child’s safety online.
- Comprehensive monitoring, including text messages, calls, and social media.
- Compatible with Android and iOS devices.
Cons
The disadvantages of mSpy are outlined below:
- Relatively higher pricing compared to some other trackers.
- Advanced features might require device rooting or jailbreaking.
Spyic
Spyic is a trusted name in the world of monitoring and tracking software. It offers precise location tracking, works without rooting or jailbreaking, and comes with features like geofencing. Spyic is highly reliable, user-friendly, and compatible with Android and iOS devices.
![]()
Key Features
See the highlights of Spyic below:
- It provides accurate location information, including location history.
- Spyic can be used without rooting or jailbreaking the target device.
- Set up virtual boundaries and get alerts if the Itel A05s device enters or exits these areas.
Pros
Here are some of Spyic’s many benefits:
- Highly reliable and user-friendly.
- Works on both Android and iOS devices.
- Offers a web-based dashboard for easy monitoring.
Cons
The drawbacks of utilizing Spyic are as follows:
- The pricing may be a bit on the higher side for some users.
- Some advanced features may require a premium subscription.
Spyzie
Spyzie is a versatile monitoring tool covering SIM location tracking and more. It provides accurate location updates, social media monitoring, and call/text tracking. One of its standout features is that it doesn’t require complex technical procedures like rooting or jailbreaking, making it accessible to users of all levels.
![]()
Key Features
Take a look at some of Spyzie’s best qualities:
- Get real-time location updates of the target device.
- Track social media activities, messages, and media files.
- Monitor calls and text messages on the target device.
Pros
Spyzie’s benefits are as follows:
- Compatible with Android and iOS devices.
- There is no need for complex technical procedures like rooting or jailbreaking.
- User-friendly interface for easy navigation.
Cons
The Spyzie’s drawback is detailed here:
- Pricing plans might be a consideration for budget-conscious users.
Part 3: How To Unlock iPhone SIM?
Now, what if you don’t only want to track your SIM number location but also want to deal with other iPhone SIM-related issues like SIM not supported, invalid SIM, locked SIM, or no network servicing? Luckily, this article is also set to share a robust solution - Wondershare Dr.Fone – SIM Unlock. This versatile tool helps you locate your device and ensures your iPhone’s SIM card functions smoothly.
Dr.Fone - Screen Unlock (iOS)
Best SIM Unlock for iPhone.
- Simple, click-through, process.
- Fix SIM unlock with a few clicks.
- Supports almost all carriers, from Vodafone to Sprint.
- No tech knowledge required, everybody can handle it.
- Supports the latest iOS version fully!
4,395,217 people have downloaded it
Why Choose Dr.Fone - SIM Unlock
Below are the key features that make this tool unmatched:
- Dr.Fone - SIM Unlock is your trusted companion for various iPhone models. Whether rocking the latest iPhone or an older version, this tool has your back.
- **User Friendly Interface.**No need to be a tech wizard to use Dr.Fone - SIM Unlock. Its straightforward interface ensures that even if you’re not tech-savvy, you can easily unlock your iPhone SIM.
- **Broad Compatibility.**It supports many iPhone models and is regularly updated to stay compatible with new releases.
- **Quick and Easy.**The process is designed to be simple and efficient, ensuring you get your iPhone back up and running quickly.
Step-by-Step Guide to Using Dr.Fone - SIM Unlock
Here’s a simple step-by-step guide to unlocking your iPhone SIM using Dr.Fone - SIM Unlock:
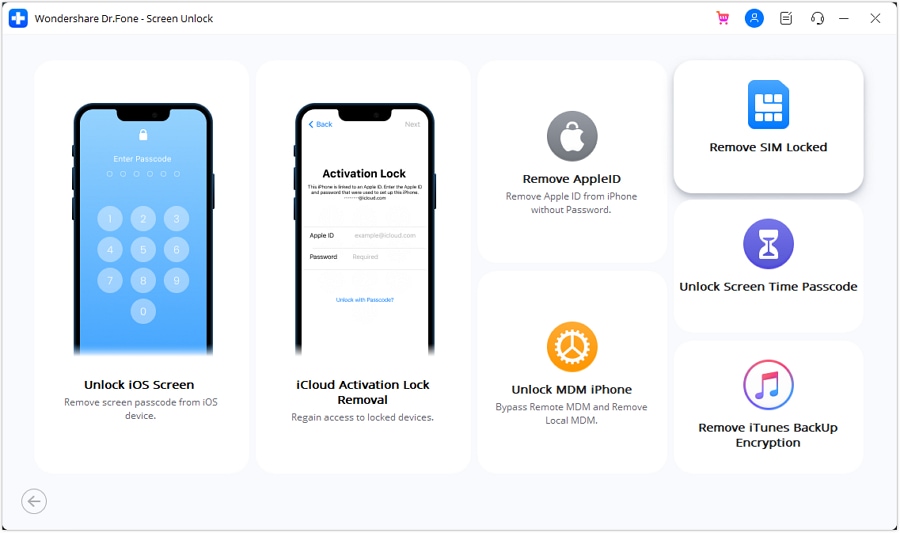
- Step 1: After downloading and installing the software, start Wondershare Dr.Fone on your computer. Continue to the Toolbox area, then select Screen Unlock and iOS to launch the tool in a new window.

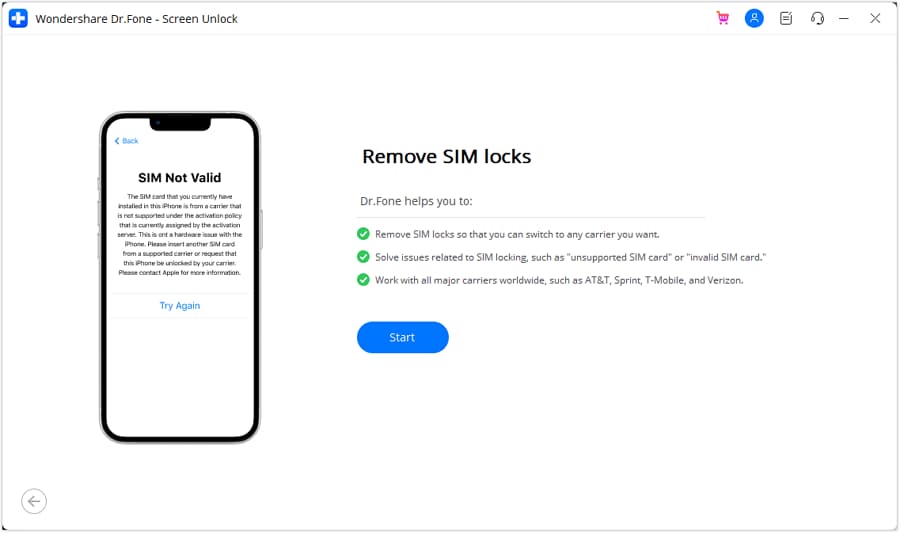
- Step 2: In the new window, hit the Remove SIM Locked button to start the process. You will then be sent to the Remove SIM Locks page, where you must click Start to initiate the process.
- Step 3: The platform will detect your device and present its details on the following screen. Click the Unlock Now button to continue the unlocking procedure.
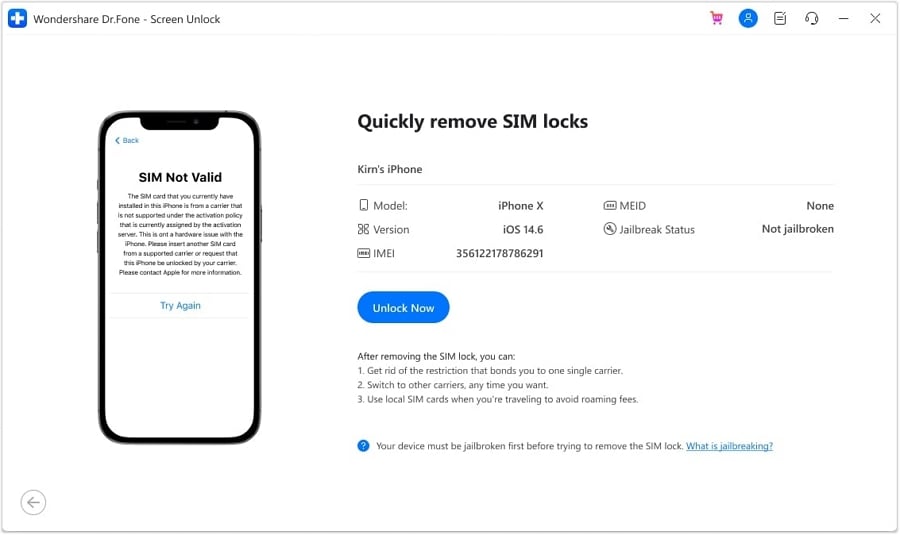
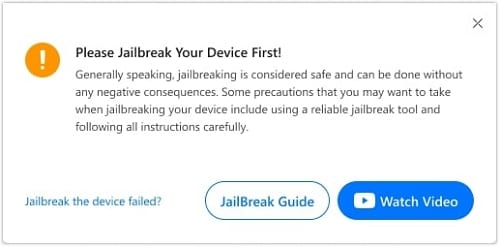
- Step 4: Because this method necessitates jailbreaking your iOS device, you will be prompted to do so first. If you want to follow a guide, click on Jailbreak Guide. If you want to watch a video guide, select Watch Video.
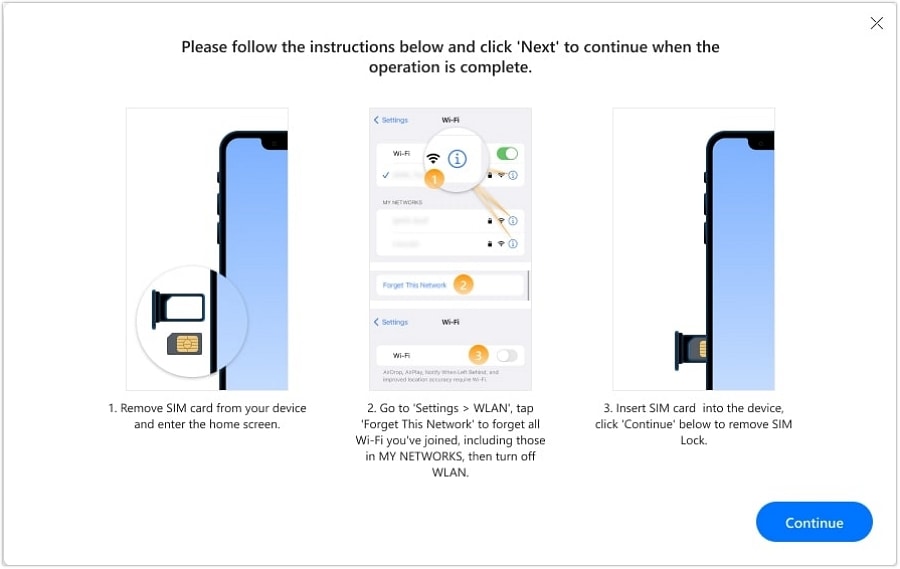
- Step 5: The screen will invite you to perform several actions, starting with removing the SIM card from the iDevice. To access the Itel A05s device’s network settings, go to Settings, then WLAN. Find the Wi-Fi networks you’ve joined and select Forget This Network.
- Step 6: Unlink all connected networks from My Networks and turn off Wi-Fi. After that, re-insert your SIM card and press the Continue button. The following screen will offer a prompt box with the status of the unlocking process.
- Step 7: After a few moments, the window will display a completion notification, and you must click Done to complete the process.
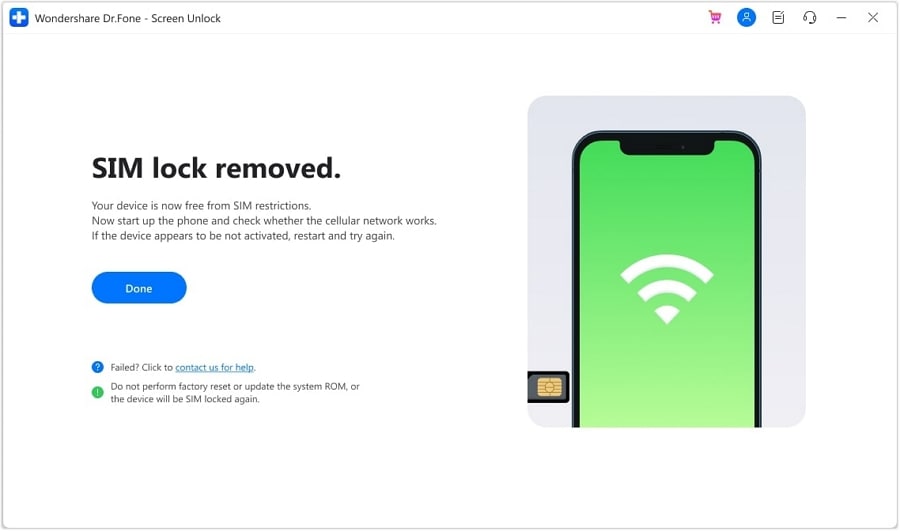
And that’s it! You’ve successfully unlocked your iPhone SIM using Dr.Fone - SIM Unlock. Now, your device should be free from SIM-related issues, and you can enjoy seamless network connectivity. So, if you’re facing SIM woes, don’t fret; Dr.Fone - SIM Unlock has you covered.
Conclusion
Losing your smartphone is more common than you might think. Thankfully, SIM location trackers are here to save the day. These simple tools offer accuracy and peace of mind, ensuring that your lost device can be swiftly recovered. Remember, quick device recovery means safeguarding your cherished memories and personal data. So, explore the recommended trackers this article has covered, and choose the one that best suits your needs.
And if you ever need to unlock your SIM card , Dr.Fone - SIM Unlock is your best companion. Enjoy the enhanced security, broad compatibility, and user-friendliness that come with it.
- Title: Bypassing Google Account With vnROM Bypass For Itel A05s
- Author: Marry
- Created at : 2024-07-18 16:29:46
- Updated at : 2024-07-19 16:29:46
- Link: https://unlock-android.techidaily.com/bypassing-google-account-with-vnrom-bypass-for-itel-a05s-by-drfone-android/
- License: This work is licensed under CC BY-NC-SA 4.0.