
How to Bypass Android Lock Screen Using Emergency Call On Google Pixel 7a?
How to Bypass Android Lock Screen Using Emergency Call On Google Pixel 7a?
The main reason why we keep our smartphone locked is to prevent children (or stalkers) checking out our private photos or messages. You don’t want anyone to access your pictures, emails, or other important data. What if you forget your pattern or PIN and cannot access your phone? Or someone changes lock screen pattern to leave you annoyed?
To avoid such types of conditions, we have tried and tested the following methods to bypass the Google lock screen pattern, PIN, password, and fingerprint.
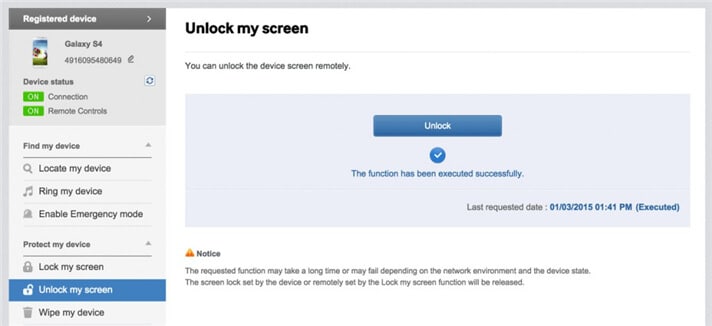
Method 1. Use ‘Find My Mobile’ feature on Google Phone
All Google devices come with the “Find My Mobile” feature. To bypass the Google lock screen pattern, PIN, password, and fingerprint, you can just follow the below steps to get it done.
- Step 1. First, set up your Google account and log in.
- Step 2. Click the “Lock My Screen” button.
- Step 3. Enter a new PIN in the first field
- Step 4. Click the “Lock” button at the bottom
- Step 5. Within a few minutes, it will change the lock screen password to the PIN so that you can unlock your device.
Method 2. Use Android Device Manager to Bypass Google Password
To know how to unlock a Google phone lock password with Android device manager, make sure the Android Device Manager is enabled on your device.
- Step 1. Visit google.com/android/devicemanager on other smartphones or PC.
- Step 2. Log into your Google account that you used on your locked device.
- Step 3. Choose the Google Pixel 7a device you want to unlock in ADM interface
- Step 4. Click on the “Lock” option.
- Step 5. Enter a password. There is no need to enter any recovery message. Select “Lock” again.
- Step 6. You would see a confirmation below if it is successful, with “Ring, Lock and Erase” buttons.
- Step 7. Now you must get the password field on your phone where you can enter your new password, and your phone will be unlocked.
- Step 8. Go to lock screen settings on your device and disable the temporary password.
Method 3. Google Login (Supports Only Android 4.4 or Lower)
If your device is still running on Android 4.4 or lower, here’s how to bypass the Google lock screen fast.
- Step 1. Enter the wrong pattern for five times
- Step 2. Choose “Forgot Pattern”
- Step 3. Enter your Google account login or backup PIN
- Step 4. Now your phone would be unlocked.
Method 4. ‘Pattern Password Disable’ and Custom Recovery (SD Card needed)
To bypass the Google lock screen in this method, you ought to be an advanced user who knows what are “custom recovery” and “rooting”. You have to install any kind of customer recovery, and you should have an SD card on your phone. SD card is required to move a ZIP file to the phone, and it is the only way to transfer the file when the Google Pixel 7a device is locked.
- Step 1. Download a zip file named “Pattern Password Disable” on your computer and move it to the SD card of your Google device.
- Step 2. Insert the card on your device
- Step 3. Restart your device into recovery mode.
- Step 4. Flash the file on your card and restart the phone.
- Step 5. Now your phone would boot up without lock screen. Don’t worry if you had a gesture lock or password. All you need to do is to input a random gesture or password, and it will be unlocked.
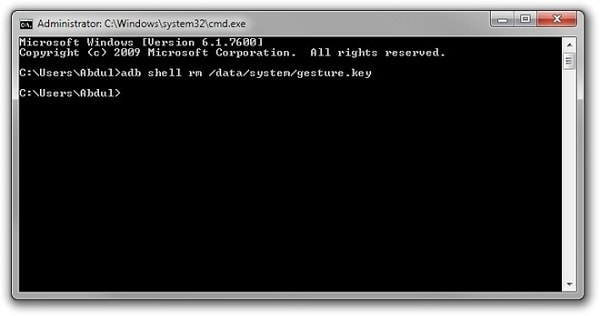
Method 5. Delete the Password File Using ADB
It is yet another option that will work only when you have enabled USB Debugging previously on your device, and your PC is allowed to connect via ADB. If you meet such requirements, it is ideal to use this method to unlock the Google lock screen.
- Step 1. Connect your device to the PC using USB cable and open command prompt in the adb directory. Type the command “adb shell rm /data/system/gesture.key” and then press “Enter”.
- Step 2. Restart your phone, and a secure lock screen must be gone, and you can access your device. Be sure to set a new PIN, pattern, or password before rebooting again.
Method 6. Factory Reset to Bypass Google Lock Screen
A factory reset is the best option in almost any case if one of these solutions couldn’t work. According to your device type, the process may vary. In most devices, you have to turn off the Google Pixel 7a device completely to start the process. But this method will delete all the precious data on the Google Pixel 7a device after the factory reset.
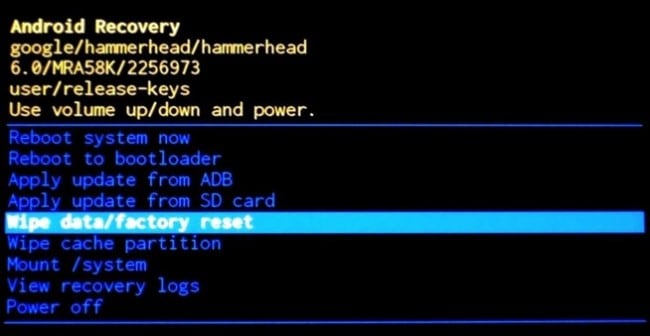
- Step 1. Hold the power button and volume down at the same time. It will open the Bootloader menu.
- Step 2. Press the volume down button two times to choose “Recovery Mode” and select it by pressing the “Power” button.
- Step 3. Hold down the power button and tap “Volume Up” once, and you would enter “recovery” mode.
- Step 4. Choose “Wipe Data/Factory Reset” option by using volume buttons.
- Step 5. Select it by pressing the Power button.
- Step 6. Select “Reboot System Now” once the process is done.
Backup your Google phone regularly in case of any data loss in the future.
Method 7. Boot into Safe Mode
Chances may be that you are using a third-party lock screen app. Then lucky for you, this way works best to bypass the Google lock screen. Specifically, you can boot your Google device into Android Safe Mode .
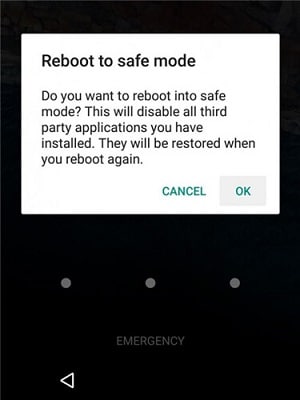
- Step 1. Open up the Power menu from the lock screen and press and hold the “Power Off” option.
- Step 2. It will ask if you want to boot in safe mode. Tap “OK”
- Step 3. Once the process finishes, it will temporarily disable the lock screen activated by the third-party app.
- Step 4. Uninstall the third-party lock screen or just reset the data.
- Step 5. Reboot your device and get out of safe mode.
- Step 6. Now the irritating lock screen app is removed completely.
Method 8. Other Methods
- Step 1. Take your friend’s phone to call on your locked phone.
- Step 2. Accept the call and press the back button without disconnecting.
- Step 3. Now you can access the Google Pixel 7a device completely
- Step 4. Go to the security settings of the Google Pixel 7a device and remove the pattern or pin.
- Step 5. It will ask you the correct pin that you don’t know, guess, and try various combinations you can recall.
To avoid forgetting your password or PIN next time, be sure to write the pattern or numbers on a text file or paper to keep them safe. If you have to bypass the Google lock screen pattern, PIN, password, and fingerprint, you may consider using Dr.Fone - Screen Unlock (Android). It is a professional tool that can remove all the fingerprints, pattern, and password lock screens without losing any data on your phone.
How To Easily Unlock Google Screen?
If you’ve ever had a Google phone, then you know that their screens are locked by default. It can be a pain if you want to access your messages or change your background image quickly. If you just set your Google password, screen lock code, pattern lock, or PIN last night or a few days ago, you are most likely to forget it.
The result is that you have locked out of your phone, and you have to reset your device’s password. But fortunately, there’s an easy way to unlock your Google screen without entering any passwords. You can have your phone up and running in a few simple steps without contacting customer service.
So don’t wait any longer - read on for instructions on how to unlock the Google phone pin code.
Let’s get started!
4 Easy Ways To Unlock Google Screen
Like most people, you probably lock your Google phone as soon as you turn it on. It’s a good way to keep your phone safe from prying eyes and accidental button presses. But what happens when you forget your phone’s passcode? Or worse, what if your phone gets locked by a malicious app?
There are a few different ways to unlock your Google phone. We’ll show you how to do it.
Method 1. Google Find My Device (Without Password/Pin/Pattern)
If you’re like me, you’ve probably tried a million different ways to unlock your Google phone, only to be frustrated by the results. Luckily, there’s an easy way to unlock your Google phone using Google’s Find My Device feature.
Google will use your location, phone information, and connection log to find your Nokia.
Follow these steps to unlock the Google lock screen password without losing data:
- Step 1: Sign into your Google account and navigate the Find My Device website.

- Step 2: Sign in with your Google account, which you used on your locked Google phone.
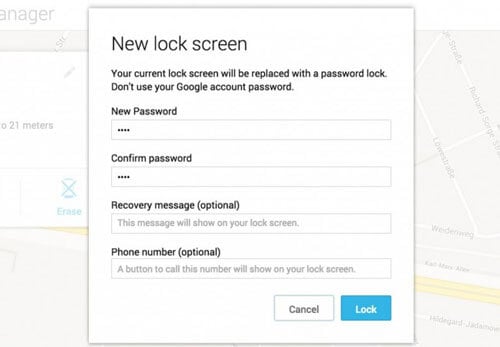
- Step 3: The Android Device Manager dashboard will show your locked Google with three options: Ring, Lock, and Erase.
- Step 4: Simply click on “Lock”.
- Step 5: Enter a password that is not your Google account password in the “New Password” field.
- Step 6: Type the new password in the “Confirm password” field. This password lock will replace the current lock screen.
- Step 7: You can leave the “Recovery message” field empty or type anything in it.
- Step 8: Enter another phone number in the “Phone number” field, although this is optional.
- Step 9: Choose “Lock” after entering your password and filling out the optional fields if you wish.
- Step 10: If the process is successful, you will receive the unlock code within a few seconds.
- Step 11: Navigate to the “Screen Settings” menu after unlocking your device.
- Step 12: Use a new password; you can use the temporary password if you want.
You can use it to unlock your Google if you have activated the Android Device Manager or Google Find My Device before your phone was locked.
A few conditions, however, must be met for this to work
- You must turn on your Google phone.
- Before locking your phone, you must activate Google Find My Device or Android Device Manager.
- You must have your Google GPS turned on to use it.
- You must be connected to WiFi on your device to log into your Google account.
- Your phone needs to be set to location.
Method 2. Unlock Google Lock Screen With Hard Reset
If you perform a hard reset on your Google lock screen, all data, and user information will be erased, including your screen lock, password, pattern lock, and PIN.
Follow the steps below if you want to know how to unlock the Google phone keypad with the hard reset, follow the steps below.
- Step 1: Turn off your Google phone.
- Step 2: Press the “Volume down” and “Power key” buttons simultaneously for a few seconds.
- Step 3: Press the “Volume Up” and “Power” buttons for a few additional seconds once the screen darkens.
- Step 4: Release all buttons and keys if you did step 3 correctly. Once you release all buttons, you’ll see a dark screen with options.
- Step 5: Choose “Wipe data/factory reset” from the menu, using “Volume Up” to scroll up, “Volume Down” to scroll down, and “Power” to select.
- Step 6: From the Android Recovery screen, select the “Yes” option by pressing the “Volume Down” button and the “Power” key.
- Step 7: With the “Power” key, select “Reboot system now” from the next display.
Your Google is now password, pattern lock, screen lock, and PIN-free after a hard reset.
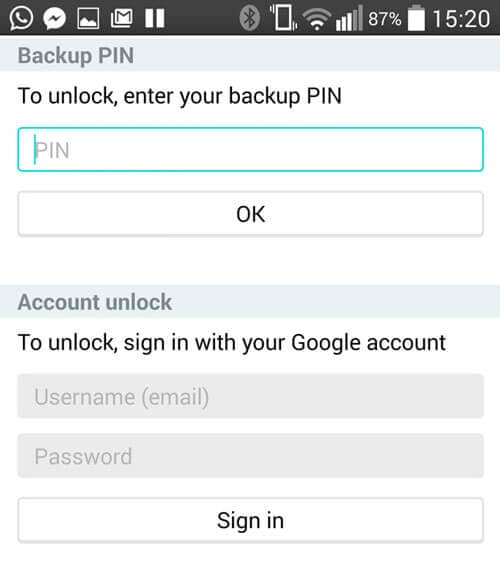
Method 3. Unlock With Answer Security Questions
You can reset the Google pattern lock using Google security questions without losing data.
Follow the steps below on how to unlock the Google phone pin code:
- Step 1: Power on your Nokia.
- Step 2: Press “Forgot pattern” several times until you see “Forgot password”.
- Step 3: Click on “Forgot pattern” to access the unlock screen.
- Step 4: Enter your Google account details or answer questions to unlock the screen. Select “Answer question”.
- Step 5: Enter your exact security answers and tap the “Unlock” button.
- Step 6: Choose “YES” from the “YES” or “NO” menu, and the password field will appear.
- Step 7: Change your password or PIN.
- Step 8: You will see your Google unlocked soon.
Method 4. Unlock the Keypad With a Security Code
You could reset your Google lock screen phone using the default security code, even if you haven’t set any security code. Here’s how to quickly unlock the Google lock screen security code.
- Step 1: Shut down your device.
- Step 2: Press these buttons in the following sequence on a classic phone.
Call button (green button) + Asterisk key (*) + Three (3)
- Step 3: Your screen displays a Formatting message when you press these keys.
- Step 4: Wait for the formatting to complete before releasing the keys.
o 12345.
Conclusion
If you have a classic-style keypad phone or an Android device, unlocking a locked Google phone keypad is not easy. However, we believe that every problem has a solution. You can unlock Google Android phones using any of the methods listed above.
Tips: Wondershare Dr.Fone is a tool that helps you keep your important data safe. It can back up all the important information on your Google phone, like photos, music, videos, contacts, and more and is compatible with over 8000 Android devices. The backup process is easy and only takes a few clicks. You can also restore your backup to any device you want, and choose which data you want to restore. This is a great way to make sure you never lose your important Google data!
Unlocking the Power of Smart Lock: A Beginner’s Guide for Google Pixel 7a Users
Google constantly comes up with features to simplify the way users interact and complete tasks on the Android platform. One of the most important features that techies loved to debate about was the Smart Lock Android, a secure password manager functioning in sync with a Google account on the Android phone.
Part 1: What is Android Smart Lock?
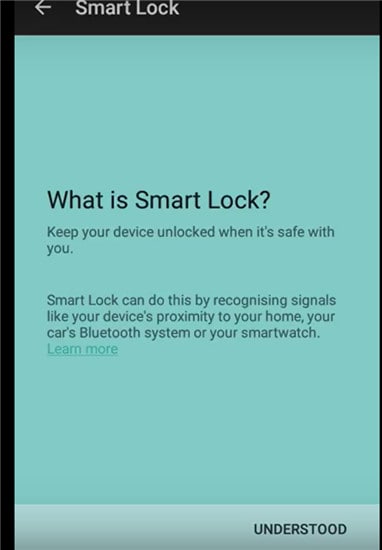
Android Lollipop added a feature called Smart Lock, and the feature was devised as a smart tool to prevent the Android phone from locking once it was initially unlocked. In other words, the feature overrides an Android phone’s Lock Screen feature, thereby saving users the need to enter passwords every time the Google Pixel 7a device locks.
If you’re at home, it’s likely your android phone is locked out if you haven’t accessed at for some time. Smart Locks solves the problem in many ways. It allows you to allocate trusted places. Once you within range of the trusted places, your phone won’t lock. Trusted devices come next. Smart Lock is assigned to Bluetooth and Android NFC unlock devices.

Finally, trusted face unlocking is the ultimate face recognition system that unlocks your Android device as soon as you look at it across the front-facing camera. A face unlock first introduced with Android Jelly Bean and has been significantly improved in later versions.
Turning On Smart Lock
The feature is enabled by first accessing settings. For example, in a Samsung Galaxy S6:
Tap on Settings, which is the gear symbol.
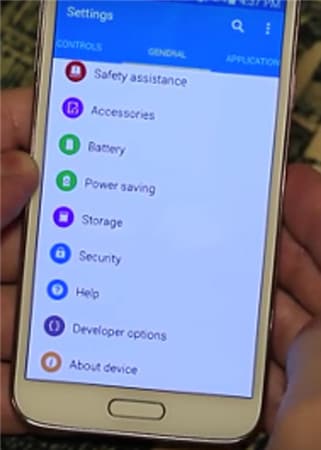
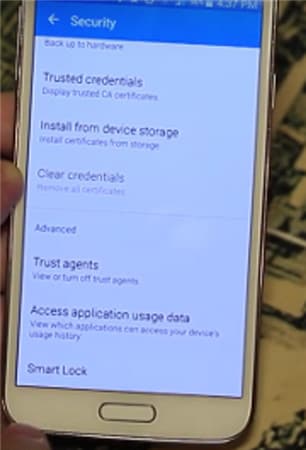
- • Click on Personal and tap on Security.
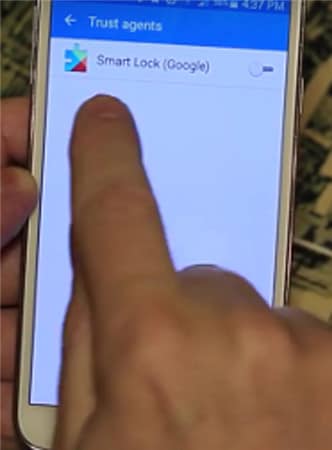
- • Go to Advanced and tap on Trust agents and make sure Smart Lock is turned on.
- • Under Screen Security tap Smart Lock.
- • Here, you need to enter your Screen Lock. If you haven’t done so, set up a password and PIN by following the on-screen prompts. The screen Lock is needed every time you have to change the Smart Lock settings.
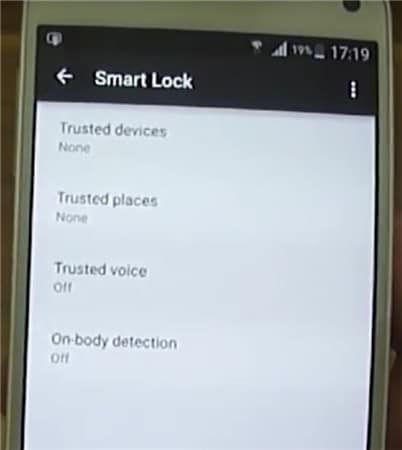
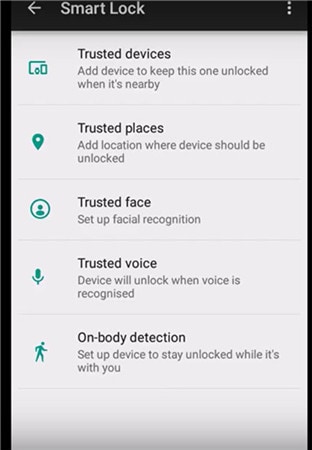
Within Smart Lock, there are three options for setting the system. You can set up trusted devices, trusted face, and trusted places individually, combining two or all three at the same time. You can choose just one trusted face, but you have the option to set up as many trusted devices and trusted places as needed.
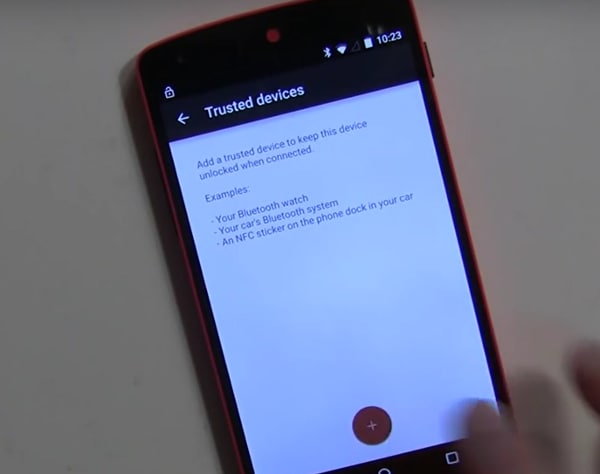
Part 2: Turn On Smart Lock For Android with Trusted Devices
You can decide on a trusted device to be paired with Smart Lock Android.
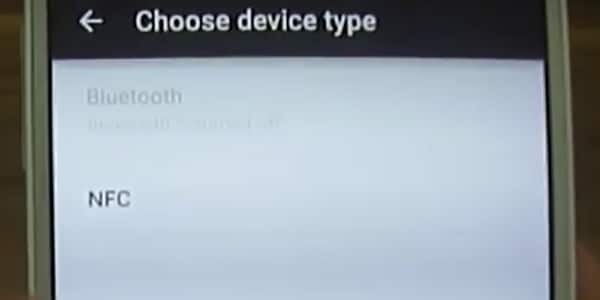
For example, you can set up a Smart Lock for Bluetooth in your Android Bluetooth settings. It can also be done for Android NFC unlock devices. Examples include the Bluetooth system in your car, NFC unlocks, android sticker on the car’s phone dock, or Bluetooth in your watch.
- • Go to Settings.
- • Tap on Security and then Smart Lock.
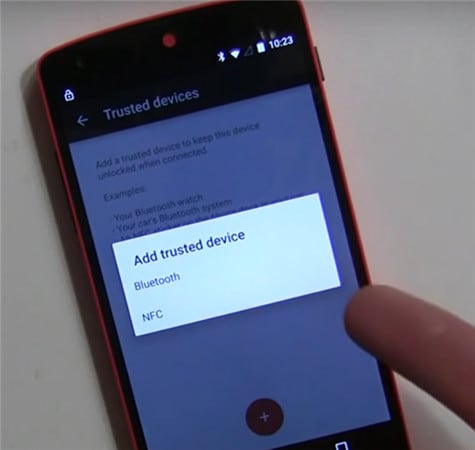
- • Existing paired options are listed under Trusted Devices.
- • Initially, trusted devices will show None.
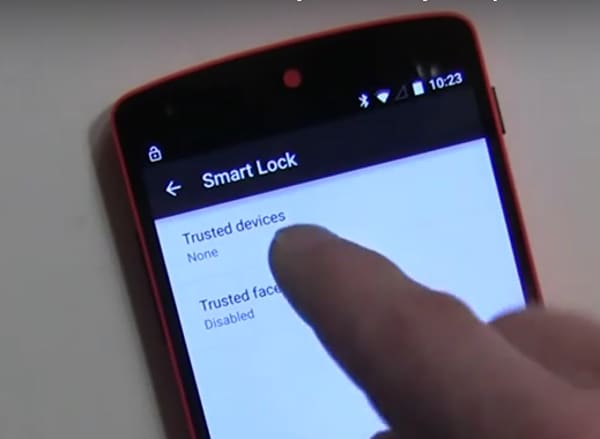
Tap on Add Trusted Devices.
The next screen is the Choose Device Type.

Since you have already paired Bluetooth, it will ask you to choose the Google Pixel 7a device from the list.
- • As an example, let’s take the case of LG HBS800. It may show Not connected until you add it.
- • It will show up under Trusted devices in the Smart Lock menu.
- • When you turn the added device on, Smart Lock now unlocks the Android mobile.
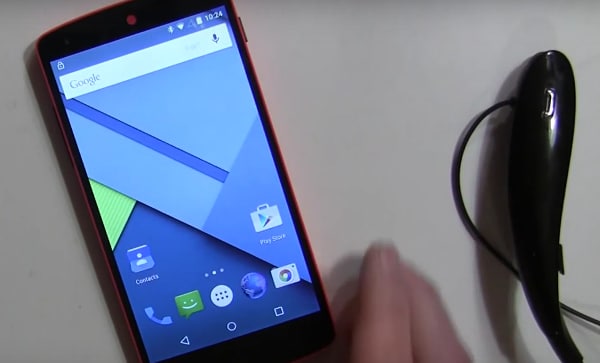
Similarly, other Bluetooth and NFC unlock android supported gadgets can be added under the list of Trusted Devices.
Part 3: Turn On Smart Lock For Android With Trusted Locations
You can also add locations or addresses to Smart Lock Trusted Locations, and the phone unlocks automatically as soon as you arrive at the desired location. For example, you can set up your home or work address under Trusted Locations.
Check current settings first.

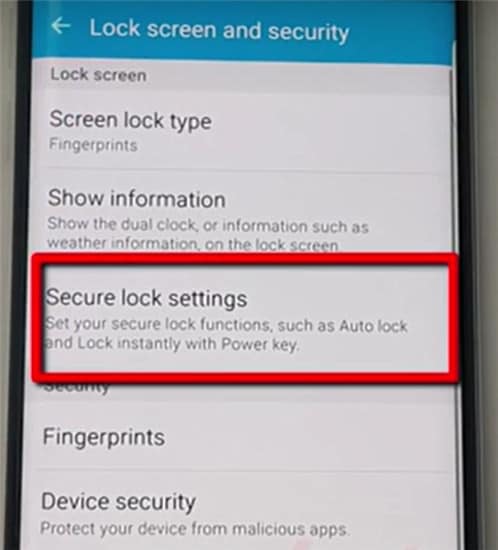
On a new Android phone, visit Settings>Personal.
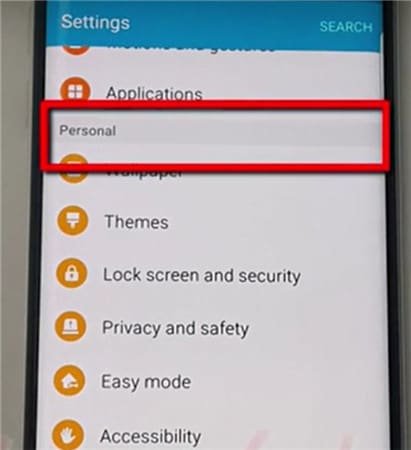
Then Lock Screen and Security.
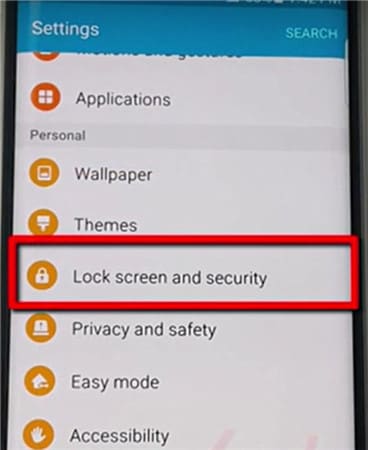
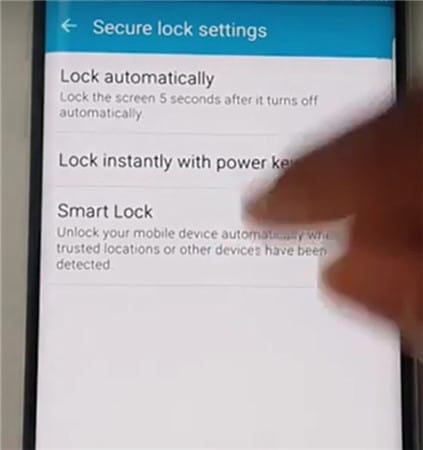
Then Secure Lock Settings.
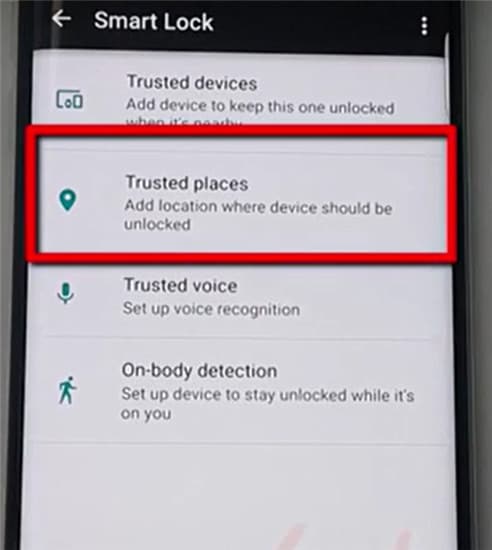
Tap Smart Lock.
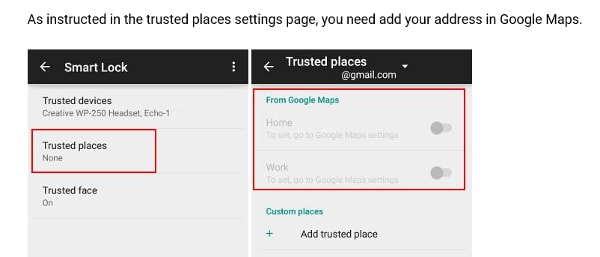
Tap on Trusted Places.
Tap on Add Trusted Places
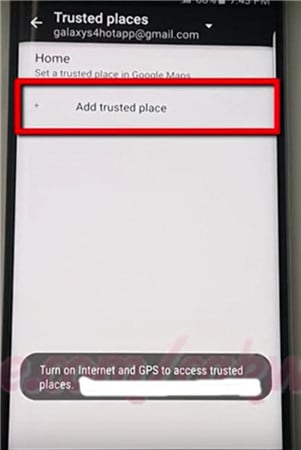
- • Initiate the Google Maps app on the Android phone. Make sure the Internet and GPS are on.
- • Pick a place.
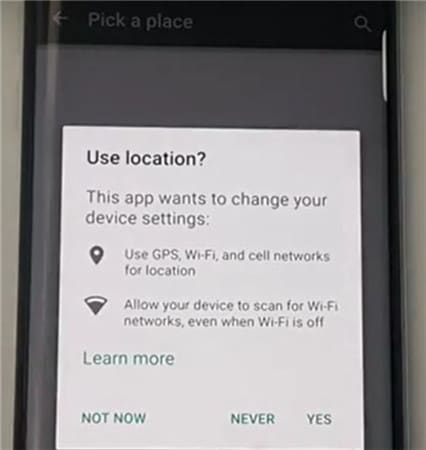
- • Click on Settings.
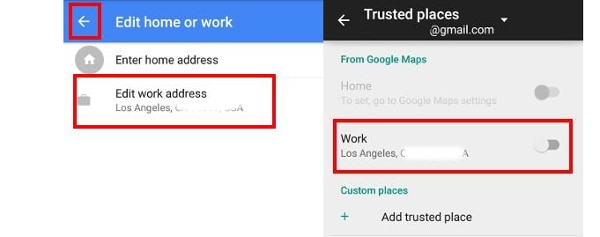
- • Click on Edit home or work. You can now add or edit the required addresses.
- • As an example, click on the Enter work address.
- • You now have the option to type in the address or use the address listed on Google Maps as the required work address.
- • A successful addition is listed and can be edited under the Edit work address.
- • Close the Google Maps app.
- • The work address is automatically propagated and configured with Smart Lock settings.
- • Go back to Settings> Security> Smart Lock> Trusted Places.
- • The work address you added is now listed under Work.
- • However, it is not yet configured as a Smart Lock option. Tap the location once, and it is enabled.
- • The switch along the address to the right turns blue, indicating it is enabled.
- • The work address is now listed under Trusted places for Work.
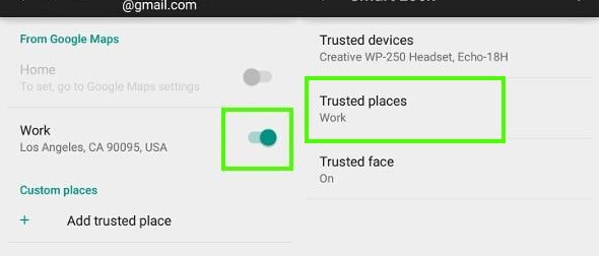
- • The phone is now configured for the work address and will unlock whenever you are at the location.
- • Since it works on Google Maps, the feature works through an Internet connection.
Part 4: Turn On Smart Lock For Android With Trusted Face
The feature recognizes your face and then unlocks the Google Pixel 7a device. Once you set up the Google Pixel 7a device to recognize your face as a trusted face, it will unlock the Google Pixel 7a device as soon as it recognizes you.
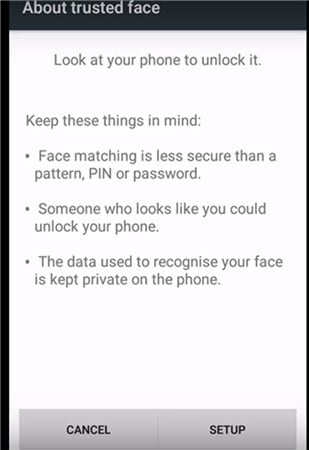
PRECAUTION: At best, this can be the first level of security, as one who resembles you to some extent can unlock the Google Pixel 7a device. Photographs are not stored in the system. The device does hold necessary data to recognize your face, and the security level is determined by how good the Google Pixel 7a device is configured. The data is not accessed by any app or loaded onto a Google server for backup.
Setting Up Trusted Face
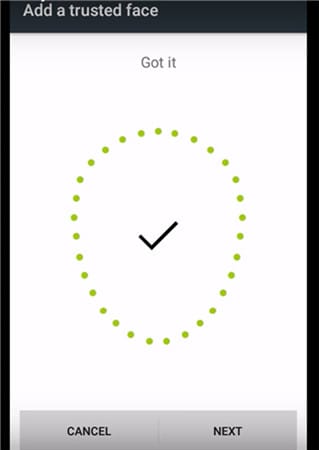
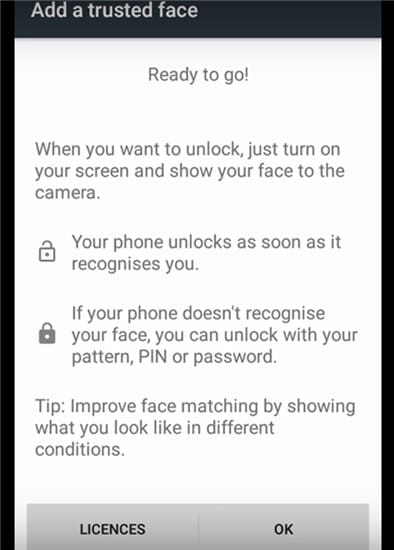
- • Go to Smart Lock and tap Trusted Face.
- • Tap on Setup. Follow on-screen instructions.
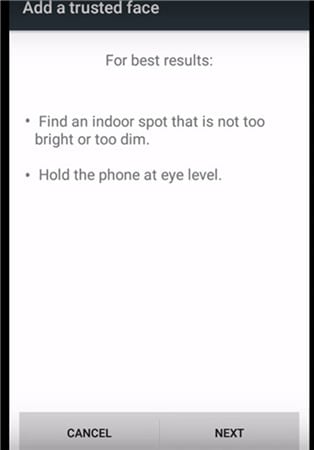
The device begins to gather data about your face. The trusted face icon appears. As a backup, in case Smart Lock does not recognize your face, use the manual system by applying the PIN or password to unlock the Google Pixel 7a device.
In case Trusted Face is not required, tap on reset Trusted Face appearing under the Trusted Face menu. Tap on Reset to reset the option.
How To Improve Facial Recognition In Your Bluetooth and Android NFC Unlock Devices
- • If you feel facial recognition is not up to the mark, go to Smart Lock and tap on a Trusted face.
- • Tap on Improve face matching.
- • Tap on Next and follow instructions on the screen to complete the task.
Smart Lock Android is a great feature and is only going to improve on time. With added security measures being introduced by Google for Bluetooth and NFC unlock android devices, including configuration to Google maps and Gmail, the feature may be one of the most important features to overcome constant blocking of devices even in protected places.
Video on How to Remove Android Lock Screen Without Data Loss
Also read:
- [New] In 2024, Perfectly Timed Instagram Content - Our List of the Top 8 Schedulers
- [New] Sites Like FameBit Where You Can Find YouTube Sponsorships for 2024
- [New] Tech Trends Spotlight 5 Cutting-Edge Camcorders for Slow Motion
- [New] Top-Ranked 5 Backdrop Change Apps for iPhones (X, 8, 7)
- Chrome Lag Solved: Boost Browsing Speeds in Minutes!
- In 2024, Exclusive MCB Logo Designs and Templates
- In 2024, How To Change Honor X50i+ Lock Screen Clock in Seconds
- In 2024, How to Unlock Tecno Phantom V Fold Phone with Broken Screen
- In 2024, Mastering Lock Screen Settings How to Enable and Disable on Honor 90
- In 2024, Transform Your Channel with Effective YouTube Link Protocols
- In 2024, Unlock Honor X50 GT Phone Password Without Factory Reset Full Guide Here
- Mastering Android Device Manager The Ultimate Guide to Unlocking Your Honor 90 Device
- Mastering Android Device Manager The Ultimate Guide to Unlocking Your Honor Play 40C Device
- Por que o divórcio é obrigatório | Free Book
- Revealing The 12 Paths Fixing Non-Appearing FB Video Posts, Now for 2024
- The Safety Quandary of OpenAI's ChatGPT: Insight Into Six Major Vulnerabilities
- The Ultimate Guide How to Bypass Swipe Screen to Unlock on Honor Magic 5 Lite Device
- Tips and Tricks for Setting Up your Tecno Pop 7 Pro Phone Pattern Lock
- Unlocking Made Easy The Best 10 Apps for Unlocking Your Honor 70 Lite 5G Device
- Title: How to Bypass Android Lock Screen Using Emergency Call On Google Pixel 7a?
- Author: Marry
- Created at : 2025-01-24 02:34:21
- Updated at : 2025-01-30 16:23:12
- Link: https://unlock-android.techidaily.com/how-to-bypass-android-lock-screen-using-emergency-call-on-google-pixel-7a-by-drfone-android/
- License: This work is licensed under CC BY-NC-SA 4.0.