
How to Reset Gmail Password on Infinix Smart 8 Plus Devices
How to Reset Gmail Password on Infinix Smart 8 Plus Devices
Nowadays, along with Windows or Apple devices, Android devices are starting to take its place as one of the most popular, reliable, and efficient technical equipment brands. As a result, the use of Android as an operating system for both PC and portable tools is becoming an extremely hot trend.
Android devices pride themselves on providing their customers with the best features possible. Not only do they support offline features, but Android devices are also capable of offering users with several services online. One of them is the ability to make use of Gmail - a very famous email site nowadays.
Gmail being used directly by an Android tool is a great advantage, but it still contains some small drawbacks that users may have to go through. According to a recent survey, the majority of Android users were likely to wonder if they were able to reset Gmail password on Android devices.
Luckily for you, this performance is possible. In this article, a very informative and detailed description will be delivered to you to help you solve the problem of resetting your Gmail password.
Part 1: Reset Gmail Password When you Forget it
There will be times when you come into the situation of not knowing what your Gmail password is, or you just simply forget it. You want to change your password but you don’t have access to a computer or laptop to perform this task. Now with the help of Android, you can do it through your own Android devices.
Step 1: Visit the Gmail login page from your Android device. Click on the Need helpline, which is highlighted in blue.


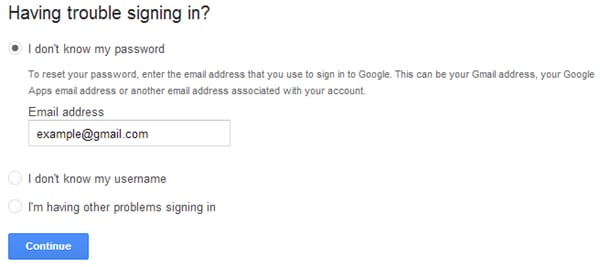
Step 2: After that, you will be moved to the Google Account Recovery page. There will be 3 main options which indicate 3 frequent problems. Select the first one, which is entitled “I don’t know my password”. Once you have chosen it, you will be required to fill in your Gmail address in the bar provided. Click on the Continue button as long as you have made sure to finish all these tasks.

Step 3: In this step, you may be asked to fill in a CAPCHA form. Just simply do it and move to the next page. There you had better type in the last password that you are still able to recall if possible, then click on the Continue button to move. Or else, you can skip this step by clicking on I don’t know button.

Step 4: Finally, you will be shown a list of options on how to reset your Gmail password on Android devices. You can either use your alternative email address or your phone number to receive a verification code. Bear in mind to fill in any required information and put a check in the CAPCHA box to submit the process.
Step 5: In this step, a blank bar will appear and it will demand you to type in your verification code. Just do it carefully to make sure there is no error. Once you have done it, a new screen will appear to tell you.

Parental Control Software
Step 6: After you have done all the previous steps, you will know how to reset your Gmail password directly from your Android device.
Part 2: Change Gmail Password When You Still Know it
Besides not knowing your password, there are still circumstances when you wish to change your current password for various reasons. Just simply follow these steps.
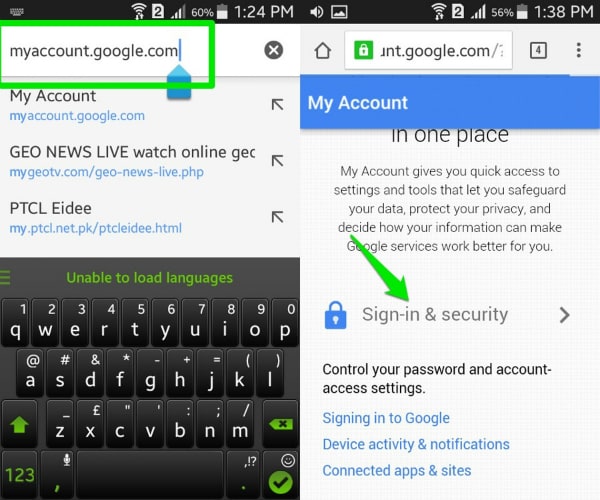
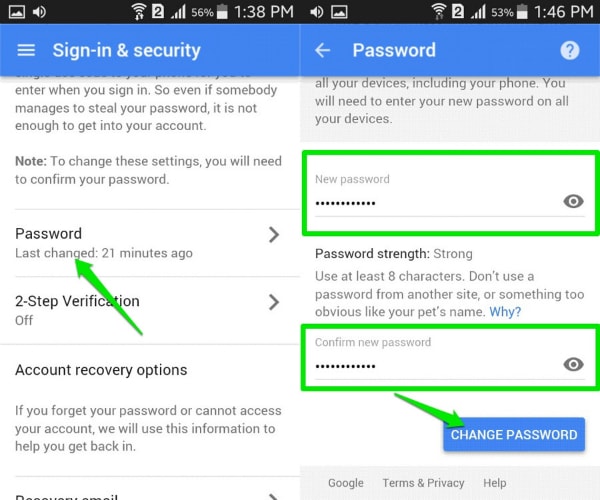
Step 1: Make sure your Android device is connected with the Internet. Then get access to the link myaccount.google.com. After logging into your account (or maybe you have already done this), scroll down, find the Sign-in and security option and choose it.
Step 2: Find the Password option in the list. Tap on it to be moved to another screen. In the menu, type in your new password that you wish to exchange, confirm it and then click on the Change password button.
Part 3: Bonus Tips
Gmail is undoubtedly a marvelous tool to use on Android devices, but have you really understood all the tips and tricks to take the best advantage of it? Below are the 5 most helpful tips that we want to offer you.
- Far from your imagination, Gmail on Android devices is capable of allowing you to make use of several accounts at the same time, even if it’s not a Gmail account. This performance not only helps you to organize your work better, but it also increase the efficiency of your job. Just simply log in your Gmail account on Gmail app, click on the down arrow which is placed next to your avatar and name, then choose Add account. You will be moved to another page, choose Personal (IMAP/POP) choice and follow the detailed guide on the screen.
- If your Android device is used by only one user, and you are guaranteed about the security of it, try to keep the Gmail logged in. It would help you to avoid wasting unnecessary time to sign in your account every time you need, not to mention that it prevent you from being confused of not knowing your account/password.
- You are capable of sorting your mails with a certain level of accuracy once you are fully aware of the features of Gmail app on Android devices. Just click on the email, then choose Settings menu and mark it as “Mark as not important”, “Mark important” or “Report to spam” owing to the priority of your email.
- Gmail app provided you with the ability to have conversations online, and whenever a message comes, there will be a sound. In case you are in a vital conference, or you don’t want to be disturbed by the noise, you can mute it. All you have to do is to tap into the conversation, choose the three dots icon then click on the Mute option in the menu.
- Enhance the speed and the accuracy of your search with the use of certain phrases. Let’s take an instance to see what Gmail can do for you in this case. If you want to search for the mails which have been sent by a certain person, typefrom:(name of the person on Gmail) in the searching bar. And in case you would love to look for a private message from that person, please type is:chat:(name of the person on Gmail) .
Part 4: Video on How to Reset Gmail Password on Android Devices
How to Unlock Infinix Smart 8 Plus Bootloader Easily
Do you want to unleash the true power of your smart phone? Do you wish to have complete control over your smart phone? If yes, well, here is the answer; unlock bootloader. For people who are already into the tricks of hacking and rooting smart phones, might be aware of this. But still, there are exciting new developments. Bootloader is a code existing in all operating systems which usually comes pre-locked. So, it is important, if you wish to have a custom ROM installed on the Infinix Smart 8 Plus device, or if you wish to have other controls like installing applications which are incompatible, to have the Infinix Smart 8 Plus device bootloader unlocked. But going through with the process of unlocking bootloader and rooting the Infinix Smart 8 Plus device will not help and rather might break the warranty of the Infinix Smart 8 Plus device. This definitely calls for a diligent watch on how to unlock HTC bootloader. So, it is imperative as a user to know the process of HTC bootloader unlock. This article serves you with some ways you could follow to unleash the true power of your HTC device. Here’s how you can do it.
Part 1: Why We Want to Unlock HTC Bootloader
For people with HTC device, unlocking bootloader would mean complete authority over the smart phone and you have all the power to control the HTC device by all means. Since, bootloader usually comes pre-locked, unlocking the bootloader is the initial step if you would like to have a custom ROM installed in your device. There are various advantages of HTC unlock starting from gaining rights of control to installing latest custom ROMs in the phone and installing incompatible applications. Moreover, HTC unlock bootloader could boost the Infinix Smart 8 Plus device speed and battery life and also help in making complete backups of the Infinix Smart 8 Plus device. You could also have controls to remove bloatware from the HTC device. So, all in all, while there could be certain side effects, if not done properly, there are various advantages of unlocking HTC bootloader. If the process is carried out properly, the Android device could be the perfect smart phone you would like to have.
Part 2: How to Unlock Infinix Smart 8 Plus Bootloader
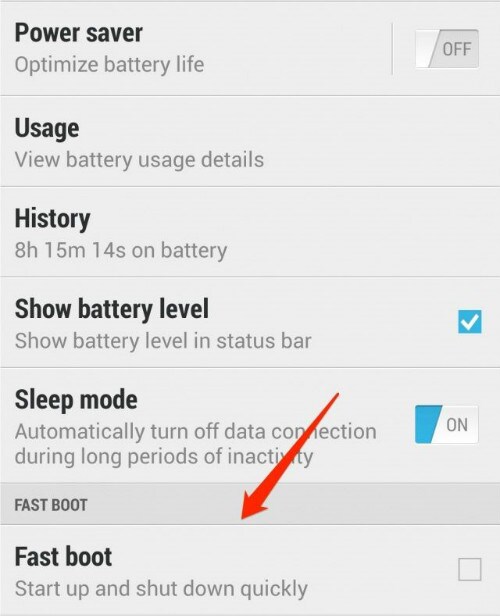
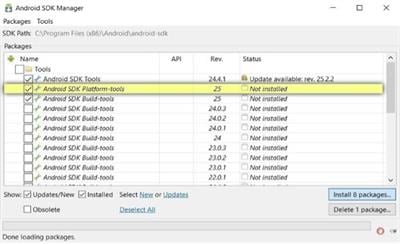
Infinix Smart 8 Plus is the flagship device of HTC by all means. With a world of features and offerings, Infinix Smart 8 Plus truly is a beast. While the phone is very powerful without any modifications, the true potential is yet to be seen and that can only be done if the bootloader is unlocked. So, to have a complete control over the Infinix Smart 8 Plus device, it is important to unlock the bootloader and the process has to be carried out diligently. One of the initial things that needs to be ensured is that the Infinix Smart 8 Plus device is fully charged or atleast 80% mark. Make sure you have the fastboot drivers for the Infinix Smart 8 Plus device configured on the windows machine and the Android SDK. Here are some of the steps which can be followed to unlock bootloader.
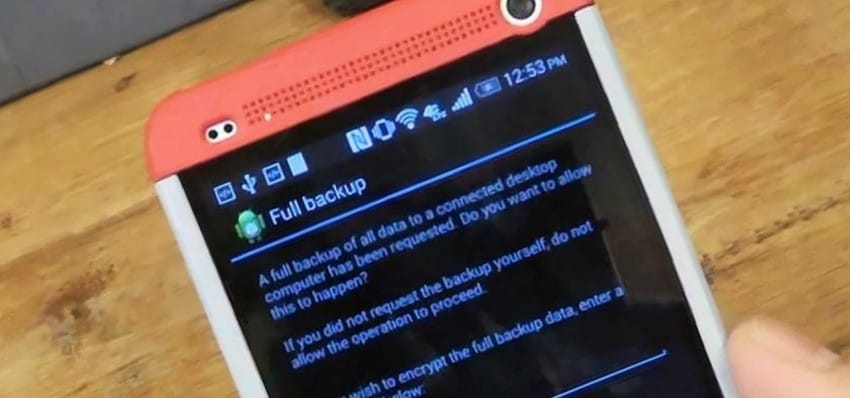
Step 1: It is always very important to keep the phone data backed up and more so when you are planning to unlock the bootloader.
As one of the initial measures, backup the Infinix Smart 8 Plus device completely as bootloader unlocking process will wipe all the data off. So, backup all the data like photos, contacts, multimedia files, documents, etc.
Step 2: Go to htcdev.com/bootloader. Ensure that you are registered with HTC and once the sign up is done, log in to HTC dev.
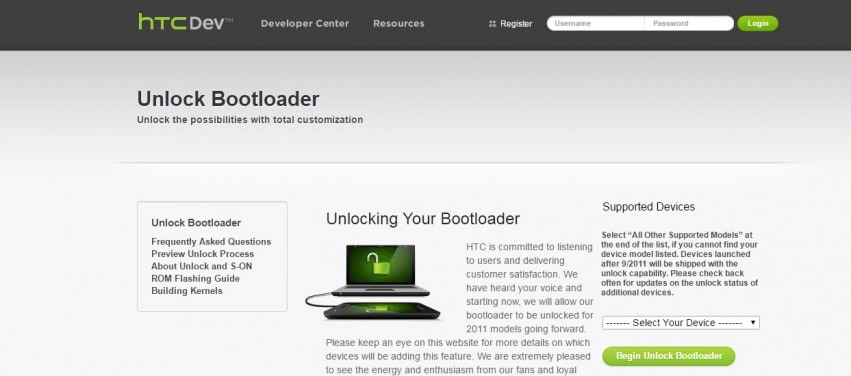
Now, ensure that HTC Sync Manager is installed on the PC.
Step 3: From the bootloader page, select your device using the drop down option as shown in the picture below.
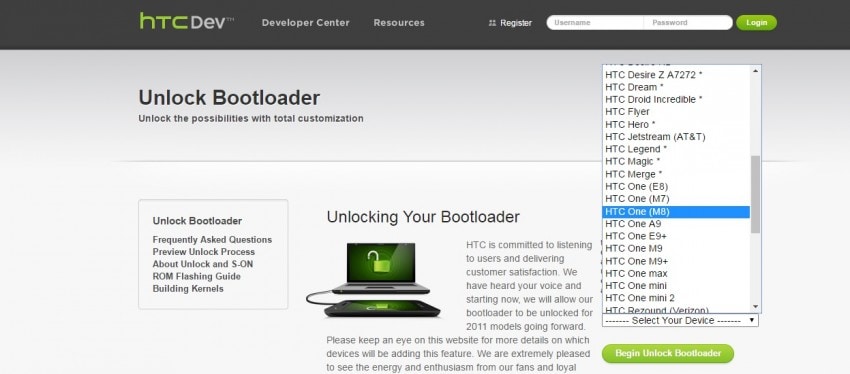
After selecting the Infinix Smart 8 Plus device, click on “Begin Unlock Bootloader”, and then confirm all the dialogue boxes which come your way on screen.
Step 4: Now, you will be presented with four steps to put the Infinix Smart 8 Plus device in bootloader mode. Disconnect the Infinix Smart 8 Plus device from the PC and turn the Infinix Smart 8 Plus device off completely. Press the volume down button along with the power button to switch the Infinix Smart 8 Plus device on in bootloader mode.
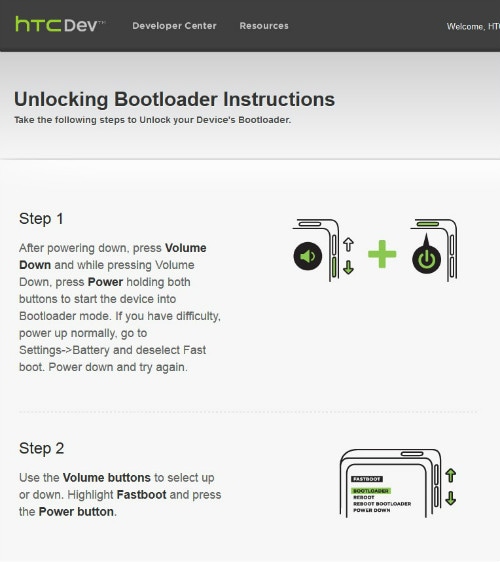
Step 5: Use the volume keys of the Infinix Smart 8 Plus device to select Fastboot option along with pressing power button to confirm, after the Infinix Smart 8 Plus device is in bootloader mode. Now, connect the Infinix Smart 8 Plus device to the computer using a USB cable.
Step 6: Go to Fastboot folder on the PC and holding down the shift key, click on any empty space followed by a click on “Open command window here”.
Step 7: In the command prompt window, type “fastboot devices” and press enter. Infinix Smart 8 Plus will show up in the command prompt.
Note: The drivers have to be installed correctly to see the Infinix Smart 8 Plus device in the command prompt. So, if the Infinix Smart 8 Plus device does not show up, reinstall HTC Sync Manager and try again after restarting the computer.
Step 8: On HTC Dev’s website third page, click on “proceed to Step 9”. Follow the steps listed and then click on submit. The unlock token code for the Infinix Smart 8 Plus device will be mailed by HTC. Download the token and name it “Unlock_code.bin” and place the token in the fastboot folder.
Step 9: Now, in the command prompt window, type the following:
fastboot flash unlocktoken Unlock_code.bin
Step 10: On the Infinix Smart 8 Plus , one message will appear asking if you want to unlock the Infinix Smart 8 Plus device bootloader.
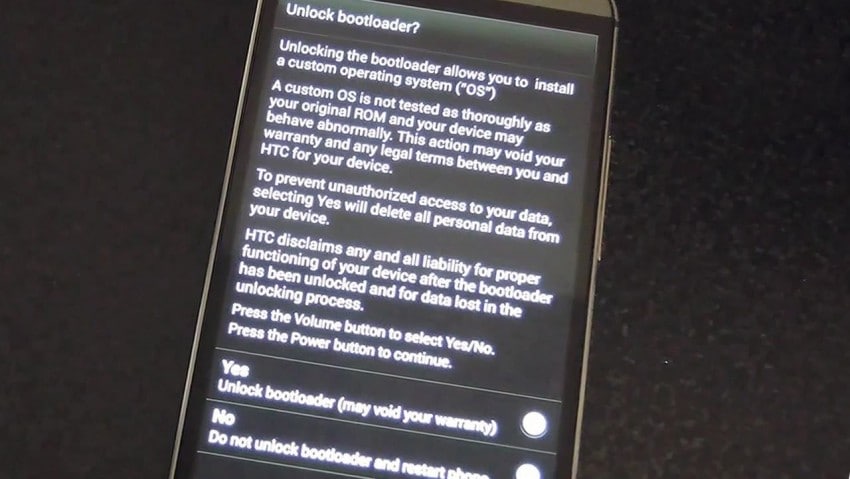
Use volume keys to select and power button to confirm. Once this is done, the Infinix Smart 8 Plus device will restart once and it’s done. The device is now bootloader unlocked.

How To Unlock Infinix Smart 8 Plus Phone Without Password?
Has your Android smartphone been locked, and are you having trouble unlocking it now because you have forgotten phone password? Looking for methods to remove the password from your Android phone without doing a factory reset?
If the answer is “YES,” you’ve come to the correct spot.
Many people, including you, have had similar issues and wish to know how to unlock an Android phone without a password.
As a result, we have created some of the greatest guidelines or, you might say, top ways that may assist you in unlocking Android phones today, simply for you and countless other Android users.
Part 1: Unlock Your Locked Screen Without Password By 6 Efficient Ways
1. By your Google account
You can use your Google Account to unlock the Android phone password if, after several tries, you are still unable to do so without doing a factory reset.
You need to log into the Google account that is associated with the Infinix Smart 8 Plus device, then do the following:
- The unlock pattern may only be used five times before a notification telling you to try again in 30 seconds appears.
- “Forgot pattern” will show up at the bottom of the screen.
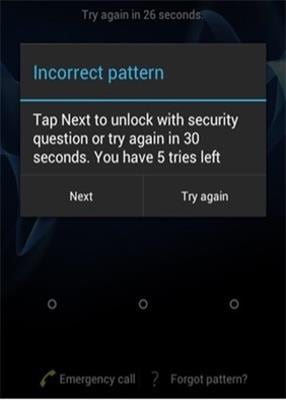
- You must enter the Gmail account that is associated with the Infinix Smart 8 Plus device here before selecting “Next.”
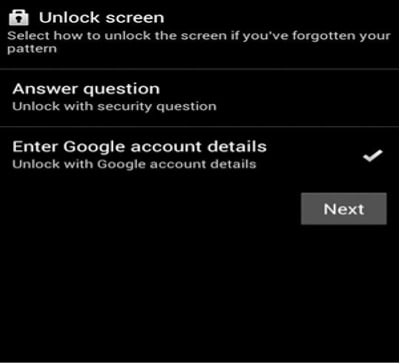
- That’s it; from this point forward, you may enter any new PIN or pattern that you can recall to unlock your smartphone.
2. Google Find My Device
Using your Google account is a superb method for finding the Infinix Smart 8 Plus device when lost or stolen.
In addition, it may be used to lock or ring your smartphone. You may have noticed that there are three options available when using this feature: “Ring,” “Lock,” and “Erase.”
To bypass the Android lock screen, all you need to do is sign into the Infinix Smart 8 Plus device’s associated Google account and then follow these steps:
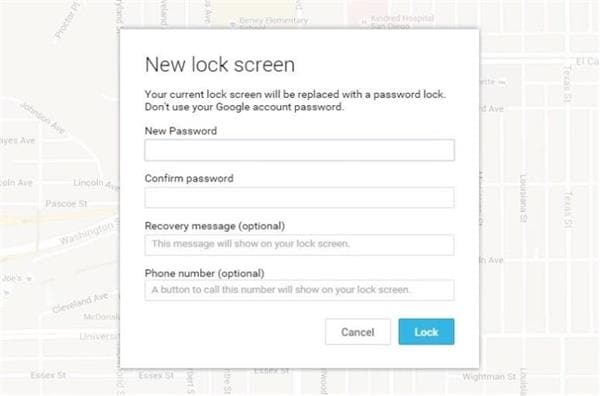
- On any Android device or a computer, go to <www.google.com/android/find> and sign in using your Google account. Choose the Android smartphone you wish to unlock after that.
- After choosing the Infinix Smart 8 Plus device, select one of the three options, “lock,” from the list.
- There will be a new pop-up window that you can use to change the Infinix Smart 8 Plus device password. Additionally, you can choose to add a phone number or recovery email.
- Confirm it immediately, then input the password you just established on your locked device.
Many Samsung customers have this issue, which prevents them from using their devices. Try using the “Find My Mobile” feature on your mobile if you wish to unlock it if you’re a Samsung user. It would be helpful if you had a Samsung or Android model account.
After that, use Find My Device to unlock your Android phone without losing any data by following the instructions below:
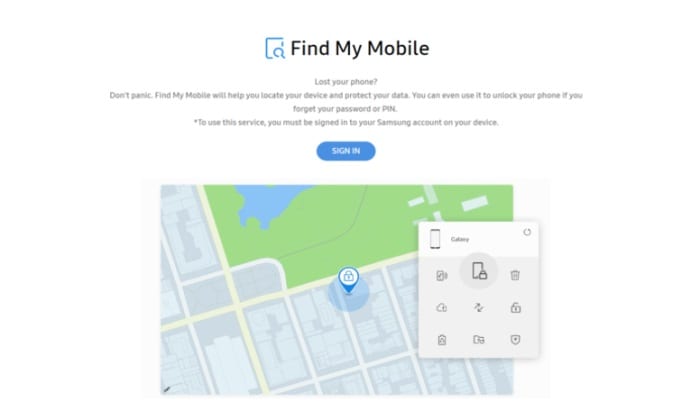
- Sign in with your Samsung account at findmymobile.samsung.com.
- Choose “Lock my screen” from the menu on the left, type a new PIN in the box given, and then click “LOCK.”
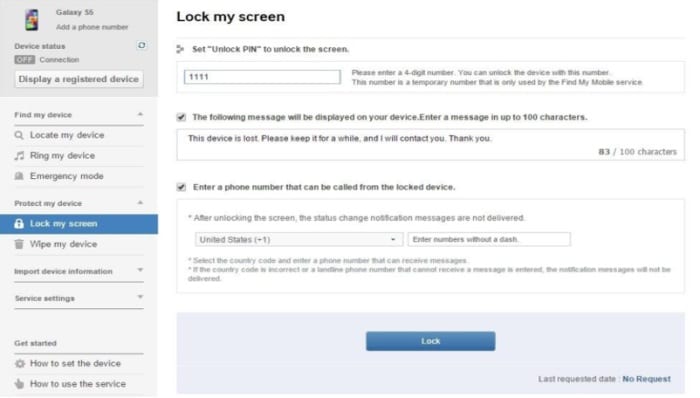
Your smartphone will be unlocked, and the password will be changed to the new one after a brief delay.
3. Use ADB (Android Debug Bridge)
Without a factory reset, Android phone passwords may also be unlocked using the Android Debug Bridge (ADB).
- You must first download ADB to your computer. Visit the Android developer’s website at https://developer.android.com/studio/command-line/adb.html to do this.
- Launch the installer after that to begin downloading crucial software for your machine.
- Here, you must use a USB cable to connect your Infinix Smart 8 Plus to the computer
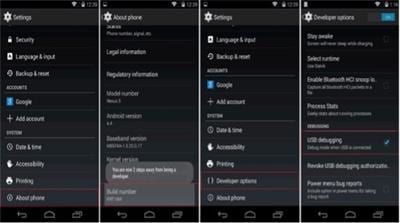
- This will activate the developer option on your smartphone if you navigate to Settings > About Phone > and choose the “Build Number” option seven times.
- After that, activate USB debugging by going to Settings > Developer Options.
- Launch the command prompt in the ADB installation directory after your device is connected to the system.
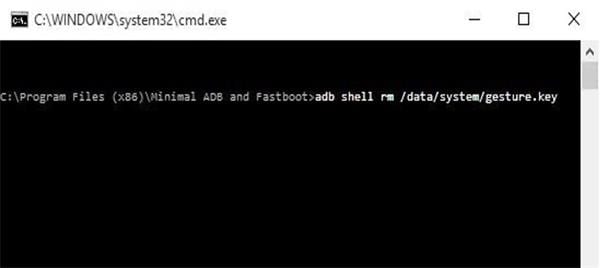
- Press enter after typing “ADB shell rm /data/system/gesture.key” into the command line.
- Finally, just restart your smartphone and use it as normal.
4. Hard reset (data loss)
Each brand has a unique method for hard resetting a locked Android device. The methods to factory reset locked Android devices from Samsung, LG, HTC, Sony, and Huawei are compiled here.
When your phone is locked, you may access the recovery menu of your phone using its physical keys and choose to hard reset the Infinix Smart 8 Plus device. Here’s how to restore a locked phone to factory settings.
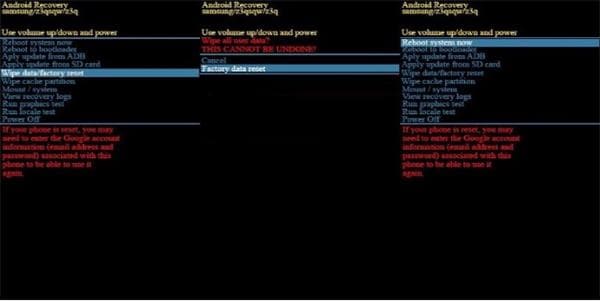
- Use the buttons to see the recovery menu.
- Press and hold the Volume Up and Side buttons simultaneously until you see the brand logo on the screen for Android devices without a Power/Bixby/Home button.
- Press and hold the Volume Up, Bixby, and Power buttons all at once if your smartphone has a Power button. Releasing them before a logo arises is advised.
- Use the Volume Down key to highlight Wipe data/factory reset when the Android system recovery option displays, then hit the Power/Bixby key to choose it.
- Allow a few seconds for the factory reset procedure to finish after selecting Yes, or Factory data reset. The phone will reboot once you pick the Reboot system. Now you may configure it as if it were a brand-new gadget.
5. Unlock from Forgot Pattern (android 4.4 or lower)
This is another choice that might assist you in unlocking your phone without a factory reset or password. You may have observed that when pattern lock was enabled on your device, a security PIN question was also prompted at that time.
Therefore, you have the choice to Backup PIN, which might assist you in unlocking your smartphone, if you are unable to unlock it. To do it, take the following actions:
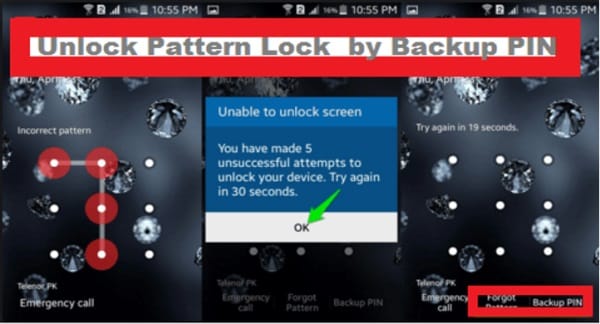
- Click on Android pattern lock.
- You’ll see a notification telling you to try again in 30 seconds after failing many times.
- The “Backup PIN” option will be there; choose it.
- Put the backup PIN and OK here.
- At last, you may unlock your cellphone by entering the backup PIN.
6. Boot into safe mode
Here’s how you can boot into safe mode.
- Hit the power button on your phone.
- Press and hold the volume down button on your phone as the animation begins. Hold it down until the animation is finished and your phone enters safe mode.
- “Safe mode” will be shown at the bottom of your screen.
- Out of safe mode
- Switch off your phone.
- Press the Power button on your phone for around 30 seconds, or until the Infinix Smart 8 Plus device restarts.
- You will see that after entering and booting into the safe mode, the lock option will not be visible.
- Then you will also see the option to turn off boot.
- You can get rid of the locked phone by proceeding with that option.
Part 2: Easy Tool To Unlock Android Phone Without Password
If you forget the lock code, you can simply unlock your Android phone using Dr.Fone - Screen Unlock.
Have you encountered the same situation? Do not fret. You may use Dr.Fone - Screen Unlock to unlock the screen lock on Android smartphones. It enables you to erase an Android phone’s password, PIN, pattern, and fingerprint.
Let’s learn how to safely remove the Android lock screen.
Step 1: Connect your phone
Open Dr.Fone on your PC, then select “Screen Unlock” from the list of tools.
The Dr.Fone functionality is still usable with the old UI of the Dr.Fone Mac version, but we will update it as soon as we can.


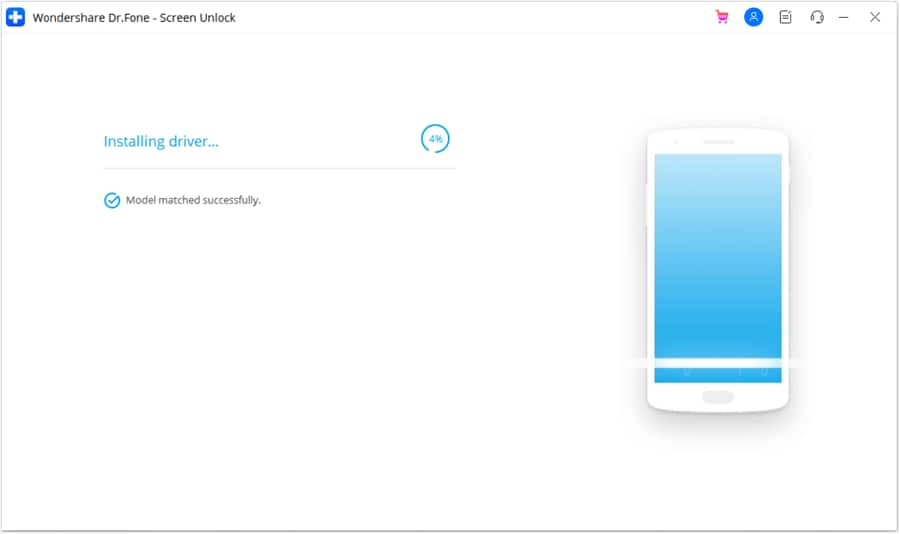
Connect your Android phone to the PC via a USB cable. then click the “Unlock Android Screen” button on the software.
Step 2. Choose a device model
Nearly all Android devices feature locked displays, including Android. Because the recovery kits for different phone models vary, it’s important to pick the correct device brand to unlock the lock. Every model of supporting hardware is included in the list.

Step 3. Switch to download mode
If you then adhere to the instructions on the software, the phone will enter Download Mode.

- Offset your phone.
- Hold down the Power, Home, and Volume Down keys all at once.
- Use the Volume Up button to start Download Mode.
- Remove the Android lock screen starting now..
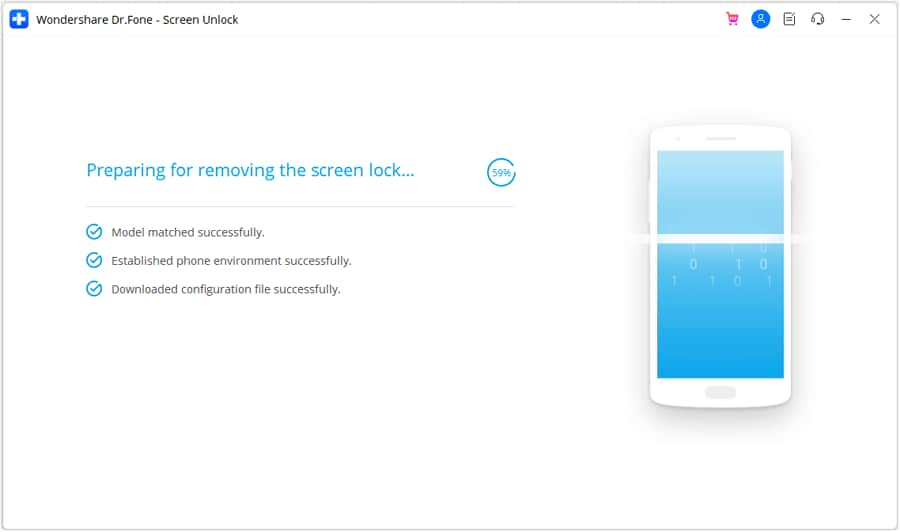
Step 4. Download a package for recovery
The recovery package will begin downloading once you set your device in download mode. Wait only till it is completed.
Step 5: Unlock Android without erasing data
After the recovery package download is finished, click “Remove Now.” This operation won’t harm any data on your Android device.
When everything is done, you won’t need to enter a password to access your Android smartphone, allowing you to see all of your data without any limitations.
Bonus Tips: How To Keep Our Data Safe?
Dr.Fone - Phone Backup is an excellent solution to keeping data safe and secure and baking it up before resetting your device, even if you have forgotten your password. You may quickly and conveniently back up practically all forms of Android phone data with Dr.Fone - Phone Backup (Android). Additionally, you may examine and export only certain types of data.
Here’s how you can use Dr.Fone - Phone Backup to keep data safe.
Step 1: Connect your Android phone to your PC.

Open Dr.Fone on your PC, then select “Phone Backup” from the menu.
Next, join your Android phone to the computer with a USB cable. The phone must be in USB debugging mode, please. You will be prompted to approve USB Debugging in a pop-up window on the Android phone if your version of Android is higher. Press the OK button if you would.

Click Backup to start backing up the data on your Android device.
If you have previously used this programme to back up your device, you may review your backup history by clicking on “View backup history.”
Step 2: Choose which file types to backup.
Once the Android phone is connected, select the file types you want to backup. Dr. Fone has previously examined all the file types for you. After that, click Backup to start the backup process.
It will cost some time for the backup. Do not disconnect your Android phone from the computer, use it, or delete any data while making a backup.

When the backup is complete, you may click the View the backup button to see what’s in the backup file.
The Bottom Line
It would be best if you had been able to answer the question, “How to unlock an Android phone without password,” using the techniques we have demonstrated here. The most effective way for resetting an Android phone is Wondershare Dr.Fone - Screen Unlock for Android. You may quickly reset a locked Android phone without a password with only a few clicks.
- Title: How to Reset Gmail Password on Infinix Smart 8 Plus Devices
- Author: Marry
- Created at : 2024-07-18 16:00:58
- Updated at : 2024-07-19 16:00:58
- Link: https://unlock-android.techidaily.com/how-to-reset-gmail-password-on-infinix-smart-8-plus-devices-by-drfone-android/
- License: This work is licensed under CC BY-NC-SA 4.0.