
:max_bytes(150000):strip_icc():format(webp)/the-10-best-password-managers-of-2022-6543213-7650bf3ab2eb41a08dbee8713ce811e3.jpg)
How to Unlock Infinix Hot 40 Phone without Any Data Loss
How to Unlock Infinix Hot 40 Phone without Any Data Loss
In today’s digital age, our Android phones serve as the primary hub of our lives, holding a treasure trove of personal and professional data. Yet, the frustration of being locked out due to forgotten passwords or malfunctioning security features can be overwhelming, compounded by the fear of data loss during the recovery process. However, there’s a beacon of hope - a way to unlock your Android phone without any data loss. In this comprehensive guide, we will explore the latest techniques, tools, and methods to regain access to your Android device safely without a password, PIN, or fingerprint. Let’s dive into it now.
Part 1. How to Unlock Infinix Hot 40 Phone with Dr.Fone - Screen Unlock (Android)
If you or someone accidentally forgot or mistyped/misentered your lock password and caused it to lock permanently, of course, you will find ways to unlock it at first. But if you are not connected to the internet, or did not register a Google account for your device, your last resort would be to factory reset your device. That will totally wipe everything you have and save it on your device. If you want to unlock your lock screen without having to worry that your device data will be erased, Dr.Fone - Screen Unlock (Android) is your phone unlocking software .
 safe & secure
Note: This tool temporarily support unlocking part of Samsung and LG locked screen without losing data, but other Android phone will be wiped all data if you try to unlock the screen with Dr.Fone - Screen Unlock (Android).
Dr.Fone - Screen Unlock (Android)
Remove 4 Types of Android Screen Lock without Data Loss
- It can remove 4 screen lock types - pattern, PIN, password & fingerprints.
- Only remove the lock screen. No data loss at all.
- No tech knowledge asked. Everybody can handle it.
- Work for Samsung Galaxy S/Note/Tab series and LG G2/G3/G4.
4,464,578 people have downloaded it
Steps on How to Unlock an Android Phone with Dr.Fone - Screen Unlock (Android)
Step 1. Connect your Android phone to your PC with Dr.Fone installed, then run the program.
Step 2. Then, you should see the “Screen Unlock” tool, so proceed into it. After that, click “Android” > “Unlock Android Screen.”

Step 3. Then choose “Remove without Data loss” to unlock part Samsung/LG devices without data loss and find your device model.

Step 4. Follow the instructions on the program to get the Android phone into “Download Mode.”
- 1. Power off the phone.
- 2. Press and hold volume down + home button + power button at the same time.
- 3. Press the volume up to enter download mode.

Step 5. The loading process will take you a few minutes because it is going to verify first your device’s compatibility.
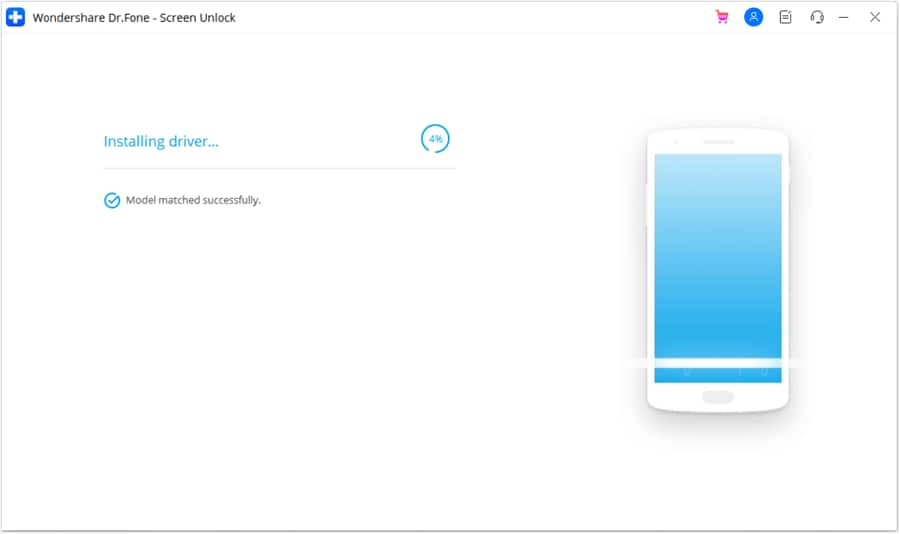
Step 6. Wait until everything is done. You should then see your device already has no lock screen.

That’s how to unlock an Android phone with just one click using Wondershare’s Dr.Fone. If your device is not Samsung or LG, you can use a more advanced mode to unlock your phone .
Part 2. How to Unlock Android Phone with Aroma File Manager (with Data Loss)/h2>
If you weren’t able to open your Wi-Fi or data connection or enable USB Debugging, this is the way for you to unlock your lock screen. This could be a bit complicated, but it should work.
Steps are provided below, and please follow the step-by-step guide carefully to avoid a boot loop or any other damage.
Step 1. Download Aroma File Manager on your PC. This is a tool that unlocks Android phones. Android users can use it for free.

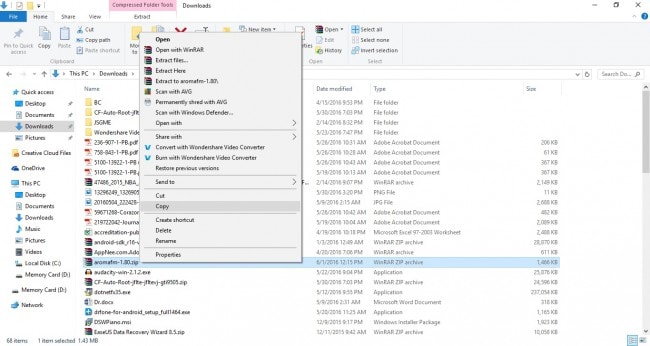
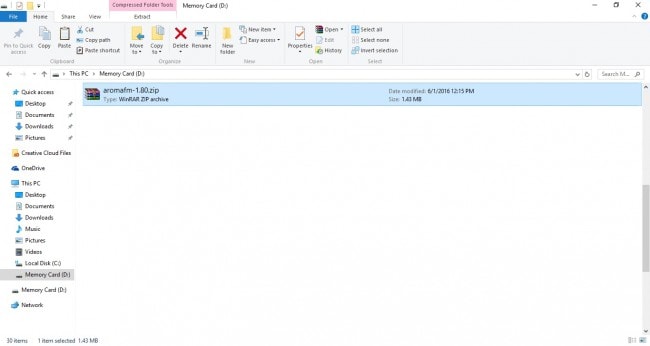
Step 2. Go to your Downloads folders and copy the downloaded zip file.
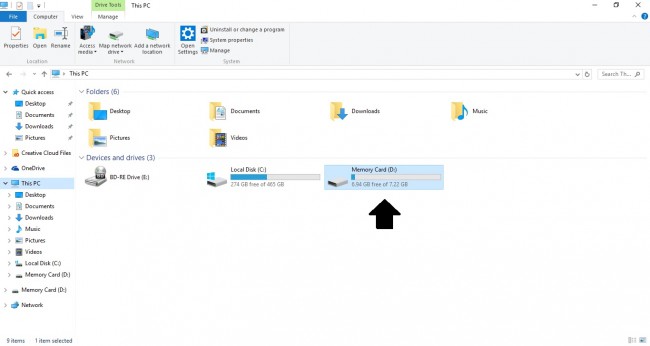
Step 3. Plug into your PC a memory card that you can insert into your phone later. Then, go to your list of connected devices and select the memory card.
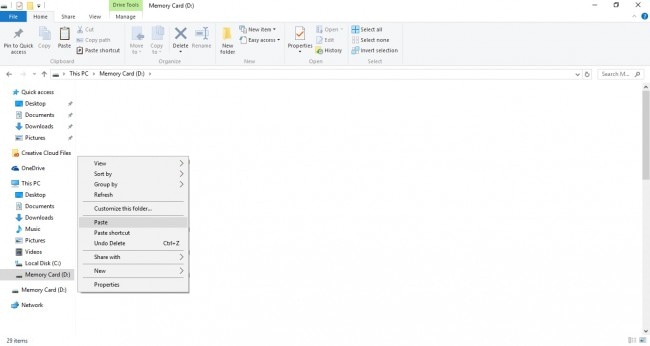
Step 4. Paste the copied Aroma zip file. Once copied, eject it from your PC, then insert it into your Android device.
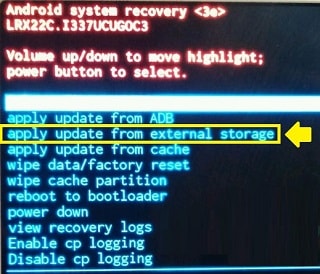
Step 5. Enter Recovery Mode for your device. Each Android device has its own ways of entering recovery mode, so take a look at this link and find your device.

Step 6. When you are already in Android Recovery Mode, use your volume keys to navigate to ‘’apply update from external storage’’, then select the zip file you copied a while ago. It will be flashed on your device.
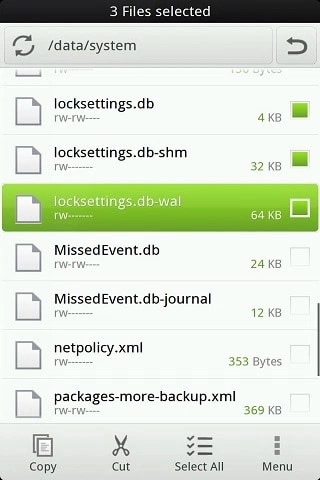
Step 7. After it, restart, and recovery mode will reopen as Aroma File Manager, so go to its settings and select ‘’Automount all devices on start’’, then restart. Back in Aroma File Manager, go to the directory data>system. Check if the ff. exist. If they do, delete them. Then restart again.
- gesture.key (pattern) / password.key (password)
- locksettings.db
- locksettings.db-shm
- locksettings.db-wal
- signature.key
- sparepassword.key
Now you have your device booted up, and your Android lock screen is still locked, just gesture in or enter anything. It will be unlocked. And that’s how to unlock an Android phone using your device.
Part 3. How to Unlock Android Phone Using Minimal ADB and Fastboot (with Data Loss)
If you weren’t able to connect to the Internet, but you, fortunately, enabled your USB Debugging option before your device was locked, the ARONSDB tool from the Android SDK package can help you unlock your Android phone.
Here is the step-by-step guide for you to follow
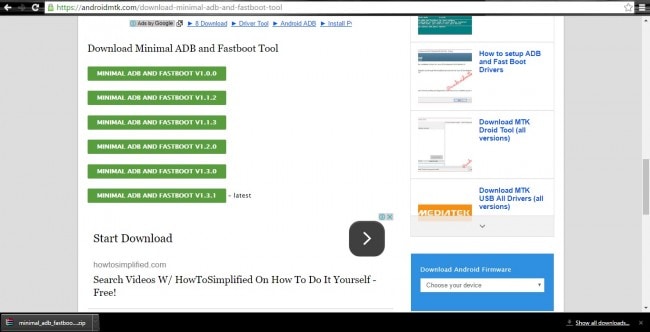
Step 1. Go to Minimal ADB and Fastboot download page.
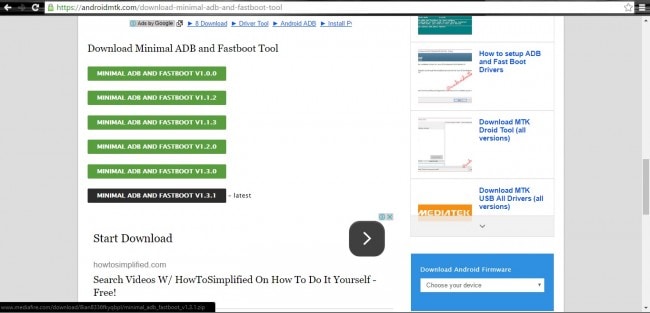
Step 2. Download the tool’s latest version.
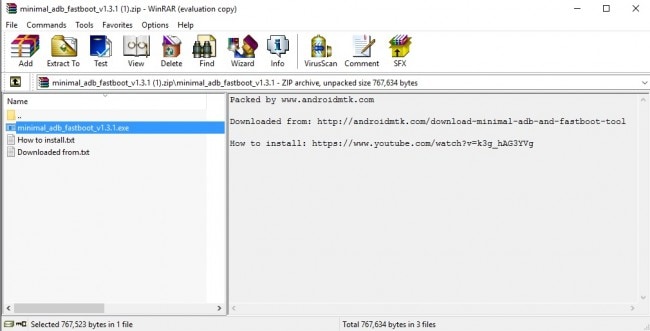
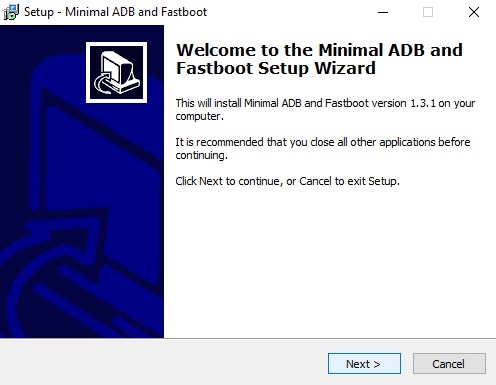
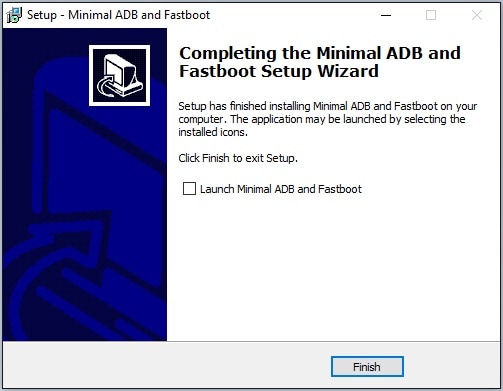
Step 3. Open the downloaded Minimal ADB and Fastbootzip file and install it.
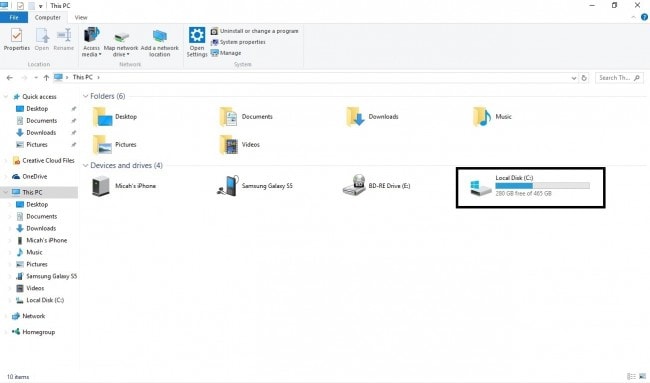
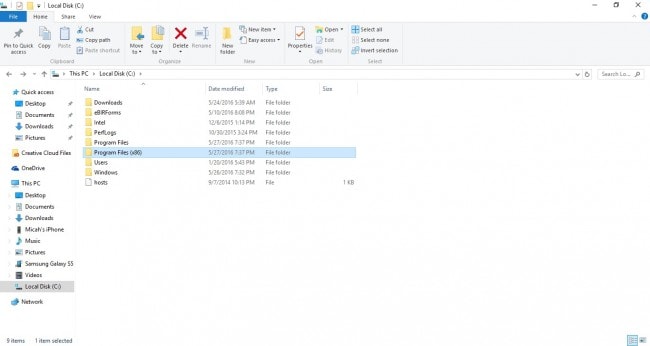
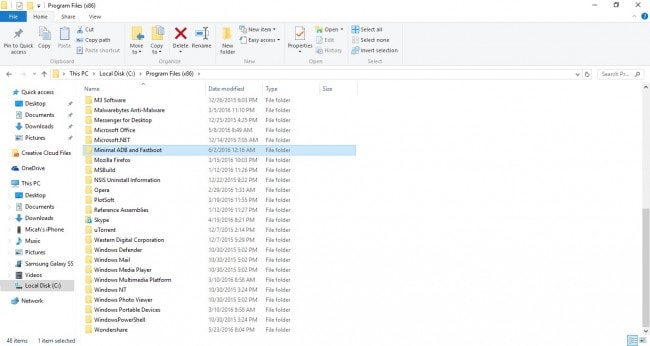
Step 4. Make sure your device is connected, then go to the Minimal ADB and Fastboot installation directory.
This PC [Win 8& 10] or My computer [Windows 7 & below]> Local Disk (C:) [primary drive]> Program Files [for 32-bit] or Program Files (x86) [for 64-bit] > Minimal ADB and Fasboot.
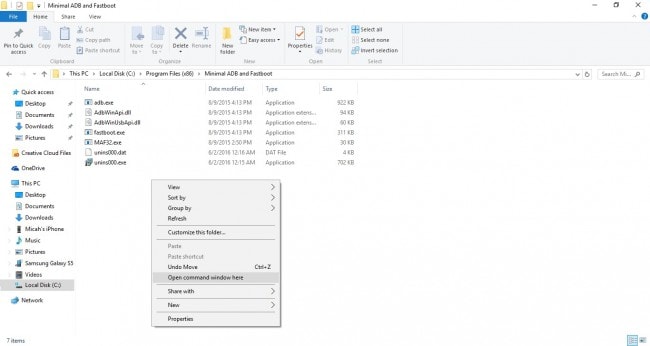
Step 5. Inside the folder, hold the Shift key on your keyboard, then right-click your mouse. An additional “Open command window here” will appear so select that.
Step 6. ADB terminal will pop out. Now, the first is to type in ADB devices. This is to check if your device is recognized by ADB. If there is no device listed below, try to remove and reconnect your Infinix Hot 40 and retype the command. If there are listed devices already, proceed.
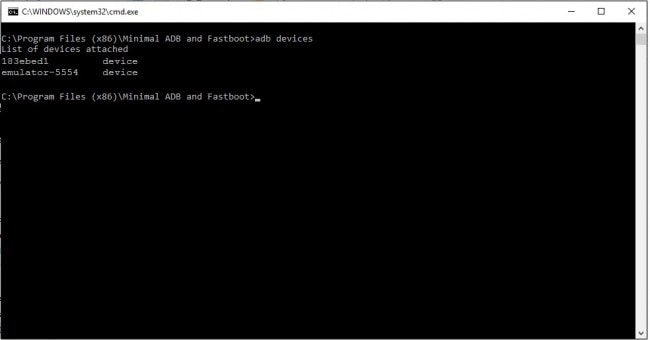
Step 7. Finally, type in the following commands one by one. These commands will remove your lock screen.
- adb shell
- cd /data/data/com.android.providers.settings/databases
- sqlite3 settings.db
- update system set value=0 where
- name=’lock_pattern_autolock’;
- update system set value=0 where
- name=’lockscreen.lockedoutpermanently’;
- .quit

This would work if you have your USB debugging turned on before it was locked. That’s how to unlock Android using ADB.
Part 4: How to Unlock Phone via Find My Device (with Data Loss)
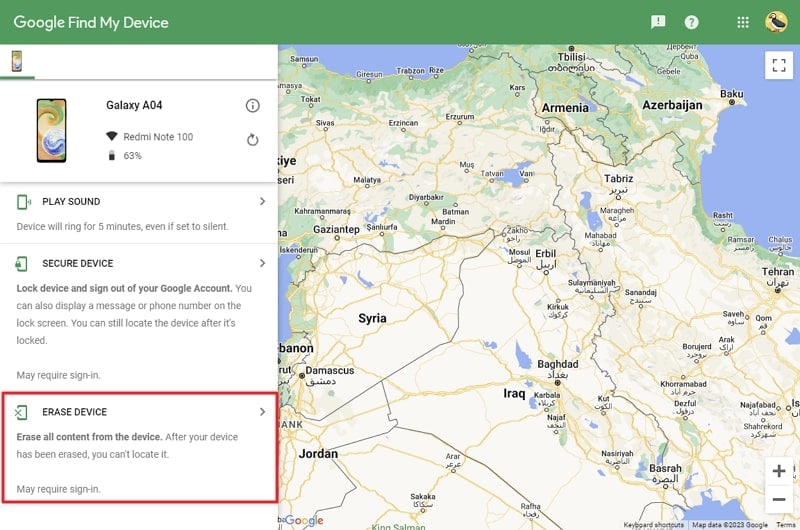
Google Find My Device is another handy way to unlock your locked Android device. However, it requires you to have your Google ID credentials and you have previously enabled Find My Device features. Moreover, it will erase all the data on your device. Use the following steps to unlock your Android phone via Find My Device:
Step 1: Open a web browser on a computer or another device and visit the Find My Device website. Now, sign in with the Google account that is linked to the locked Android device.
Step 2: After signing in, you will see a list of devices associated with your Google account on the left side of the screen. Select the locked Android device from the list and choose the “Erase Device” option from the menu on the left-hand side.
Step 3: You will now be asked to confirm your identity through a Google account password or using a pass-key. Afterward, follow the on-screen instructions to erase and unlock your Android device.
Part 5: How to Unlock Android Phone without Losing Data in Safe Mode
One way to unlock your Android phone without losing the data is by utilizing Safe Mode. This method works only if the screen lock you have been using is a third-party app. Since Safe Mode disables third-party apps, you can easily use it to uninstall the problematic app. Here is how to unlock an Android phone without losing data:
Step 1: On your Android device, press and hold “Power” and “Volume Down” keys together for 3 seconds. After the Power menu becomes visible, press and hold the “Power off” option.
Step 2: After a while, you will see the “Safe Mode” option on your screen with some basic instructions. Now, you can use the button to boot into Safe Mode and remove the screen lock application.

Part 6. How to Unlock Android Phone without Any Data Loss Using Google Account (Android 4.4 or lower)
If luckily, you left your Wi-Fi open and luckily connected to the internet, this is the easiest way to unlock your Android phone.
The step-by-step guide for you to refer
Step 1: Retry the incorrect password or pattern until the ‘’Forgotten Password/Pattern’’ appears below. Then select that.
Step 2: Check ‘’Enter your Google Account details’’ then tap next.
Step 3: Input your Google Account details, username, and password. You are done.
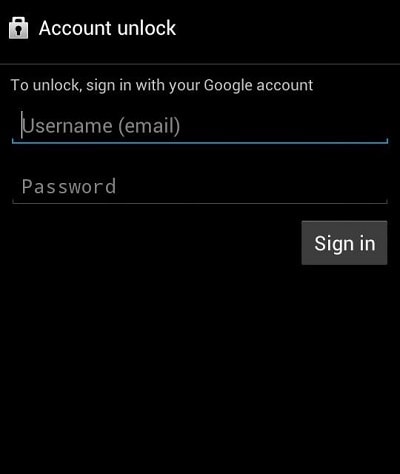
You will be given the option to input a new password or pattern right after you enter your Google account details. But if not, Google must have emailed you your temporary password or pattern that you will input to unlock your lock screen.
Top 12 Prominent Infinix Hot 40 Fingerprint Not Working Solutions
Part 1. Optimal Solution: Unlock With Wondershare Dr.Fone Directly
Facing a malfunctioning fingerprint on your Infinix Hot 40 can be frustrating. In this scenario, the most effective resolution is the removal of the registered fingerprint. Yet, traditional methods of removing the fingerprint can be difficult and pose security risks. In this case, going for tools like Wondershare Dr.Fone is the best choice. This tool ensures your Pixel device is at no risk.
Dr.Fone offers a swift solution to remove the Android lock screen in five minutes. It effectively removes 4 types of screen locks. These include patterns, PINs, passwords, and fingerprints. Dr.Fone can bypass the Android FRP lock without needing a PIN or Google account. It ensures accessibility to the Android device without such credentials.
![]()
Dr.Fone - Screen Unlock (Android)
The Best UnlockJunky Alternative to Bypass FRP and Solve Your Screen Locks
- Remove all Android screen locks (PIN/pattern/fingerprints/face ID) in minutes.
- Bypass the FRP lock of Samsung without a PIN or Google account.
- Everyone can handle the lock screen without any tech knowledge.
- Provide specific removal solutions to promise good success rate.
4,008,672 people have downloaded it
Prominent Features of Wondershare Dr.Fone
- FRP bypass is enabled for brands like Samsung, Xiaomi, Redmi, Oppo, Realme , and Vivo.
- With Dr.Fone, bypassing screen locks can be achieved without data loss.
- Fone supports 2000+ Android phones and tablets from over 18 brands for screen unlocking.
Step-by-Step Guide To Remove Fingerprint Type Lock on Google Pixel Using Dr.Fone
With Dr.Fone, you can resolve the Infinix Hot 40 fingerprint sensor not working issue within minutes. Below is a detailed walkthrough for removing a fingerprint lock on a Google Pixel:
- Step 1: Connecting and Accessing Screen Unlock Feature on Dr.Fone
Open Wondershare Dr.Fone and connect your Android device via a USB cable. Once the connection is established, navigate to the “Toolbox” tab and choose “Screen Unlock.” Upon reaching the new screen, choose the “Android” option. Then, select “Unlock Android Screen” from the options on the following screen.
- Step 2: Selecting Google As the Infinix Hot 40 device Brand and Activating Recovery Mode
Afterward, you’ll be guided to a subsequent screen prompting you to choose the Infinix Hot 40 device brand, Google. Once you select the brand, you’ll be directed to enter a specific mode corresponding to it. For Google Pixel Devices, the specific mode to enter is Recovery Mode. Simply follow the on-screen instructions to activate Recovery Mode on your device.
- Step 3: Initiate the Fingerprint Removal Process
After entering Recovery Mode, the screen unlocking procedure will initiate automatically. Please wait for the fingerprint removal process to finish. In case of failure, select “Try Again” to attempt unlocking again. Upon successfully unlocking your Android device’s screen, tap “Done.”
Part 2. 11 Conventional Solutions To Resolve Pixel Fingerprint Not Working
The solution above using Wondershare Dr.Fone is an effective and comprehensive method. It can tackle fingerprint recognition issues, but sometimes, users may look for simpler alternatives. We will explore conventional solutions that can address Pixel fingerprint problems. Each solution will also explain the underlying reasons for the Pixel 6 fingerprint sensor issue.
1. Fingerprint Sensor Not Touched Firmly
Problem
If the fingerprint sensor fails to recognize your fingerprint, it might be due to inadequate pressure. This could also be due to improper finger placement on the sensor.
Solution: Firm Placement
Ensure you firmly place your finger on the sensor, covering it entirely. Avoid too much pressure, but make sure the sensor fully contacts your fingerprint.
![]()
2. Device Showing Glitches
Problem
Glitches or software bugs in your Pixel device may cause disruptions. This can include issues with the fingerprint sensor’s functionality. These problems can range from minor issues to severe software glitches.
Solution: Restart Your Pixel Device
One of the easiest and simplest solutions is to restart your Pixel phone. You can do that by pressing the “Power” and the “Volume Up” keys. It will lead to a pop-up power menu where you must choose “Restart” to reboot your device.
![]()
3. Outdated Firmware
Problem
An outdated operating system or firmware can lead to compatibility issues. This can lead to malfunctioning features like the Pixel 6A fingerprint sensor not working.
Solution: Check for Updates
The best way to resolve this issue is to update your Pixel device. Having an outdated version of Android OS can lead to an accumulation of bugs and glitches. Moreover, it can seriously affect the Infinix Hot 40 device’s performance, causing many issues. Here is how to check and update your Pixel phone:
Instructions. On your Pixel device, access the “Settings” app. Within Settings, scroll down to tap the “System” option. On the following screen, hit the “System update” option to check if any latest update is available. Here, if you see any updates, download and install them promptly. Before initiating the update, ensure your device is connected to a stable Wi-Fi network with sufficient battery charge.
![]()
4. Dirty Phone or Sensor
Problem
Accumulated dirt, dust, or residue on the phone or fingerprint sensor can cause obstruction. This can lead to the failure to properly recognize your fingerprint.
Solution
1. Cleaning the Phone
Employ a gentle, dry microfiber cloth for wiping down the complete surface of your Pixel device. Take particular care to thoroughly clean the region surrounding the fingerprint sensor. Refrain from utilizing rough substances or strong chemicals as they could potentially cause harm to the Infinix Hot 40 device.
2. Fingerprint Sensor Cleaning
Gently wipe the fingerprint sensor area using a clean, dry cloth to ensure thorough cleaning. For better results, consider using a dampened cotton swab with water or isopropyl alcohol. Before using it again, ensure the sensor is entirely dry.
3. Compressed Air or Soft Brush
Use compressed air or a soft brush if there’s visible debris or particles around the sensor. Be cautious not to apply excessive pressure that might damage the sensor.
![]()
5. Screen Protector: Dirty or Damaged
Problem
A smudged or impaired screen protector might disrupt the working of the fingerprint sensor. This can potentially cause it to fail to recognize your fingerprint.
Solution
1. Clean the Screen Protector
Start by effectively cleaning the screen protector on your Pixel device. For a thorough cleaning, consider utilizing a screen cleaning solution. Ensure that the screen protector is free from any dirt or debris.
2. Replace Damaged Protectors
Is the screen protector visibly damaged, scratched, or peeling off? If yes, consider replacing it with a new one. Damaged protectors can hinder fingerprint recognition and compromise device protection.
3. Check Compatibility
Ensure the screen protector is designed to be compatible with fingerprint sensors. Some protectors may obstruct or interfere with the sensor’s functionality.
4. Remove Air Bubbles
There can be air bubbles trapped under the screen protector. If there are, gently press them out towards the edges using a card designed for this purpose.
![]()
6. Clean Your Finger
Problem
The problem may lie with your fingers rather than the Infinix Hot 40 device. Unclean or moist fingers can hinder accurate fingerprint recognition on the sensor, causing the Infinix Hot 40 fingerprint sensor to not work.
Solution
1. Cleanse and Dry Your Hands
Remove any dirt, oil, or moisture that might cause issues with the fingerprint sensor. It’s crucial to wash and thoroughly dry your hands. Additionally, verify that your fingers are entirely dry before engaging the sensor. The reason is any moisture or dampness may cause inaccuracies in fingerprint identification.
2. Avoid Oily or Greasy Substances
Refrain from touching oily or greasy surfaces before using the fingerprint sensor. These substances can transfer onto your fingers, affecting sensor accuracy. If your fingers are dirty or damp, pause to clean them using a dry, clean cloth.
![]()
7. Covering Screen if Fingerprint on Screen
Problem
Fingerprint marks or smudges on the screen might disrupt sensor functionality. This leads to inaccurate recognition when you try to unlock your device.
Solution
1. Avoid Covering the Sensor Area
Be cautious while cleaning the screen to avoid covering or smudging the area around the fingerprint sensor. Precise cleaning around this area prevents interference with sensor functionality.
2. Use Proper Holding Technique
While holding the Infinix Hot 40 device, avoid placing your fingers or palms over the fingerprint sensor. Opt for holding the Infinix Hot 40 device to minimize accidental contact with the sensor area.
![]()
8. Fingerprint Sensor Not Visible
Problem
Misconfigured settings on your Pixel device can lead to situations where the fingerprint sensor is not visible. It can lead to scenarios where the Infinix Hot 40 device fails to recognize your screen unlocking attempt.
Solution: Adjust the Setting To Consistently Display the Sensor
You must adjust the display settings to ensure the fingerprint sensor is always visible. To do that, you can begin by opening the Settings app. Navigate to the “Display” tab and select “Lock Screen.” On the following window, toggle on “Always show time and info.”
![]()
9. Low Touch Sensitivity
Problem
The fingerprint sensor may have low touch sensitivity . It can lead to difficulties in accurately recognizing fingerprints, leading to Infinix Hot 40 fingerprint not working.
Solution
1. Adjust Sensitivity Settings
Accessories like a screen protector might impact the performance of your Pixel device’s touch sensitivity. When using a screen protector, your Pixel enhances touch sensitivity. To do that, navigate to the Settings app and open it. Move to the “Display” window and scroll down to the last option. Toggle on the “Screen protector mode” to increase the screen sensitivity.
![]()
2. Finger Re-Enrollment
Delete existing fingerprints and re-register them. This re-enrollment can sometimes improve sensitivity and help remove the issues. Here is how you can delete and re-enroll your fingerprint:
- Step 1. In the Settings app of your Pixel, tap “Security & Privacy.” Then, press “Device Unlock” and choose “Fingerprint Unlock.” The device will now ask you to provide your device PIN or password.
![]()
- Step 2. Tap “Fingerprint Unlock” on the following screen and delete the previously enrolled fingerprints. Then, press “Add fingerprint” and follow the on-screen prompts to complete the process.
![]()
10. Other Hardware Issues
Problem
Persistent fingerprint sensor problems might indicate underlying hardware issues . This could go beyond common troubleshooting and might require professional help.
Solution
1. Inspect for Physical Damage
Thoroughly examine your Pixel device for any physical damage. These include cracks, dents, or scratches around the fingerprint sensor area. Physical damage could affect the sensor’s functionality.
2. Safe Mode Check
Boot the Infinix Hot 40 device in safe mode to determine if third-party apps are causing conflicts. To do that, press the “Power” key with any volume key to access the power menu. Afterward, long-press the “Power Off” option until the “Reboot to Safe Mode” option appears on your device’s screen. Press “OK” to reboot into Safe Mode and test the fingerprint sensor’s functionality.
![]()
3. Professional Assessment
If you suspect hardware issues, seek professional help from authorized service centers. A clear sign of hardware issues can be visible damage or the sensor failing to function even in safe mode.
11. Factory Reset as Last Resort
Problem
Did all other troubleshooting methods fail to resolve persistent fingerprint sensor issues? Then, a factory reset might be required to revert the Infinix Hot 40 device to its original settings.
Solution
1. Backup Data
Before initiating a factory reset, ensure that all crucial data is safeguarded. This encompasses contacts, photos, documents, and any other significant files. Use Google’s backup services or third-party apps to securely back up your data .
2. Initiating Factory Reset
Proceed with the following steps to execute a factory reset on your Pixel device:
- Step 1. On your Pixel smartphone, navigate to Settings and access the “System” tab. Here, scroll down to the bottom and tap “Reset Options.”
![]()
- Step 2. In “Reset Options,” choose “Erase All Data (Factory Reset)” to continue. Afterward, select “Erase All Data” on the next screen and follow the instructions to complete the process.
![]()
In summary, this article detailed various methods to fix the Infinix Hot 40 fingerprint not working. Diverse approaches were explored, from simple steps like sensor cleaning to advanced solutions like factory resets. However, Dr.Fone stands out among these solutions as a top-tier option. It offers a secure and efficient resolution to the persistent problem of fingerprint failure on the Infinix Hot 40 .
Tips and Tricks for Setting Up your Infinix Hot 40 Phone Pattern Lock
Failing to remember the pattern lock of a phone is one of the most puzzling situations for Android users. Unlike the famous OS, Android gives a seamless method to eliminate the issue.
You can attempt the methods below or an expert tool if you have forgotten the pattern lock on your gadget and reset it. However, we suggest you try Dr.Fone - Screen Unlock for a quick and safe solution. To make things more straightforward, we have given you other techniques as a workaround to the issue.
So, keep following us to unlock the lock screen pattern and use your phone again.
Part 1: What Is Android Pattern?
A pattern lock is used to identify the actual user by your Android phone. It is a widely used phone locking system and a secured one. Simply put, a pattern lock includes a line pattern you choose that you can draw to unlock a lock screen. You can enable this lock screen feature from the security menu in the settings application.
So, if you have set a pattern lock as a screen lock for your device, you will need to draw the exact pattern every time you log in.
Part 2: Best Tool to Unlock Your Pattern
Dr.Fone - Screen Unlock
The most effective and quick tool to unlock a pattern lock is Dr.Fone - Screen Unlock by Wondershare. Dr.Fone is an all-in-one tool for all your Android needs and has been in the business for a long time. We suggest you use Dr.Fone. The following steps will help you unlock your device:
Step 1. Select the “Screen Unlock” option in the Dr.Fone interface.

Step 2. Select Unlock Android Screen
To unlock the pattern lock on your device, the “Unlock Android Screen” will guide you to finish the whole process.
Step 3. Select unlock mode
If you click “Remove without Data Loss,” only some limited Samsung or LG phone models can be unlocked without losing data. To unlock most phone brands’ screens, “100% Remove Screen Lock” is a better choice.
You can find the brand compatible with your phone in the following list.

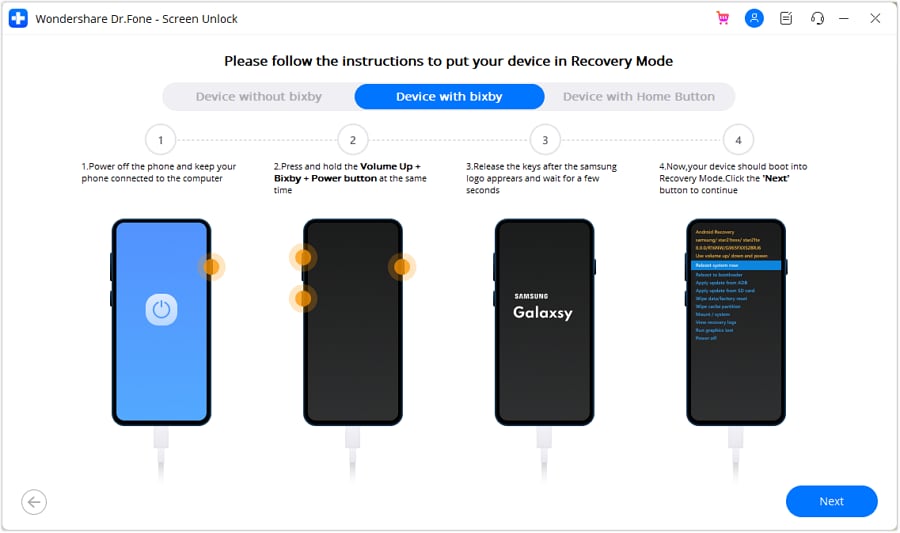
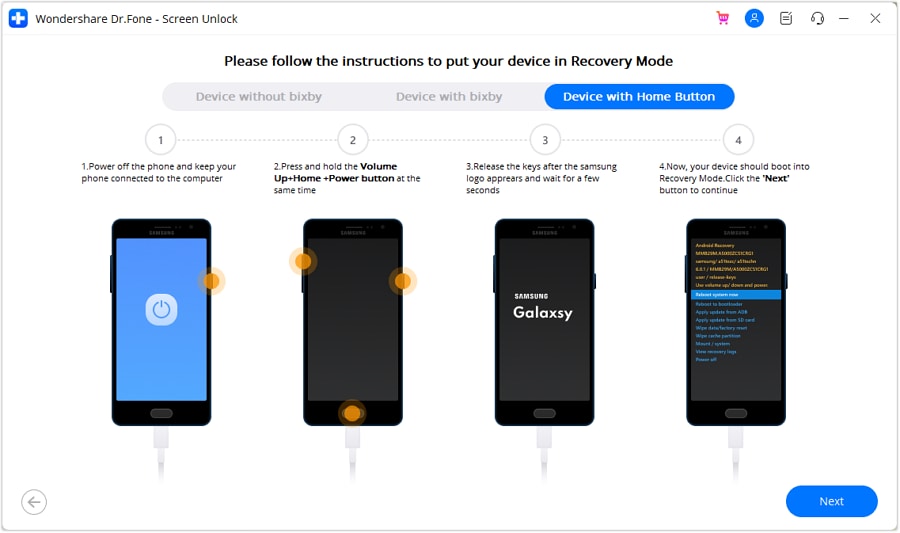
Step 4. Go into Recovery Mode
Read the program instructions carefully; entering recovery mode is the prerequisite to unlocking the pattern lock.
(Here are 3 examples of Samsung phones)
How to get into recovery mode with Bixby
How to get into recovery mode without Bixby

How to get into recovery mode with Home button
Step 5. Instructions to Wipe Cache Partition
Now you’re in recovery mode, pick these options in the image below.
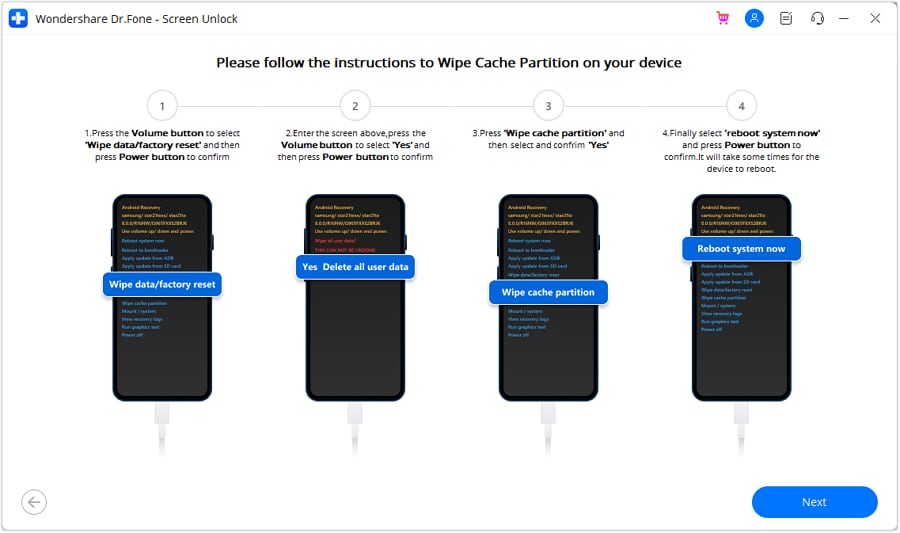
When the “Unlocked successfully” appears on the screen, you can access your device without a pattern lock or other locks!

Part 3: How to Bypass Android Pattern When You Forgot It?
1. Google Find My Device (For Android7.1.1 or later)
Step 1. Open the Android Device Manager site by typing https://www.google.com/android/find in an internet browser.
Step 2. You must give your Google ID credentials to sign in. Remember that this should be a similar Google account connected to your phone.
Step 3. After logging in, select your device.
Step 4. You will get three choices here, i.e., lock, erase, and ring.
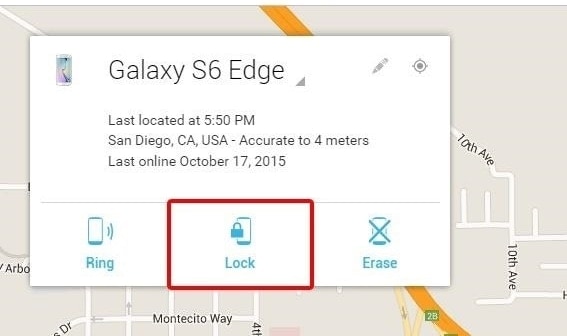
Step 5. Click on the “Lock” button to reset its pattern.
Step 6. It will open another spring-up window. From here, you can give the new password to your phone.
Step 7. After affirming your PIN/password, you can give a recovery message and number (in case of theft only).
Step 8. Complete the process and sign out of your account on the browser.
2. Forgot Pattern (For Android 4.4 or earlier)
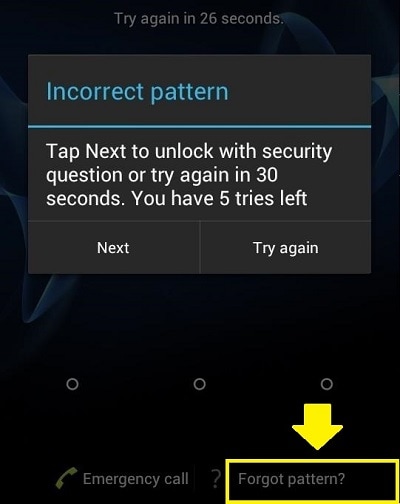
Step 1. First and foremost, give some wrong patterns to your phone. It will tell you that you attempted the incorrect pattern lock.
Step 2. On a similar window, click the “Forgot pattern” choice on the base.
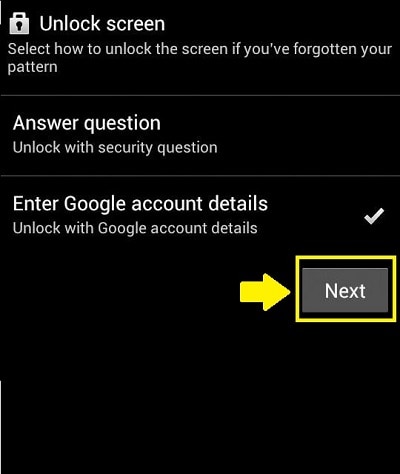
Step 3. That will open another screen, which you can use to sidestep the forgotten pattern of Android. Select the choice for entering the Google Account credentials and continue.
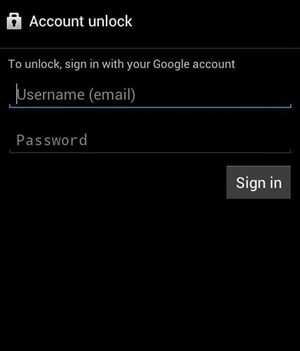
Step 4. To reset the lock screen pattern, you must give the correct details of the Google ID previously logged into the Infinix Hot 40 device.
Step 5. After giving the correct details, you can provide another pattern lock to the phone.

Step 6. Affirm your decision and set another pattern lock on your phone.
3. Emergency Call Trick (For Android 5 or 5.1.1)
Step 1: Tap the Emergency Call button and enter ten asterisks (*).
Step 2: Copy and paste the asterisks on the dialer until you no longer see the paste choice.
Step 3: Return to the lock screen and tap on the camera symbol.
Step 4: Press the settings choice on your Android gadget after pulling down the notification tray. Now you will have the chance to enter the PIN/password, and you ought to continue unlocking your Android phone. Continue to paste until the lock screen UI crashes.
4. Safe Mode Boot (For Android 4.1 or later)
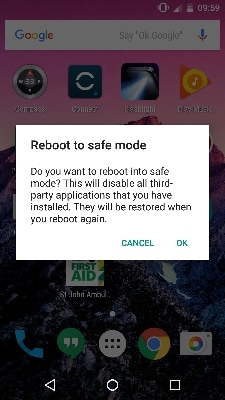
Step 1: You can bring up the power menu and hold the “Power Off” button for most phones, especially Android phones. A warning will spring up, asking whether you might want to Reboot to Safe Mode. Here, it would help if you had to press Ok.
Step 2: Clear your lock screen application’s data.
Clean data off your lock screen app, uninstall it, and then reboot your device to escape safe mode. When you do so, your phone or Android device will unlock.
5. Use ADB (USB required for Android 10 and lower)
- Connect your device to your PC using a USB connector.
- On your PC, open a terminal window (or command prompt).
- Type in the commands given below. Press Enter after each line:
adb shell
album/data/data/com.android.providers.settings/databases
sqlite3 settings.db
update system set value=0 where name=’lock_pattern_autolock’;
update system set value=0 where name=’lockscreen.lockedoutpermanently’;
.quit
exit
adb reboot
- After your gadget has rebooted, enter the command below:
adb shell
rm/data/framework/gesture.key
exit
adb reboot
- Your phone will reboot. After it reboots and requests a security pattern, you can utilize any pattern, and it will unlock.
Conclusion
This guide provides insight into the most common Android issue. Here, we have discussed different techniques to bypass the pattern lock on your Android phone. However, we suggest you go for a professional tool while carrying this out. Therefore, you should choose an expert tool like Dr.Fone - Screen Unlock to open the lock screen pattern.
- Title: How to Unlock Infinix Hot 40 Phone without Any Data Loss
- Author: Marry
- Created at : 2024-04-04 21:54:27
- Updated at : 2024-04-05 23:43:59
- Link: https://unlock-android.techidaily.com/how-to-unlock-infinix-hot-40-phone-without-any-data-loss-by-drfone-android/
- License: This work is licensed under CC BY-NC-SA 4.0.
