
How to Unlock Itel A60 PIN Code/Pattern Lock/Password
How to Unlock Itel A60 PIN Code/Pattern Lock/Password
I have forgotten the pattern, PIN, or password needed to unlock my Itel A60 smartphone. What should I do?
If you have a Itel A60 phone and have forgotten the screen unlock PIN code, pattern lock, or password, you can still access it using some tried and tested tricks and hacks. This article will discuss 5 different ways on how to unlock Itel A60 smartphone. Some methods might work without erasing your data, while others, like factory resetting, may erase all content from your phone. Regardless of which method you use, you will be able to unlock your phone! So, let’s get started!
1. How to Unlock Itel A60 With Google Find My Itel A60?
A way to unlock the Itel A60 phone is via Google Find My Device feature. While this method can help unlock your phone, it erases all content from it.
For this method, you need a PC and your Google account details. Here are the steps for it:
Step 1: Open your browser and go to Google Find My Device on your PC.

Step 2: Log in to the Google account you used to set up your Itel A60 phone.
Step 3: It will show you 3 options: Play Sound, Secure Device, and Erase Device.

And then select “**Erase Device.**”


Selecting this option will erase all content from your device, including screen unlock PIN, password, and pattern.
Step 4: Now, you can access your phone without an unlock PIN or pattern and set a new one.
Use this method only if your phone is backed up so you can restore all your data later.
2. How to Unlock Android device Using Lock Remove Tool?
Another foolproof method on how to unlock Android pattern lock is by using a lock removal tool like Dr.Fone - Screen Unlock (Android) .
 safe & secure
Dr.Fone - Screen Unlock is a screen unlock tool that can unlock your Android phone if you forget its screen unlock PIN, password, or pattern in just 5 minutes. It has a simple operation that requires just a few clicks to unlock your phone screen. Plus, this method is reliable, secure, and has a high success rate. However, there’s a possibility that it might not work with older phone models.
![]()
Unlock Android PIN Code/Pattern Lock/Password within Minutes
- Remove all Android screen locks (PIN/pattern/fingerprints/face ID) in minutes.
- Unlock 20,000+ models of Android phones & tablets.
- Everybody can handle it without any technical background.
- Save you from ending up with a locked phone after too many pattern attempts.
4,008,669 people have downloaded it
Here are the steps to unlock Android phone using Dr.Fone - Screen Unlock (Android):
Step 1: Launch Dr.Fone on your PC and select the “Screen Unlock” option from the main page.
Step 2: Connect your phone to your PC with a USB cable. Now click on the “Android” > “Unlock Android Screen” option.

Step 3: A device brand will appear. Select your phone’s brand, i.e., Samsung.

Step 4: Now, follow the instructions as you see to unlock your Android device.
Your phone is now unlocked, and you can access it without entering a PIN, password, or pattern.

Now, if you don’t remember your Google account details and don’t have access to a PC to use a screen unlock tool, you can unlock Android phone using the conventional way.
How to Unlock Itel A60 with Google Account?
Almost all Android smartphones, including Itel A60 , require you to enter your Google account details when setting up your phone for the first time. This includes the email, password, and security question. These details come in handy later on in situations where your phone is lost or stolen or if you’re switching to another phone. However, they can also help with basic issues like unlocking your phone in case you forget your Itel A60 screen unlock PIN, pattern, or password.
You can unlock your Itel A60 phone with Google Account in the following two ways:
- Using Google account details
- Using Google security question
Using Google Account Details
Almost all Android smartphones, including Itel A60 , require you to enter your Google account details when setting up your phone for the first time. This account comes in handy later on in situations where your phone is lost or stolen or if you’re switching to another phone. However, it can also help with basic issues like unlocking your phone in case you forget your Itel A60 screen unlock PIN, pattern, or password. But to use this method successfully, you need to remember the email address bound to the Itel A60 device and its password.
Here’s how to unlock the Itel A60 pattern lock without losing data using your Google account:
- Step 1: Enter the incorrect PIN, pattern, or password 5 times, and click on “Forgot Password” or “Forgot Pattern.”
- Step 2: The interface will then ask you to enter your Google account details as an alternate option. Enter the Google account details you used when setting up your Itel A60 phone.
- Step 3: This will unlock your phone. You can now reset the screen unlock PIN, password, or pattern.
If you don’t remember your Google account details, you can still unlock your Itel A60 phone using a third-party tool.
Using Security Question
Another way to unlock your Itel A60 phone using Google is by answering the security question. When we set up our Google account, we usually choose a security question and an answer. This comes in handy if you want to recover your Google account, reset the password, or if you want to unlock your phone’s screen.
For the latter, here are the steps:
- Step 1: Enter the incorrect PIN or pattern to unlock your screen several times till you see the “Forgot Pattern” or “Forgot Password” option. Click on it.
- Step 2: Now select the “Answer Security Question” option and type in the answer.
- Step 3: Click on “Unlock” after which you will be asked if you want to set a new PIN or pattern. Select “Yes.”
- Step 4: Your Itel A60 phone will be unlocked, and you can set a new PIN or pattern for your screen.
How to Unlock Itel A60 by Hard Reset?
Hard resetting your smartphone usually solves everything! Hence, it can also help you unlock your Itel A60 phone; however, using this method will erase all the data on your phone. So, if you still want to unlock Itel A60 phone using this method, only do so if you have backed up your device and have no other way to unlock your phone. This includes forgetting your Google account details or not having access to a PC to download and use Dr Fone - Screen Unlock (Android).
Here are the steps for it:
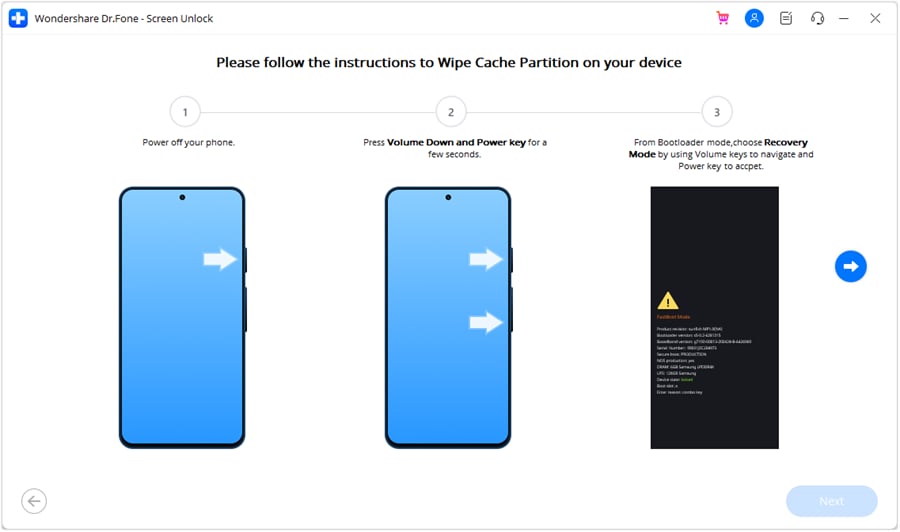
- Step 1: Power off your Itel A60 phone.
- Step 2: Press and hold the power and volume down button until the Sony screen appears.
- Step 3: The “System Recovery” menu will appear. Use the volume up and down button to scroll to the “Factory Reset” option. Use the power button to select this option.
- Step 4: Select “Yes” when asked for confirmation.
Your Itel A60 phone will be hard reset, and all the locks will be removed. When you turn it on again, you will have to set it up like a new phone using your Google account details.
How to Unlock Itel A60 with Itel Companion?
If you’ve forgotten the screen lock of your Itel A60 device, you can use Sony’s official software, Itel Companion, to unlock your device. Itel Companion is a reliable method that can help you regain access to your Itel without data loss. Here’s how to unlock your Itel A60 using Itel Companion:
Step 1: Install and launch Itel A60 Companion from the official website and click “Support Zone.” Move to the “Phone/Tablet Software Update” option on the next screen and tap “Start.”

Step 2: Now, plug in your laptop to power, as the process will take some time, and choose “repair my phone/tablet.” Here, agree to the warning that you will lose your data and click “Next” to proceed.

Step 3: Allow the program to download files to prepare for the update process and choose your Itel A60 model. Click “Next” and connect your Itel A60 to the PC. Ensure that the phone is turned off, and press and hold the “Volume Down” button when connecting the cable to the phone.

Step 4: Once correctly connected to the PC, the program will download the necessary software and upload it to your device. After completing the process, you can unplug the Itel A60 device and turn it on.

How to Remove Operator Lock on Itel A60 ?
An operator lock, also called a carrier lock, constitutes a limitation imposed on a mobile phone by a network provider. This measure is implemented to guarantee that the Itel A60 device exclusively functions with the services provided by that specific carrier. If you wish to remove the operator lock from your Itel A60 device, you’ll need to follow specific steps and meet certain criteria. Here’s how to remove the operator lock on a Itel A60 :
Step 1: Begin by checking whether your device can be unlocked or not from its network carrier restrictions. To do that, you need to dial the code “*#*#7378423#*#*” on your device, tap “Service Info” and select “SIM Lock.”

Step 2: Carefully check the information provided on the screen. If there is “X” before the “Network” option and the number in front of it is larger than 0, it means your device can be unlocked. If the number in front of “Network” is 0, your device can’t be unlocked as it is hard-locked.

Step 3: The next step involves getting your device’s IMEI number. To accomplish this task, simply input “*#06#” on your device. Once you have the IMEI number, use a reliable service from the internet to the unlocking code. Insert the SIM card of another network and provide the code you gained to unlock your Itel A60 device.

Bonus Tip: How to Unlock Bootloader?
Unlocking the bootloader on your Android device provides significant advantages. These actions encompass obtaining root access, installing custom ROMs, configuring custom recoveries, and carrying out advanced procedures. Here’s an essential guide on unlocking the bootloader of your Sony device while keeping all precautions in mind:
Step 1: To start with the process, verify the bootloader status for your Sony smartphone. On opening the “Dialer” app, dial the number “*#*#7378423#*#*“ and access the “Rooting Status” option within the “Service Provider” settings.
Step 2: If the bootloader status displays “Yes,” ensure that the Sony USB drivers and ADB tools are installed on your computer. Enable “USB Debugging” and “OEM Unlocking” on your smartphone and switch it off.
Step 3: Connect the Itel A60 smartphone with a USB cable and press the “Power + Volume Up” keys for a few seconds. Open the Windows computer and access the “Devices and Printers” directory. Right-click on the “fastboot driver” file, select “Update,” and select the location of the “android_winbus.inf” file. Verify the fastboot connectivity through the CMD command.
Step 4: Open the official “Sony Unlocking Site” and add in the IMEI number. On acknowledging, use the commands as follows: adb reboot bootloader
Unlock the bootloader with the following command: fastboot oem unlock 0x<insert your unlock code
Verify the bootloader is unlocked and use the command to reboot the system; if not done automatically: fastboot reboot
Conclusion
Forgetting your Itel A60 screen unlock password, PIN, or pattern is quite common. For such instances, there are several methods that you can use to unlock your screen, 5 of which we have discussed in this article.
If you’re looking for ways that are time-effective and reliable, you can use your Google account or other ways to unlock Itel A60 and set a new screen lock. However, with these methods, you can lose your data, so we only recommend using them if your device is backed up.
Rootjunky APK To Bypass Google FRP Lock For Itel A60
Factory Reset Protection (FRP) is a security feature built into Android devices running Android 5.1 Lollipop and later versions. It prevents someone from using your phone after a factory data reset without Google account login credentials. The FRP makes it much less attractive for thieves to steal Android phones, knowing they will need help to access them.
FRP automatically activates when you add a Google account to your Android phone. It links the Itel A60 device to your account, making it the “trusted owner.” Once activated, FRP becomes embedded in the phone’s system.
While Google FRP is a valuable security feature, it’s vital to acknowledge that there are legitimate situations where bypassing it might be necessary. These instances include forgotten Google account credentials, buying a second-hand device, and device issues. In these cases, tools like RootJunky can help you bypass FRP Lock. We’ll explore how to use RootJunky APK later, but first, let’s define what it is and its role in FRP bypass.
The RootJunky APK is a free Android application also called RootJunky SDL or RootJunky FRP Bypass tool. This app’s primary function is to bypass the Google Account FRP lock on Samsung devices. Rootjunky uses the weaknesses in Android’s setup process to create a new user account or switch existing ones, letting you bypass the FRP and regain control of your phone.
You can complete this process using the app by connecting your phone to a computer through an OTG cable. RootJunky can be helpfu l if you’ve forgotten your Google account password or bought a second-hand phone locked to someone else’s account. However, only use it if you have legitimate reasons to bypass FRP lock, like accessing your device after forgetting your Google account details.

Downloading the RootJunky FRP bypass tool from unofficial sources can introduce malware risks, so stick to trusted sources like the official website. Additionally, when exploring RootJunky, it is vital to keep the following in mind:
- Not all Android devices are susceptible to the methods used by RootJunky. It is necessary to check compatibility with your specific device model and Android version.
- Using FRP bypass tools like RootJunkycan potentially compromise the security of your device. Be cautious and proceed if you fully understand the risks involved.
- Bypassing FRP may involve data loss.
- Download RootJunky FRP bypass APK from a reliable source to minimize the risk of malware or viruses. You can check the APK file from official websites or trusted forums.
- Google constantly updates its security measures, so these tools may not always work effectively.
Part 2: How To Use RootJunky To Bypass Google FRP?
Here are the general steps to use the FRP Bypass APK RootJunky app to bypass Google FRP lock. But remember that specific steps may vary depending on your device and Android version:
- Step 1: On your computer, download the Rootjunky RealTerm program from the official Rootjunky website.

- Step 2: On your phone, download the Rootjunky APK (com.rootjunky.frpbypass-1.0.apk) file from the official website or other reputable sites.

- Step 3: Go to Settings > Security and tap Install unknown apps. Then, enable unknown sources to allow installation of apps from outside the Play Store. Connect your device to a Wi-Fi network.

- Step 4: On your Android phone, open a file explorer app and install the downloaded RootJunky APK file.
- Step 5: Connect your smartphone to your computer using a USB cable.
- Step 6: Launch the Rootjunky RealTerm program on your computer. Under the Display tab, check the Half Duplex option.
- Step 7: On your computer, go to Device Manager > Modems. Locate your device’s port name (e.g., COM3).
- Step 8: On the RealTerm program, enter the correct port number under the Ports tab, then click Change.

Step 9: Click Send to establish a connection. Enter the two commands:
at + creg? \ r \ n
atd1234; \ r \ n
Step 10: Once connected, the Rootjunky APK on your phone will provide on-screen instructions to bypass FRP.
Step 11: If prompted, perform a factory data reset of your device.
While RootJunky offers a free method for FRP bypass, it can be incompatible with your device’s brand, requiring technical knowledge, tedious, and potentially risky. If you are looking for a simpler, safer, and more user-friendly solution, Wondershare Dr.Fone might be a better fit for you. If you want to learn how to use this tool to bypass FRP lock with minimal technical expertise, then keep reading.
Part 3: Easier Tool Than RootJunky APK To Bypass Google FRP
Google FRP adds an extra layer of security after a device reset. However, regaining access to the smartphone can be challenging if you forget your Google account details, forget your lock screen, or just buy a used device. While methods like the FRP RootJunky app exist, using it can be complex or risky.
Consider exploring third-party options like Dr.Fone for a potentially easier and safer FRP bypass solution. Dr.Fone Screen Unlock tool helps remove the Android FRP lock without requiring a PIN or Google Account.
Why Use Dr.Fone - Screen Unlock?
Here are some of the key features of Dr.Fone - Screen Unlock:
- **User-friendly:**Fone boasts an intuitive interface, eliminating the need for technical expertise. Even beginners can navigate the process with ease.
- **Widespread Brand Compatibility:**Fone supports mainstream brands, such as Samsung, Xiaomi, Oppo, Redmi, Realme, and Vivo, catering to a broader user base.
- **Fast and Efficient:**Regain access to your device in minutes without wasting time on tedious procedures.
Step-by-step Guide to Removing FRP Lock With Dr.Fone - Screen Unlock
Ready to leave the hassle of using RootJunky and easily bypass the FRP lock? Download and install Dr.Fone on your computer, then follow these steps to learn how to bypass Google FRP on your device:
- Step 1: Launch Dr.Fone on your computer and connect it to your Android device. Choose Screen Unlock from the Toolbox in the main interface.
- Step 2: Choose Android as your device type. This will take you to the next screen, where you can select Remove Google FRP Lock to proceed.
- Step 3: Select your device’s brand from the list and click Start to continue.

Note:
The next steps may vary depending on the brand you selected.
- Step 4: Select the OS version of your device and click Start to continue.

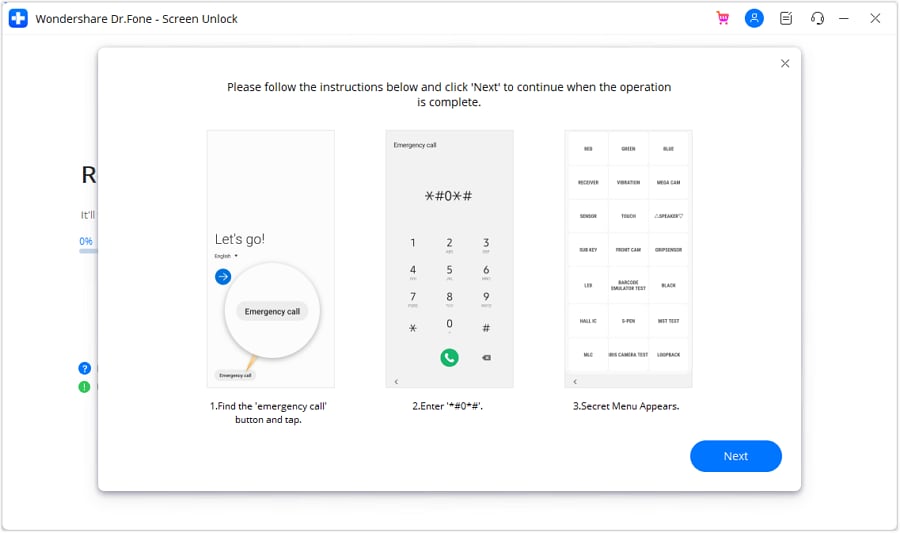
- Step 5: Access the secret menu on your phone using the on-screen instructions, then click Next to proceed to the next step.
- Step 6: When your Samsung prompts you to activate USB debugging, tap Allow. Then, on your computer screen, click Authorized to confirm.

- Step 7: You will see the FRP lock being bypassed on your Android device on the next screen.
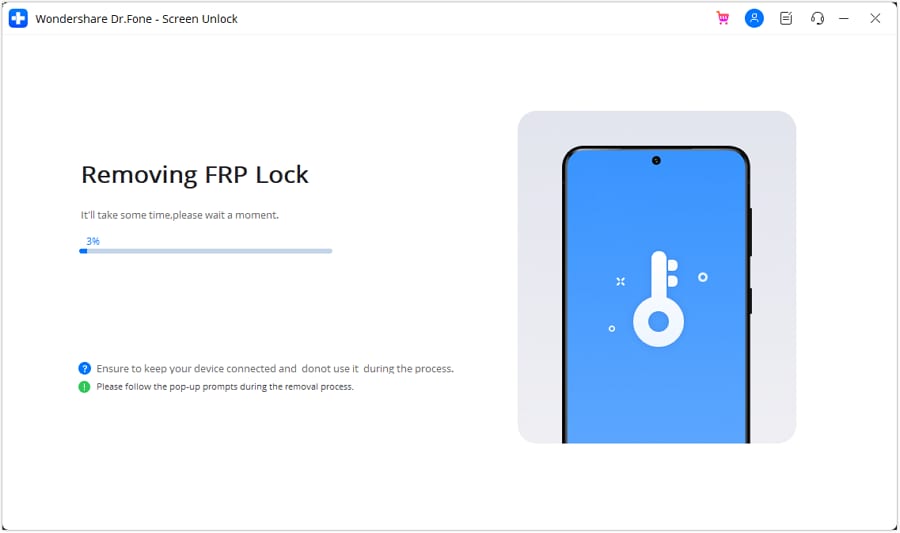
- Step 8: Click Done if the FRP lock removal was successful, otherwise, click Try Again to repeat the process.
That’s it! With Dr.Fone Screen Unlock, you can easily bypass Google FRP and regain access to your Android device, leaving the complexities of RootJunky behind.
Tips: Are you searching for a powerful FRP bypass tool? No worries as Dr.Fone is here to help you. Download it and start a seamless unlock experience!
Conclusion
Both RootJunky and Dr.Fone offer options for you to regain control of phones with Google FRP lock. FRP Bypass RootJunky tool excels with its free-to-use approach, perfect for tech-savvy users comfortable with APK installations. While requiring a paid subscription, Dr. Fone provides pre-rooted firmware installations and broader device compatibility, which is ideal for those seeking a more streamlined but supported experience.
The best choice boils down to your personal needs and budget. Remember, FRP bypass should only be utilized by rightful owners facing genuine lockouts. When used responsibly, these tools can help you access your phone after a factory reset even without your Google account credentials. Choose the tool that best fits your needs and proceed with caution. Use these tools responsibly and regain access to your device the right way.
How To Enable USB Debugging on a Locked Itel A60 Phone
Unlocking your Android’s potential goes beyond its surface features. Understanding USB debugging is key to troubleshooting and maximizing your device’s capabilities. In simple terms, USB debugging allows deeper access to your phone’s functionalities, aiding in software development and data recovery.
However, enabling USB debugging becomes crucial yet challenging when your phone is locked. This article delves into this necessity, explaining how to enable USB debugging on locked phones, especially for Android users. Unravel the mystery behind this essential feature, empowering yourself to navigate through locked phone scenarios effortlessly.
Part I. Challenges in Enabling USB Debugging on a Locked Android Phone
USB debugging is a nifty tool that lets you peek behind the scenes of your Android phone’s software. It’s like having a secret key that unlocks deeper access to your device, enabling tasks like software tweaking, app testing, and even data recovery.

Challenges in Enabling USB Debugging on a Locked Phone
Outlined below are some of the barriers, scenarios, and limitations, shedding light on the challenges that make USB debugging seemingly impossible.
- **Locked-out access.**When your phone is locked, gaining access to the settings becomes a roadblock to enabling USB debugging.
- **Limited functionality.**The phone’s locked state restricts the usual methods of accessing developer settings and USB debugging options.
- **Security measures.**For security reasons, most devices limit access to sensitive settings when the phone is locked, making it tricky to enable USB debugging.
Scenarios Requiring USB Debugging on a Locked Phone
Unlocking your phone’s potential becomes crucial in moments of crisis. Explore below some of the scenarios where enabling USB debugging on a locked Android device becomes your beacon of hope:
- **Data recovery.**Imagine accidentally locking yourself out of your phone with important data inside. Enabling USB debugging could be your ticket to retrieve that precious information.
- **Software troubleshooting.**Sometimes, a locked phone might need software fixes or troubleshooting that requires USB debugging to access certain tools.
- **Device testing.**For developers or tech-savvy users, testing new apps or debugging software issues often demands enabling USB debugging, even when the phone is locked.
Part II. How To Enable USB Debugging on Locked Phones
This section outlines the traditional method of enabling USB debugging on an Android phone. Stay tuned and check out the steps below:
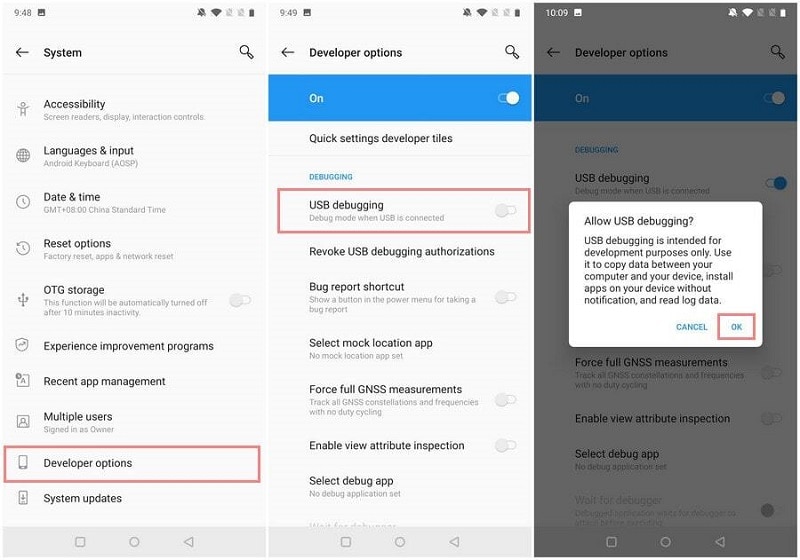
- Step 1: Unlock your device**.** If needed, enter your phone’s passcode or pattern to gain access to the Settings.
- Step 2: Go to Settings, scroll down to About Phone, and tap on Build number seven or eight times to unlock the Developer Options.

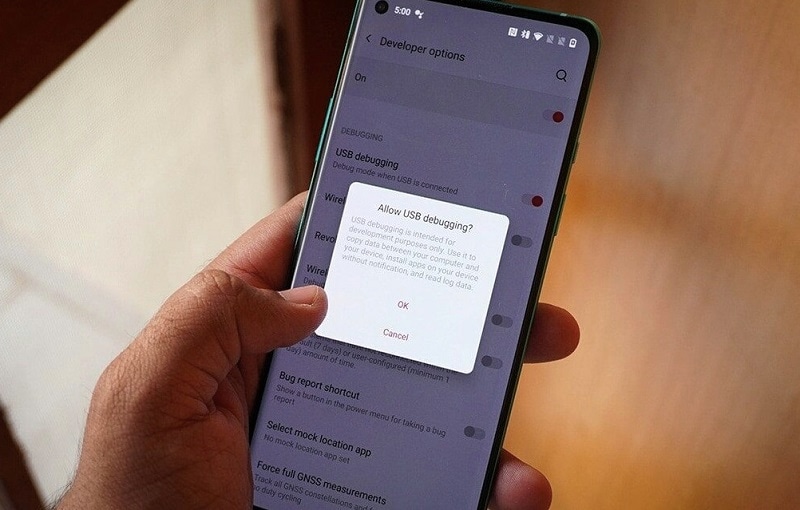
Step 3: Once unlocked, return to Settings, find Developer Options (usually at the bottom), and enter the menu. Enable USB Debugging by tapping OK once the Allow USB Debugging? message appears.
However, what if your phone remains locked, making these steps impossible? Such a case calls for an alternative solution. Fortunately, there is one tool that is fully reliable when it comes to unlocking locked mobile devices. Dr.Fone - Screen Unlock (Android) can help bypass these challenges and enable USB debugging on a locked Android phone effortlessly. So, buckle up as the next section unravels the secrets to unlock your device’s potential!
Part III. Seamlessly Unlock Your Android With a Professional Resolution
Enabling USB debugging on a locked phone can feel like navigating a maze with no clear exit. Sometimes, despite your best efforts, the traditional method fails to grant access. Fret not! There’s a smoother path that unlocks your phone and eases the USB debugging hurdle.

Why Unlocking First Makes Sense
Attempting to enable USB debugging on locked phones can hit roadblocks. That’s why unlocking your device first becomes a game-changer. Dr.Fone – Screen Unlock (Android) is the hero of this story, simplifying the process and ensuring a hassle-free experience.
Key Features and Benefits
Check out the amazing key features and benefits of Dr.Fone – Screen Unlock that fits Android devices:
- **Data safety and reliability.**Your data’s security remains paramount. With Dr.Fone – Screen Unlock, your device’s integrity and precious data stay safeguarded throughout the unlocking process.
- Dr.Fone - Screen Unlock is compatible with a wide range of Android devices, irrespective of brand or model, ensuring accessibility for various users.
- It’s not just about unlocking a locked screen; Dr.Fone offers multiple unlock modes tailored to different scenarios, whether a forgotten password, PIN, pattern, or fingerprint issue.
- **High success rate.**With a high success rate in unlocking locked screens, Dr.Fone - Screen Unlock provides a reliable solution, even for complex lock scenarios.
- **No data loss.**Users can rejoice in the fact that the unlocking process doesn’t compromise data integrity. Your photos, messages, and apps remain untouched and secure.
- **Ease of use.**The software is designed for simplicity, making the unlocking process accessible to users with varying levels of technical expertise.
Tips: Forget your device password and can’t get access to it? No worries as Dr.Fone is here to help you. Download it and start a seamless unlock experience!
Guide To Unlock Your Itel A60 With Dr.Fone – Screen Unlock (Android)
Below are the steps on how you can unlock your Android device using Dr.Fone:
Step 1: Get the most recent version of Wondershare Dr.Fone and connect your Android device to your computer via a USB cord. After connecting, access the unlock screen tool by going to the Toolbox and then selecting Screen Unlock.
Step 2: Once prompted, choose Android to unlock your Android screen lock. On the following screen, you’ll see two options; choose Unlock Android Screen.
- Step 3: After that, you’ll be taken to a new screen where you can choose the brand of your mobile device.
- Step 4: Once done, click the Remove without Data Loss button from the two options presented on the screen.

- Step 5: Unlocking the Android screen requires choosing the Brand, Device Name, and Device Model next. Enable the option that says I agree with the warning, and I am ready to proceed by clicking the corresponding checkbox. To proceed with unlocking the screen, click Next.

- Step 6: Type 000000 when asked to confirm the process. After entering the code, click Confirm to run the program.

- Step 7: Once you’ve recognized your Android device’s model, Dr. Fone will walk you through entering Download Mode. Following the on-screen prompts will take you directly to the next screen. It then depicts the progress of the screen unlocking procedure, in which the platform’s required drivers and configuration files are downloaded.

- Step 8: A new screen will appear, indicating the process has been completed. Click Done if your device’s screen unlock issue has been successfully fixed. If not, click the Try Again button.
Dr.Fone – Screen Unlock (Android) acts as your trusty guide, leading you through the maze of locked screens and inaccessible settings. It unlocks your phone first and enables USB debugging without the frustrating barriers.
Learn More About Android Unlock:
Samsung Unlock Codes to Unlock Samsung Phones [2024 Updated]
Unlocking Your Realme Phone Made Easy: No Data Loss!
The Best Android Unlock Software of 2024
Conclusion
In face of locked screens, USB debugging is a beacon of access and troubleshooting for your Android device. Remember, enabling USB debugging on a locked phone is crucial, opening doors to unforeseen solutions. However, what if you want to enable USB debugging on locked phones, but the process gets messy?
Then, it’s time to consider Dr.Fone - Screen Unlock (Android). It effortlessly paves the way to enable USB debugging on locked phones. By ensuring your device’s security and accessibility, even in locked states, Dr.Fone empowers you to navigate through obstacles, safeguarding your data while unlocking endless possibilities.
- Title: How to Unlock Itel A60 PIN Code/Pattern Lock/Password
- Author: Marry
- Created at : 2024-07-18 16:04:30
- Updated at : 2024-07-19 16:04:30
- Link: https://unlock-android.techidaily.com/how-to-unlock-itel-a60-pin-codepattern-lockpassword-by-drfone-android/
- License: This work is licensed under CC BY-NC-SA 4.0.