
How to Unlock Vivo Y36i Phone without Any Data Loss
How to Unlock Vivo Y36i Phone without Any Data Loss
In today’s digital age, our Android phones serve as the primary hub of our lives, holding a treasure trove of personal and professional data. Yet, the frustration of being locked out due to forgotten passwords or malfunctioning security features can be overwhelming, compounded by the fear of data loss during the recovery process. However, there’s a beacon of hope - a way to unlock your Android phone without any data loss. In this comprehensive guide, we will explore the latest techniques, tools, and methods to regain access to your Android device safely without a password, PIN, or fingerprint. Let’s dive into it now.
Part 1. How to Unlock Vivo Y36i Phone with Dr.Fone - Screen Unlock (Android)
If you or someone accidentally forgot or mistyped/misentered your lock password and caused it to lock permanently, of course, you will find ways to unlock it at first. But if you are not connected to the internet, or did not register a Google account for your device, your last resort would be to factory reset your device. That will totally wipe everything you have and save it on your device. If you want to unlock your lock screen without having to worry that your device data will be erased, Dr.Fone - Screen Unlock (Android) is your phone unlocking software .
 safe & secure
Note: This tool temporarily support unlocking part of Samsung and LG locked screen without losing data, but other Android phone will be wiped all data if you try to unlock the screen with Dr.Fone - Screen Unlock (Android).
Dr.Fone - Screen Unlock (Android)
Remove 4 Types of Android Screen Lock without Data Loss
- It can remove 4 screen lock types - pattern, PIN, password & fingerprints.
- Only remove the lock screen. No data loss at all.
- No tech knowledge asked. Everybody can handle it.
- Work for Samsung Galaxy S/Note/Tab series and LG G2/G3/G4.
4,464,578 people have downloaded it
Steps on How to Unlock an Android Phone with Dr.Fone - Screen Unlock (Android)
Step 1. Connect your Android phone to your PC with Dr.Fone installed, then run the program.
Step 2. Then, you should see the “Screen Unlock” tool, so proceed into it. After that, click “Android” > “Unlock Android Screen.”


Step 3. Then choose “Remove without Data loss” to unlock part Samsung/LG devices without data loss and find your device model.

Step 4. Follow the instructions on the program to get the Android phone into “Download Mode.”
- 1. Power off the phone.
- 2. Press and hold volume down + home button + power button at the same time.
- 3. Press the volume up to enter download mode.

Step 5. The loading process will take you a few minutes because it is going to verify first your device’s compatibility.
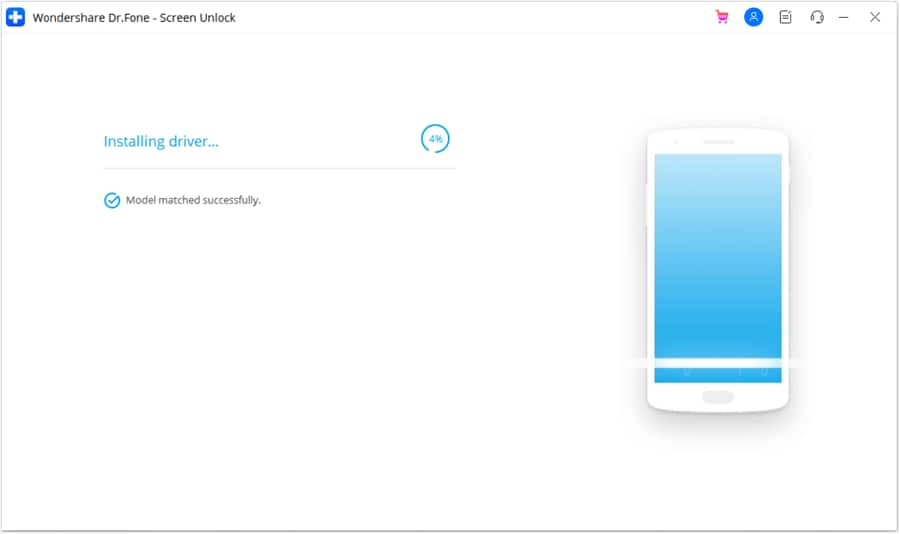
Step 6. Wait until everything is done. You should then see your device already has no lock screen.

That’s how to unlock an Android phone with just one click using Wondershare’s Dr.Fone. If your device is not Samsung or LG, you can use a more advanced mode to unlock your phone .

Part 2. How to Unlock Android Phone with Aroma File Manager (with Data Loss)/h2>
If you weren’t able to open your Wi-Fi or data connection or enable USB Debugging, this is the way for you to unlock your lock screen. This could be a bit complicated, but it should work.
Steps are provided below, and please follow the step-by-step guide carefully to avoid a boot loop or any other damage.
Step 1. Download Aroma File Manager on your PC. This is a tool that unlocks Android phones. Android users can use it for free.

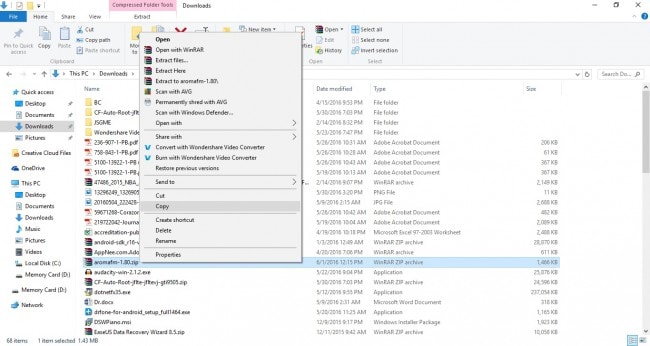
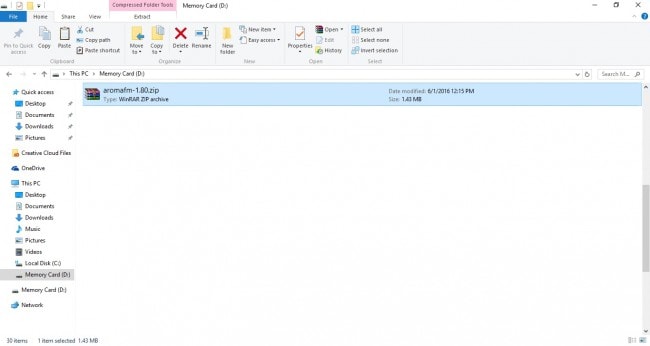
Step 2. Go to your Downloads folders and copy the downloaded zip file.
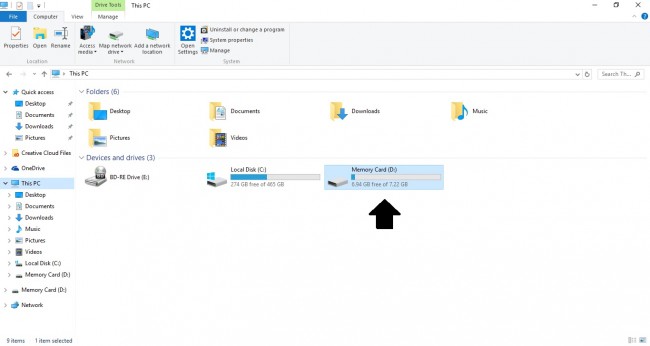
Step 3. Plug into your PC a memory card that you can insert into your phone later. Then, go to your list of connected devices and select the memory card.
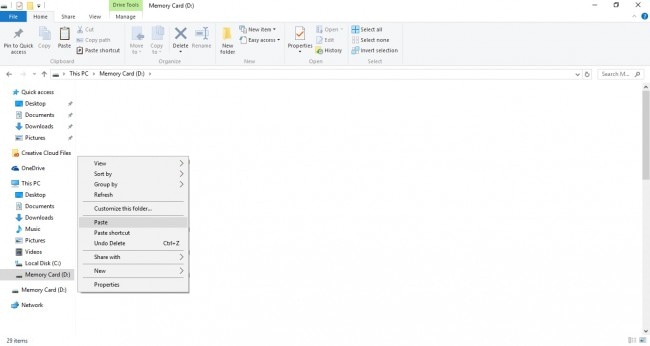
Step 4. Paste the copied Aroma zip file. Once copied, eject it from your PC, then insert it into your Android device.
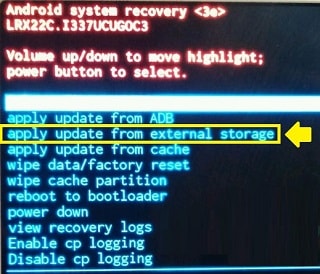
Step 5. Enter Recovery Mode for your device. Each Android device has its own ways of entering recovery mode, so take a look at this link and find your device.

Step 6. When you are already in Android Recovery Mode, use your volume keys to navigate to ‘’apply update from external storage’’, then select the zip file you copied a while ago. It will be flashed on your device.
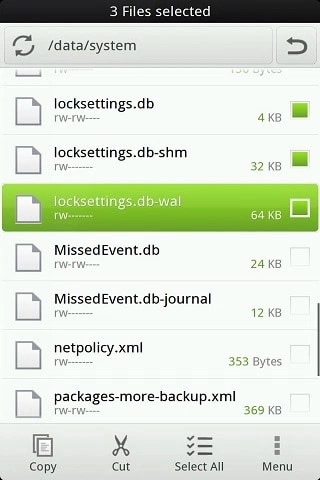
Step 7. After it, restart, and recovery mode will reopen as Aroma File Manager, so go to its settings and select ‘’Automount all devices on start’’, then restart. Back in Aroma File Manager, go to the directory data>system. Check if the ff. exist. If they do, delete them. Then restart again.
- gesture.key (pattern) / password.key (password)
- locksettings.db
- locksettings.db-shm
- locksettings.db-wal
- signature.key
- sparepassword.key
Now you have your device booted up, and your Android lock screen is still locked, just gesture in or enter anything. It will be unlocked. And that’s how to unlock an Android phone using your device.
Part 3. How to Unlock Android Phone Using Minimal ADB and Fastboot (with Data Loss)
If you weren’t able to connect to the Internet, but you, fortunately, enabled your USB Debugging option before your device was locked, the ARONSDB tool from the Android SDK package can help you unlock your Android phone.
Here is the step-by-step guide for you to follow
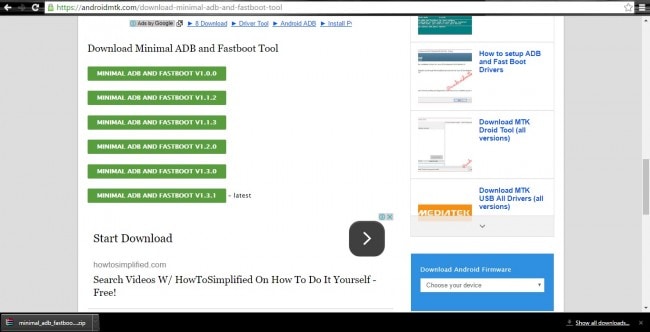
Step 1. Go to Minimal ADB and Fastboot download page.
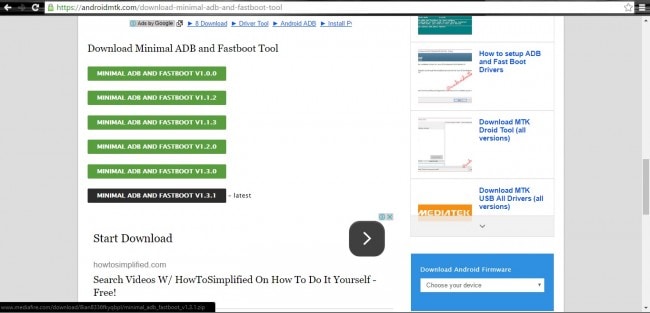
Step 2. Download the tool’s latest version.
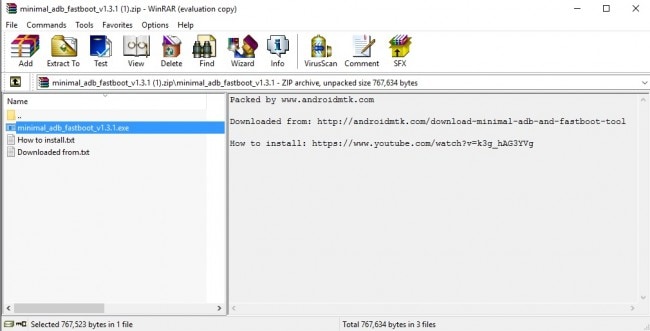
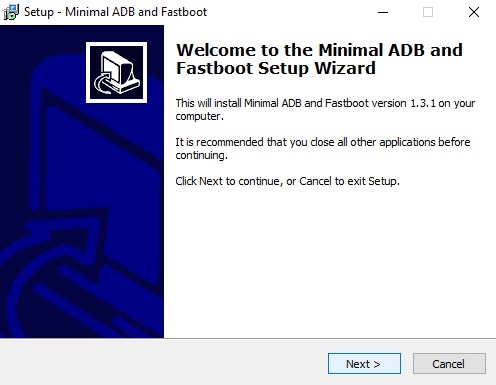
Step 3. Open the downloaded Minimal ADB and Fastbootzip file and install it.
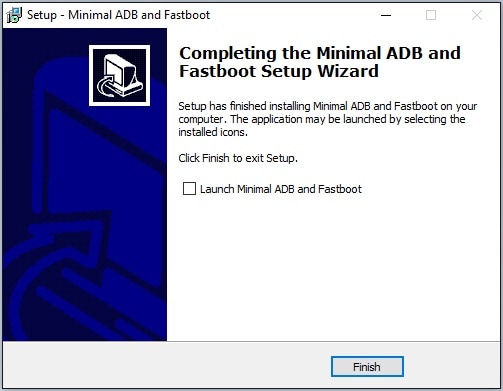
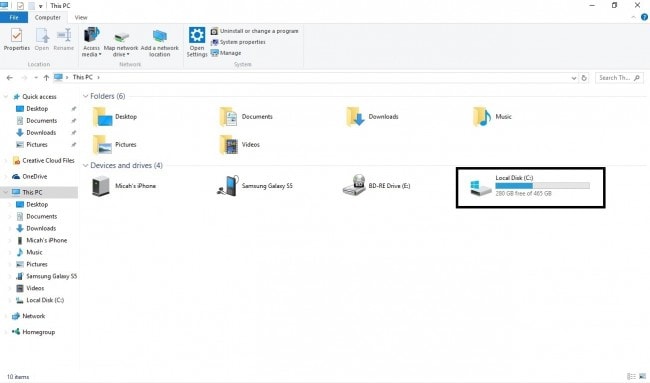
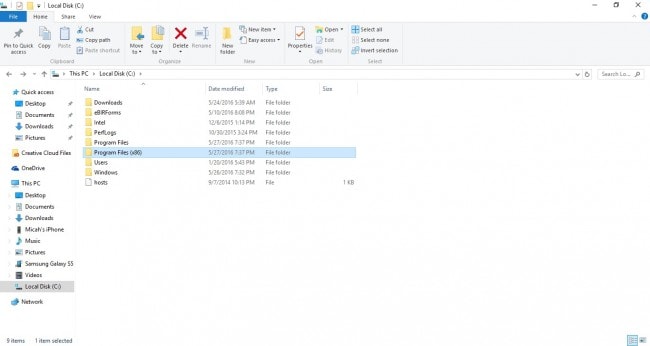
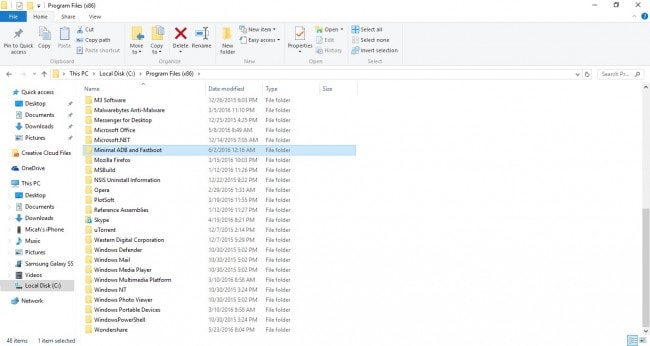
Step 4. Make sure your device is connected, then go to the Minimal ADB and Fastboot installation directory.
This PC [Win 8& 10] or My computer [Windows 7 & below]> Local Disk (C:) [primary drive]> Program Files [for 32-bit] or Program Files (x86) [for 64-bit] > Minimal ADB and Fasboot.
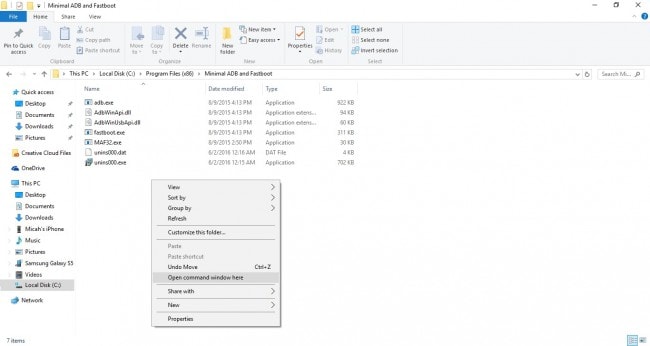
Step 5. Inside the folder, hold the Shift key on your keyboard, then right-click your mouse. An additional “Open command window here” will appear so select that.
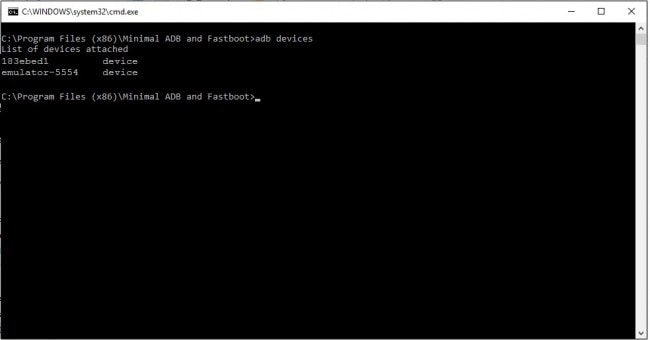
Step 6. ADB terminal will pop out. Now, the first is to type in ADB devices. This is to check if your device is recognized by ADB. If there is no device listed below, try to remove and reconnect your Vivo Y36i and retype the command. If there are listed devices already, proceed.
Step 7. Finally, type in the following commands one by one. These commands will remove your lock screen.
- adb shell
- cd /data/data/com.android.providers.settings/databases
- sqlite3 settings.db
- update system set value=0 where
- name=’lock_pattern_autolock’;
- update system set value=0 where
- name=’lockscreen.lockedoutpermanently’;
- .quit

This would work if you have your USB debugging turned on before it was locked. That’s how to unlock Android using ADB.
Part 4: How to Unlock Phone via Find My Device (with Data Loss)
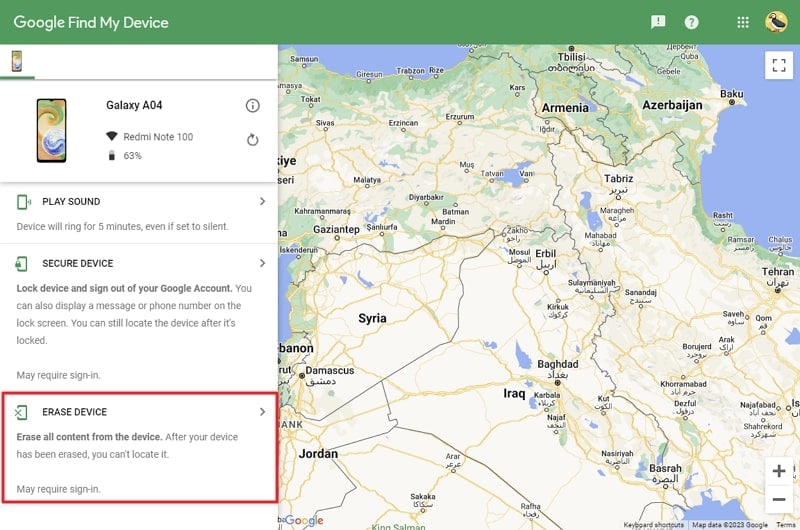
Google Find My Device is another handy way to unlock your locked Android device. However, it requires you to have your Google ID credentials and you have previously enabled Find My Device features. Moreover, it will erase all the data on your device. Use the following steps to unlock your Android phone via Find My Device:
Step 1: Open a web browser on a computer or another device and visit the Find My Device website. Now, sign in with the Google account that is linked to the locked Android device.
Step 2: After signing in, you will see a list of devices associated with your Google account on the left side of the screen. Select the locked Android device from the list and choose the “Erase Device” option from the menu on the left-hand side.
Step 3: You will now be asked to confirm your identity through a Google account password or using a pass-key. Afterward, follow the on-screen instructions to erase and unlock your Android device.
Part 5: How to Unlock Android Phone without Losing Data in Safe Mode
One way to unlock your Android phone without losing the data is by utilizing Safe Mode. This method works only if the screen lock you have been using is a third-party app. Since Safe Mode disables third-party apps, you can easily use it to uninstall the problematic app. Here is how to unlock an Android phone without losing data:
Step 1: On your Android device, press and hold “Power” and “Volume Down” keys together for 3 seconds. After the Power menu becomes visible, press and hold the “Power off” option.
Step 2: After a while, you will see the “Safe Mode” option on your screen with some basic instructions. Now, you can use the button to boot into Safe Mode and remove the screen lock application.

Part 6. How to Unlock Android Phone without Any Data Loss Using Google Account (Android 4.4 or lower)
If luckily, you left your Wi-Fi open and luckily connected to the internet, this is the easiest way to unlock your Android phone.
The step-by-step guide for you to refer
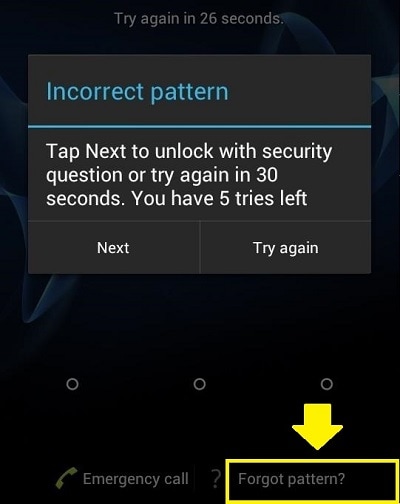
Step 1: Retry the incorrect password or pattern until the ‘’Forgotten Password/Pattern’’ appears below. Then select that.
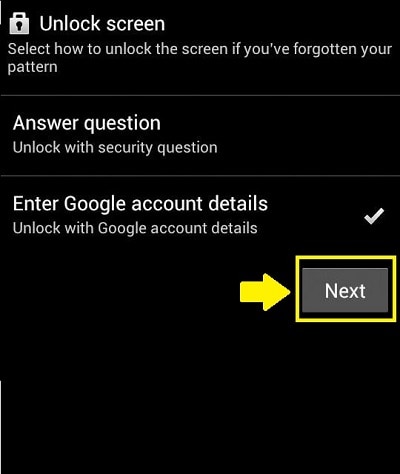
Step 2: Check ‘’Enter your Google Account details’’ then tap next.
Step 3: Input your Google Account details, username, and password. You are done.
You will be given the option to input a new password or pattern right after you enter your Google account details. But if not, Google must have emailed you your temporary password or pattern that you will input to unlock your lock screen.

How to Bypass Android Lock Screen Using Emergency Call On Vivo Y36i?
The main reason why we keep our smartphone locked is to prevent children (or stalkers) checking out our private photos or messages. You don’t want anyone to access your pictures, emails, or other important data. What if you forget your pattern or PIN and cannot access your phone? Or someone changes lock screen pattern to leave you annoyed?
To avoid such types of conditions, we have tried and tested the following methods to bypass the Vivo lock screen pattern, PIN, password, and fingerprint.
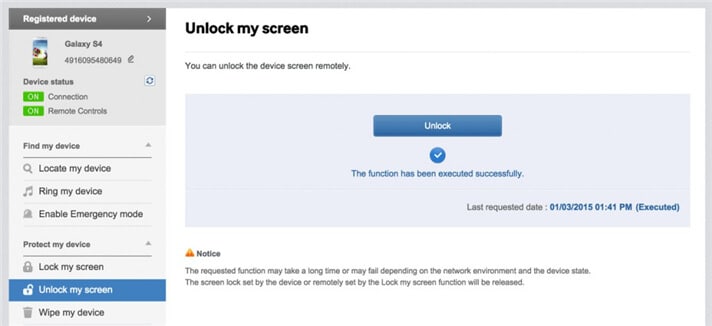
Method 1. Use ‘Find My Mobile’ feature on Vivo Phone
All Vivo devices come with the “Find My Mobile” feature. To bypass the Vivo lock screen pattern, PIN, password, and fingerprint, you can just follow the below steps to get it done.
- Step 1. First, set up your Vivo account and log in.
- Step 2. Click the “Lock My Screen” button.
- Step 3. Enter a new PIN in the first field
- Step 4. Click the “Lock” button at the bottom
- Step 5. Within a few minutes, it will change the lock screen password to the PIN so that you can unlock your device.

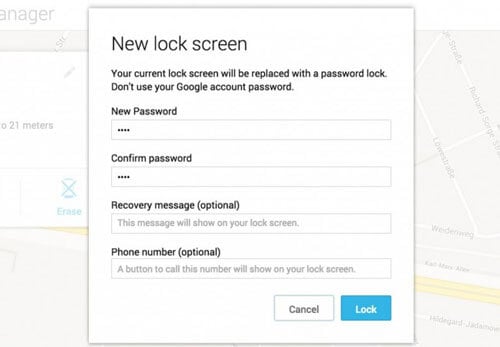
Method 2. Use Android Device Manager to Bypass Vivo Password
To know how to unlock a Vivo phone lock password with Android device manager, make sure the Android Device Manager is enabled on your device.
- Step 1. Visit google.com/android/devicemanager on other smartphones or PC.
- Step 2. Log into your Google account that you used on your locked device.
- Step 3. Choose the Vivo Y36i device you want to unlock in ADM interface
- Step 4. Click on the “Lock” option.
- Step 5. Enter a password. There is no need to enter any recovery message. Select “Lock” again.
- Step 6. You would see a confirmation below if it is successful, with “Ring, Lock and Erase” buttons.
- Step 7. Now you must get the password field on your phone where you can enter your new password, and your phone will be unlocked.
- Step 8. Go to lock screen settings on your device and disable the temporary password.
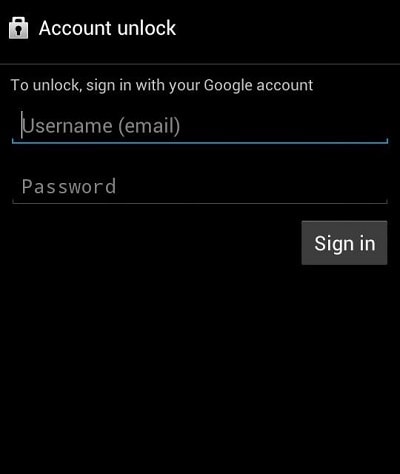
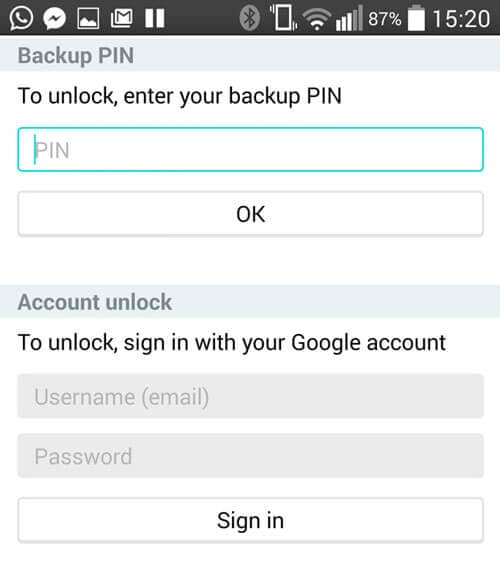
Method 3. Google Login (Supports Only Android 4.4 or Lower)
If your device is still running on Android 4.4 or lower, here’s how to bypass the Vivo lock screen fast.
- Step 1. Enter the wrong pattern for five times
- Step 2. Choose “Forgot Pattern”
- Step 3. Enter your Google account login or backup PIN
- Step 4. Now your phone would be unlocked.
Method 4. ‘Pattern Password Disable’ and Custom Recovery (SD Card needed)
To bypass the Vivo lock screen in this method, you ought to be an advanced user who knows what are “custom recovery” and “rooting”. You have to install any kind of customer recovery, and you should have an SD card on your phone. SD card is required to move a ZIP file to the phone, and it is the only way to transfer the file when the Vivo Y36i device is locked.
- Step 1. Download a zip file named “Pattern Password Disable” on your computer and move it to the SD card of your Vivo device.
- Step 2. Insert the card on your device
- Step 3. Restart your device into recovery mode.
- Step 4. Flash the file on your card and restart the phone.
- Step 5. Now your phone would boot up without lock screen. Don’t worry if you had a gesture lock or password. All you need to do is to input a random gesture or password, and it will be unlocked.
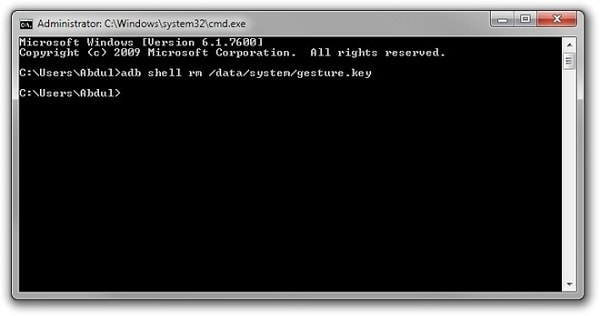
Method 5. Delete the Password File Using ADB
It is yet another option that will work only when you have enabled USB Debugging previously on your device, and your PC is allowed to connect via ADB. If you meet such requirements, it is ideal to use this method to unlock the Vivo lock screen.
- Step 1. Connect your device to the PC using USB cable and open command prompt in the adb directory. Type the command “adb shell rm /data/system/gesture.key” and then press “Enter”.
- Step 2. Restart your phone, and a secure lock screen must be gone, and you can access your device. Be sure to set a new PIN, pattern, or password before rebooting again.
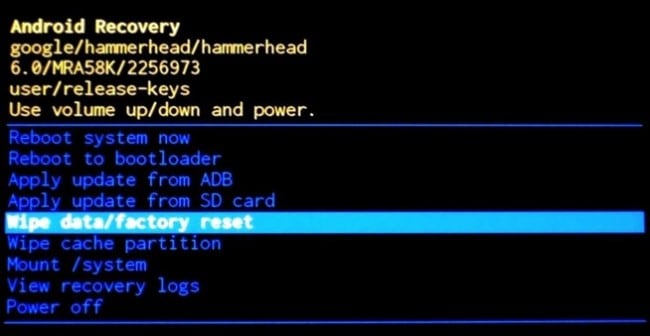
Method 6. Factory Reset to Bypass Vivo Lock Screen
A factory reset is the best option in almost any case if one of these solutions couldn’t work. According to your device type, the process may vary. In most devices, you have to turn off the Vivo Y36i device completely to start the process. But this method will delete all the precious data on the Vivo Y36i device after the factory reset.
- Step 1. Hold the power button and volume down at the same time. It will open the Bootloader menu.
- Step 2. Press the volume down button two times to choose “Recovery Mode” and select it by pressing the “Power” button.
- Step 3. Hold down the power button and tap “Volume Up” once, and you would enter “recovery” mode.
- Step 4. Choose “Wipe Data/Factory Reset” option by using volume buttons.
- Step 5. Select it by pressing the Power button.
- Step 6. Select “Reboot System Now” once the process is done.
Backup your Vivo phone regularly in case of any data loss in the future.
Parental Control Software
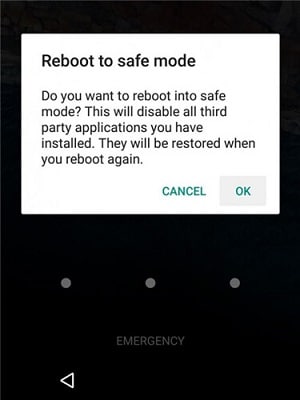
## Method 7. Boot into Safe ModeChances may be that you are using a third-party lock screen app. Then lucky for you, this way works best to bypass the Vivo lock screen. Specifically, you can boot your Vivo device into Android Safe Mode .
- Step 1. Open up the Power menu from the lock screen and press and hold the “Power Off” option.
- Step 2. It will ask if you want to boot in safe mode. Tap “OK”
- Step 3. Once the process finishes, it will temporarily disable the lock screen activated by the third-party app.
- Step 4. Uninstall the third-party lock screen or just reset the data.
- Step 5. Reboot your device and get out of safe mode.
- Step 6. Now the irritating lock screen app is removed completely.
Method 8. Other Methods
- Step 1. Take your friend’s phone to call on your locked phone.
- Step 2. Accept the call and press the back button without disconnecting.
- Step 3. Now you can access the Vivo Y36i device completely
- Step 4. Go to the security settings of the Vivo Y36i device and remove the pattern or pin.
- Step 5. It will ask you the correct pin that you don’t know, guess, and try various combinations you can recall.
To avoid forgetting your password or PIN next time, be sure to write the pattern or numbers on a text file or paper to keep them safe. If you have to bypass the Vivo lock screen pattern, PIN, password, and fingerprint, you may consider using Dr.Fone - Screen Unlock (Android). It is a professional tool that can remove all the fingerprints, pattern, and password lock screens without losing any data on your phone.
How to Reset Gmail Password on Vivo Y36i Devices
Nowadays, along with Windows or Apple devices, Android devices are starting to take its place as one of the most popular, reliable, and efficient technical equipment brands. As a result, the use of Android as an operating system for both PC and portable tools is becoming an extremely hot trend.
Android devices pride themselves on providing their customers with the best features possible. Not only do they support offline features, but Android devices are also capable of offering users with several services online. One of them is the ability to make use of Gmail - a very famous email site nowadays.
Gmail being used directly by an Android tool is a great advantage, but it still contains some small drawbacks that users may have to go through. According to a recent survey, the majority of Android users were likely to wonder if they were able to reset Gmail password on Android devices.
Luckily for you, this performance is possible. In this article, a very informative and detailed description will be delivered to you to help you solve the problem of resetting your Gmail password.
Part 1: Reset Gmail Password When you Forget it
There will be times when you come into the situation of not knowing what your Gmail password is, or you just simply forget it. You want to change your password but you don’t have access to a computer or laptop to perform this task. Now with the help of Android, you can do it through your own Android devices.
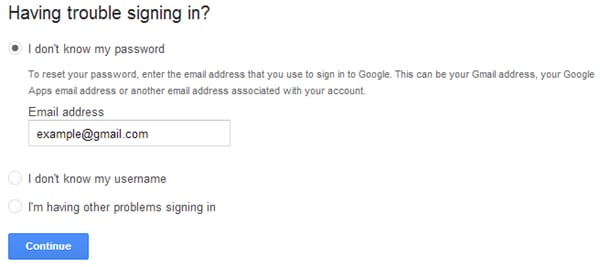
Step 1: Visit the Gmail login page from your Android device. Click on the Need helpline, which is highlighted in blue.

Step 2: After that, you will be moved to the Google Account Recovery page. There will be 3 main options which indicate 3 frequent problems. Select the first one, which is entitled “I don’t know my password”. Once you have chosen it, you will be required to fill in your Gmail address in the bar provided. Click on the Continue button as long as you have made sure to finish all these tasks.

Step 3: In this step, you may be asked to fill in a CAPCHA form. Just simply do it and move to the next page. There you had better type in the last password that you are still able to recall if possible, then click on the Continue button to move. Or else, you can skip this step by clicking on I don’t know button.

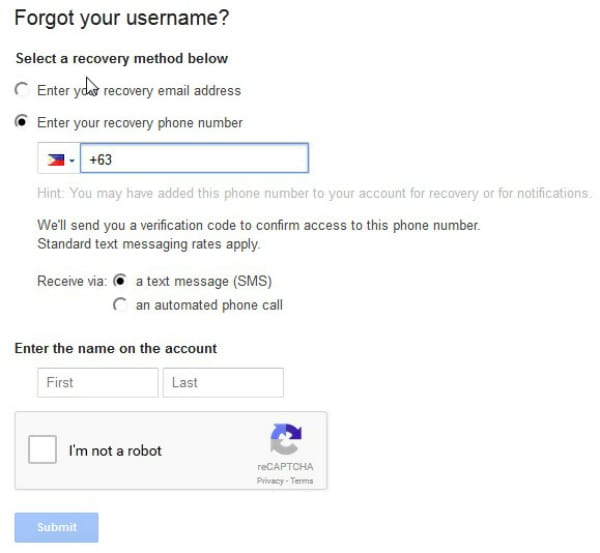
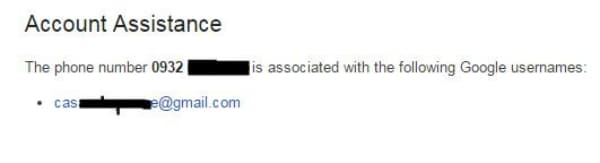
Step 4: Finally, you will be shown a list of options on how to reset your Gmail password on Android devices. You can either use your alternative email address or your phone number to receive a verification code. Bear in mind to fill in any required information and put a check in the CAPCHA box to submit the process.
Step 5: In this step, a blank bar will appear and it will demand you to type in your verification code. Just do it carefully to make sure there is no error. Once you have done it, a new screen will appear to tell you.

Step 6: After you have done all the previous steps, you will know how to reset your Gmail password directly from your Android device.
Part 2: Change Gmail Password When You Still Know it
Besides not knowing your password, there are still circumstances when you wish to change your current password for various reasons. Just simply follow these steps.
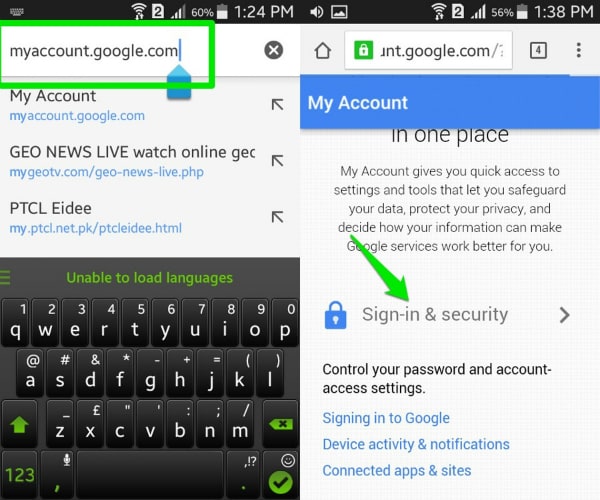
Step 1: Make sure your Android device is connected with the Internet. Then get access to the link myaccount.google.com. After logging into your account (or maybe you have already done this), scroll down, find the Sign-in and security option and choose it.
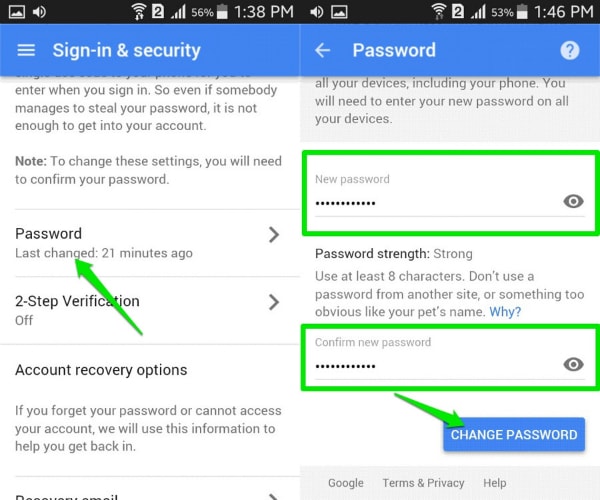
Step 2: Find the Password option in the list. Tap on it to be moved to another screen. In the menu, type in your new password that you wish to exchange, confirm it and then click on the Change password button.
Part 3: Bonus Tips
Gmail is undoubtedly a marvelous tool to use on Android devices, but have you really understood all the tips and tricks to take the best advantage of it? Below are the 5 most helpful tips that we want to offer you.
- Far from your imagination, Gmail on Android devices is capable of allowing you to make use of several accounts at the same time, even if it’s not a Gmail account. This performance not only helps you to organize your work better, but it also increase the efficiency of your job. Just simply log in your Gmail account on Gmail app, click on the down arrow which is placed next to your avatar and name, then choose Add account. You will be moved to another page, choose Personal (IMAP/POP) choice and follow the detailed guide on the screen.
- If your Android device is used by only one user, and you are guaranteed about the security of it, try to keep the Gmail logged in. It would help you to avoid wasting unnecessary time to sign in your account every time you need, not to mention that it prevent you from being confused of not knowing your account/password.
- You are capable of sorting your mails with a certain level of accuracy once you are fully aware of the features of Gmail app on Android devices. Just click on the email, then choose Settings menu and mark it as “Mark as not important”, “Mark important” or “Report to spam” owing to the priority of your email.
- Gmail app provided you with the ability to have conversations online, and whenever a message comes, there will be a sound. In case you are in a vital conference, or you don’t want to be disturbed by the noise, you can mute it. All you have to do is to tap into the conversation, choose the three dots icon then click on the Mute option in the menu.
- Enhance the speed and the accuracy of your search with the use of certain phrases. Let’s take an instance to see what Gmail can do for you in this case. If you want to search for the mails which have been sent by a certain person, typefrom:(name of the person on Gmail) in the searching bar. And in case you would love to look for a private message from that person, please type is:chat:(name of the person on Gmail) .
Part 4: Video on How to Reset Gmail Password on Android Devices
- Title: How to Unlock Vivo Y36i Phone without Any Data Loss
- Author: Marry
- Created at : 2024-07-18 12:31:29
- Updated at : 2024-07-19 12:31:29
- Link: https://unlock-android.techidaily.com/how-to-unlock-vivo-y36i-phone-without-any-data-loss-by-drfone-android/
- License: This work is licensed under CC BY-NC-SA 4.0.