
In 2024, A Perfect Guide To Remove or Disable Google Smart Lock On Vivo Y100i
A Perfect Guide To Remove or Disable Google Smart Lock On Vivo Y100i
Google services are pivotal in enhancing user experience and securing personal data. Among these services, Google Smart Lock stands out for its ingenious features. These are integrated into Android devices, simplifying access and bolstering security. However, there are instances where users seek to disable or remove Google Smart Lock.
This article goes through the details of Google Smart Lock and its significance. It offers a solution to address unexpected screen lock scenarios on Android devices.

Part 1. Understanding Google Smart Lock and How It Works?
Want to know what is Google Smart Lock? Google Smart Lock serves as a multi-purpose tool within the Google ecosystem. It is designed to streamline security measures and password management access across platforms. At its core, Google Smart Lock operates as a feature that manages passwords. Google Smart Lock aims to enhance authentication processes. Primarily, it operates across Android devices and computers.
It offers a unified approach to security, ensuring you don’t have to remember all the passwords. Google Smart Lock securely stores and manages passwords for websites and apps. It enables users to access these services without repeatedly entering login details. When you visit a familiar website or app, Google Smart Lock fills in the login credentials. It automatically provides the login ID and password, maintaining effortless access.
Part 2. Recognizing Some Top Features of Google Smart Lock
Google Smart Lock’s password management has revolutionized how users handle and secure their login credentials. It remains a cornerstone when handling Android devices and computer systems. The following are several notable features that significantly enhance user convenience and security:
1. Password Autofill
Google Smart Lock simplifies the login process across apps and websites. It does that by automatically filling in saved credentials. This eliminates the need for users to remember and manually input passwords.

2. Cross-Platform Synchronization
It synchronizes saved passwords across multiple devices using the same Google account. This ensures smooth access to credentials on Android devices and computers.
3. Secure Storage
Passwords stored within Google Smart Lock are encrypted and securely stored in the user’s Google account. This maintains confidentiality and safeguards sensitive login information.
4. Effortless Password Generation
It allows the creation of strong and unique passwords when signing up for new accounts. That enhances overall account security and allows users to have strong passwords.
These features significantly ease the burden of password management and enhance user security. Yet, Google Smart Lock does have limitations that prompt some users to consider removing it.
Part 3. Why Is It Essential To Remove Google Smart Lock?
Despite its array of benefits, there are times when users consider removing or disabling Google Smart Lock. Described below are these limitations to better grasp why users might choose to Google Smart Lock turn off:
1. Privacy Concerns
Some users focus on privacy and feel uncomfortable with Google Smart Lock’s access to their passwords. The reason behind this is how easily anyone can access the saved password. All they need to do is access “Manage Passwords” in Google Chrome, and all their passwords will be open. This leads them to opt for more private password management options.
2. Glitches and Technical Issues
Technical glitches in the functioning of Google Smart Lock can be frustrating. This is especially prominent when managing passwords with similar usernames across different websites. The same can happen when using similar passwords for different websites or apps. Users experiencing such issues can seek to remove it to restore regular operations.
### 3\. No UpdatesYou should be aware that Google Smart Lock for Passwords has been deprecated. This indicates it no longer receives updates or support from Google. Developers are advised to opt for Google’s One Tap Sign-in feature as an alternative by Google. It provides a more efficient and secure method for signing in to apps and websites.
4. Preference for Third-Party Tools
Certain users might have a preference for specialized third-party password management tools. They can go for solutions that offer a wider array of features. Many users might want to find options better aligned with their specific needs. This prompts them to disable Google Smart Lock.
Part 4. Understanding Some Effective Ways To Disable or Remove Google Smart Lock
If you want to disable Google Smart Lock on your devices, it is a relatively easy thing to do. Several ways are available to disable or remove Google Smart Lock from devices. These approaches cater to users’ diverse needs and preferences. Here is how to turn off Google Smart Lock:
Way 1. Disabling Google Smart Lock on Your Android
To deactivate Google Smart Lock on your Android device, you can use Chrome. Google Chrome is the main hub for storing all your login credentials for websites and apps. This provides the quickest way to disable Google Smart Lock. To disable Google Smart Lock from the Chrome app on your Android device, follow these steps:
- Step 1. Begin by opening the Google Chrome app on your Android device. Then, tap the “three dots” icon from the top right corner and press “Settings.”

- Step 2. Within the Settings, choose “Passwords,” and on the following screen, look for the “Save passwords” and “Auto Sign-in” options. Toggle off both options to disable the Google Smart Lock feature from your Android.


Way 2. Removing Google Smart Lock From Android Settings
Google Smart Lock enables users to keep their phones unlocked under specific, pre-approved, and secure conditions. This simplifies device usage by eliminating the need to input passwords or security codes. The basic working of this aspect of Google Smart Lock, now known as “Extend Unlock,” is divided into three parts.
The first one is on-body detection, which keeps the Vivo Y100i device unlocked when it’s carried or held by the user. The other two are “Trusted Places” and “Trusted Devices.” Users can set specific locations, like home or work, as “Trusted Places.” When the Vivo Y100i device is within these locations, it remains unlocked and accessible. Smart Lock integrates biometric authentication methods to unlock devices.
As helpful as it is in managing access to your Android device, privacy concerns can cause users to disable this lock. The following are the steps you can take to disable Google Smart Lock/Extend Unlock via Android settings:
- Step 1. Access “Settings” on your Android device and scroll down to tap “Passwords & security.” Here, press the option labeled as “Privacy.”
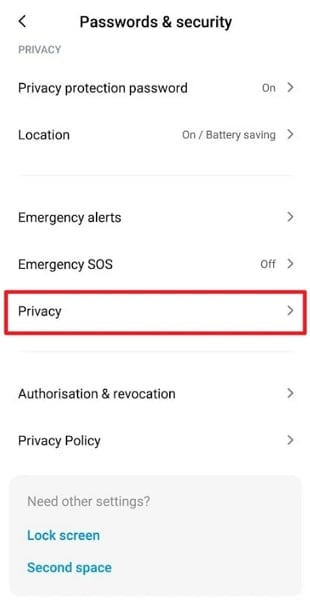
- Step 2. On the following screen, head to the “Trust agents” option and toggle off the “Smart Lock (Google)” option to disable the feature on your device.

Way 3. Disabling Google Smart Lock From Chrome
While you can manage this feature on Android devices, it is also available on Google Chrome on your computer. To disable Google Smart Lock from Google Chrome on your computer or laptop, you can follow these steps:
- Step 1. On your computer, access Google Chrome and click the “three dots” near the top right corner. From the context menu, choose “Settings” and tap “Autofill and passwords” from the left side.

- Step 2. Now, click “Google Password Manager” on the ensuing window, and choose “Settings” from the left side. Toggle off “Offer to save passwords” and “Sign in automatically” to disable Google Smart Lock.

Part 5. Forgot Google Smart Lock From Android Device? Recover Using Wondershare Dr.Fone
Disabling the Google Smart Lock can have a side effect, which is the danger of forgetting an important password. One of these important passwords is the screen lock on your Android device. These scenarios could involve forgetting the Vivo Y100i device’s PIN, pattern, or password. This could be essential for unlocking the phone or accessing its functionalities. It can lead to being locked out of the Vivo Y100i device, hindering normal operations.
In such instances, regaining access becomes crucial. Wondershare Dr.Fone offers a robust solution in these cases. This software specializes in unlocking Android devices when users forget their device passcodes. It offers a swift solution to eliminate Android lock screens within 5 minutes. If you own a Samsung or LG device, you can unlock it without data loss.
Notable Features of Wondershare Dr.Fone
- This tool bypasses the Android FRP lock without necessitating a PIN or Google account.
- It broadens its ability to unlock well-known Android brands like Samsung, Huawei, and LG.
- Additionally, its intuitive interface guarantees that no technical know-how is required.

Step-by-Step Guide To Unlock Android Smartphone via Wondershare Dr.Fone
Dr.Fone makes the process of unlocking an Android device a breeze. Here’s a step-by-step guide to recover an Android device using Wondershare Dr.Fone:
- Step 1. Unlocking an Android Device Using Wondershare Dr.Fone
To begin, install the most recent edition of Wondershare Dr.Fone and connect your Android device using a USB cable. Access the “Toolbox” menu and locate the “Screen Unlock” tool upon successful connection. Once opened, choose the “Android” option when prompted. Next, select “Unlock Android Screen” from the available options.

- Step 2. Device Brand Selection and Screen Unlock Initiation
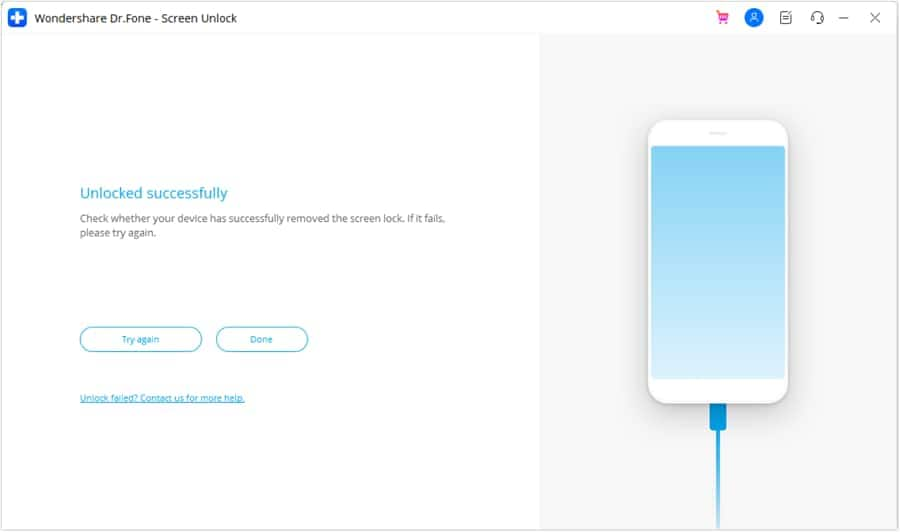
Select your device brand and “100% Remove Screen Lock.” Selecting the Vivo Y100i device brand initiates access to the designated mode. It will trigger Dr.Fone to commence unlocking the Android screen. Note that entering specific modes varies depending on the Vivo Y100i device brand. Upon successfully unlocking your Android device screen, tap “Done.”
Tips: Forget your device password and can’t get access to it? No worries as Dr.Fone is here to help you. Download it and start a seamless unlock experience!
Conclusion
This comprehensive guide describes the significance of Google Smart Lock. It explains its features and various methods to disable it from Android devices and Chrome. Exploring scenarios of forgotten passcodes highlighted the critical need for a reliable solution. Wondershare Dr.Fone emerges as a savior in such situations. It offers a secure means to regain access when locked out of your device.
Delete Gmail Account With/Without Password On Vivo Y100i
Email accounts have proven their worth in digital devices beyond sending emails. Lately, Android devices have only operated with a Gmail account. This is because most of the data, such as contact information, messages, and other details, are saved across the storage space offered with the email. Against all recognizable uses of Gmail accounts, users look for ways how to delete Gmail accounts.
To this day, it is known that Gmail accounts can be removed with or without a password. However, one should know that if they consider deleting their Gmail account, they won’t be able to send or receive emails. With that, let’s proceed to reveal all essential methods that can be used to delete a Gmail account permanently. This article will also focus on a perfect tool that assists in making the process easier.
Part 1. Synopsis: Things To Know Before Deleting Gmail Account
Although the process of deleting a Gmail account sounds basic, there are many pointers connected to it. For that, this part is putting up a discussion on the important things that a user should know before they delete their Gmail account permanently:
- No Going Back: If you delete a Gmail account, the process is irreversible. All details and information will be lost, and the email won’t be trackable ever again.
- Cannot Reset Passwords if Connected: If the Gmail account is connected to any other service, make sure that you remember their passwords. Since the account will be deleted, you cannot reset their passwords.
- Access to Other Services: Although you are deleting your Gmail account, you can still access Google Photos, Google Drive, and other services.
- Lookout For Emails: Ensure that the emails in your account are saved. You can easily download them anywhere before deleting the Gmail account.
Part 2. Delete Your Gmail Account Using Your Password: Desktop Solution
For the first method, we will discuss how to delete a Google account with your password. You will use your computer for this process and access the Google Account services. The service helps you save all your essential Gmail data before you remove it. To understand how it makes it possible, look through the steps provided below:
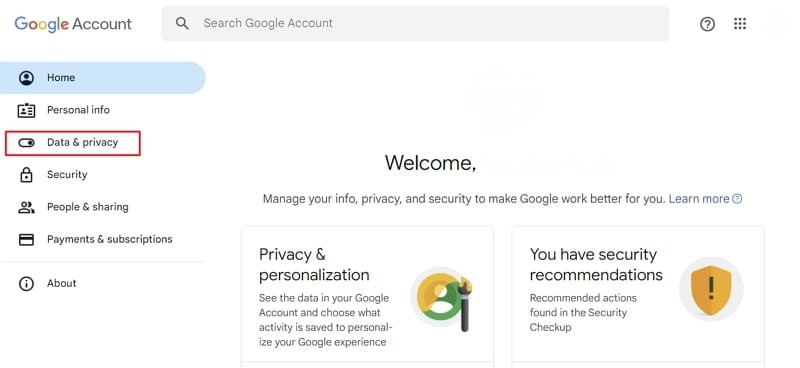
- Step 1. Access the website https://myaccount.google.com/ on your desktop browser and log in with your credentials. Proceed to the “Data & privacy” section from the left panel.
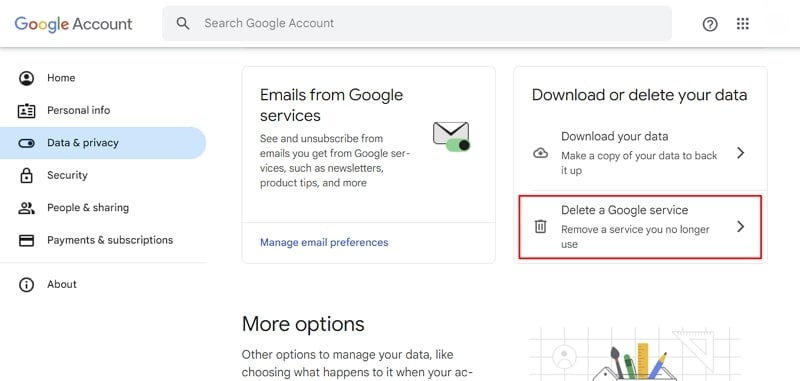
- Step 2. On the following window, scroll down and look for the “Delete a Google service” option. Accessing this would allow you to delete your Gmail account permanently.
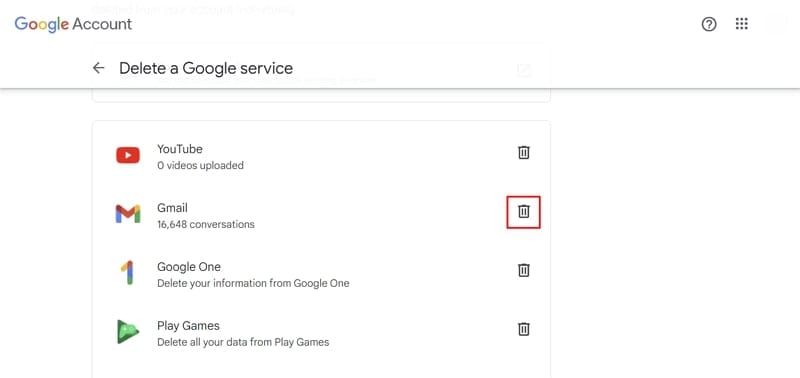
- Step 3. You will be led to a new screen where you need to provide your password credentials again. On successfully providing your password, look for the “Gmail” option on the next screen. Click the “Trash” icon to continue deleting the Gmail account.
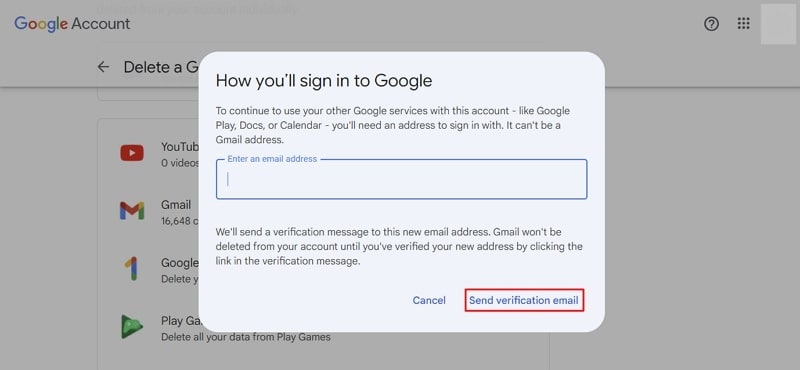
- Step 4. A new pop-up window opens, demanding another email address that can help connect to other Google services. Provide the email address and continue to click “Send verification email .” The Gmail account won’t be deleted until the user verifies the email sent to the new address.
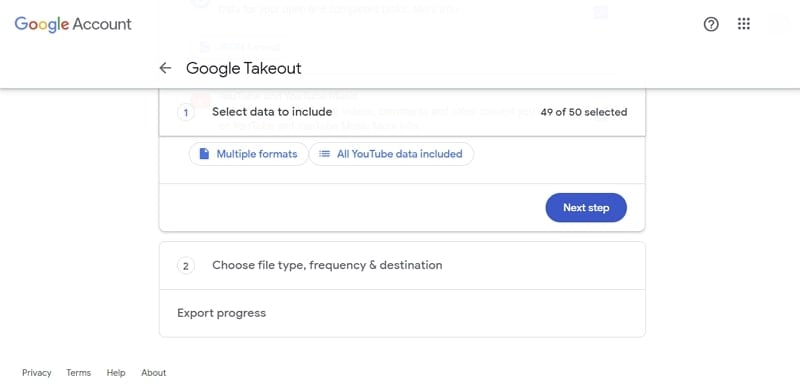
- Step 5. For those who want to save their email data, look for the “Download your data” option in the same window. This leads you to the Google Takeout window, where you need to select the data to include. After selecting the data, define the file type, frequency, and destination for exporting all important data.
Part 3. Delete Your Gmail Account From Your Smartphone: Android & iOS
If you use a smartphone device and want to delete your Gmail account from that particular device, you are at the right place. The following methods will help you understand how to delete Gmail from your Android and iOS devices:
Android Devices
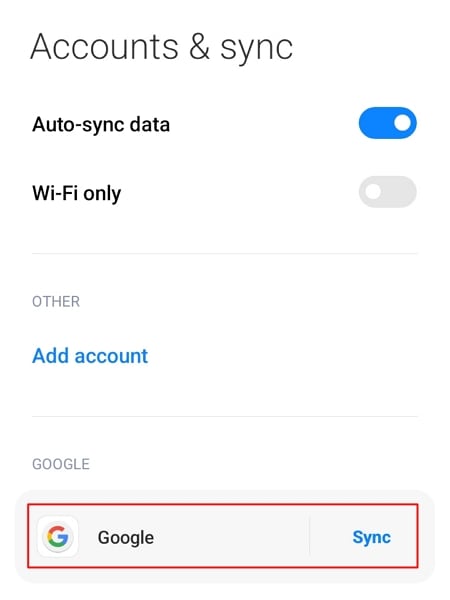
- Step 1. Look for “Settings” on your Android and continue to the “Accounts & sync” option in the list. As you proceed into the next window, look for the Google account and select it.
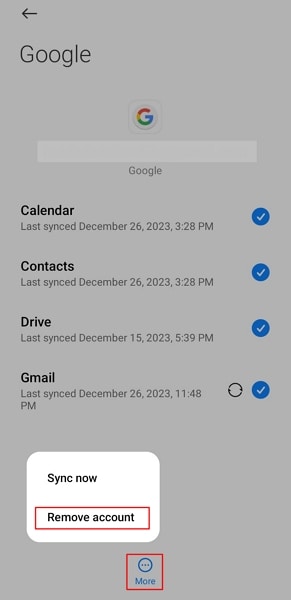
- Step 2. Select the “More” option at the bottom on the following screen. Choose the “Remove account” option in the pop-up menu and provide your credentials to execute the deletion of your Gmail account.
iOS Devices
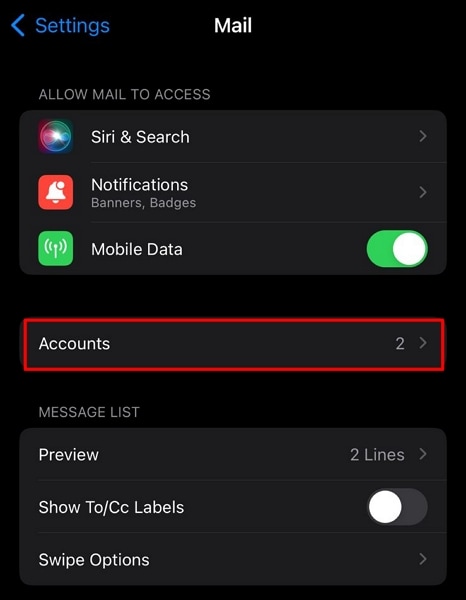
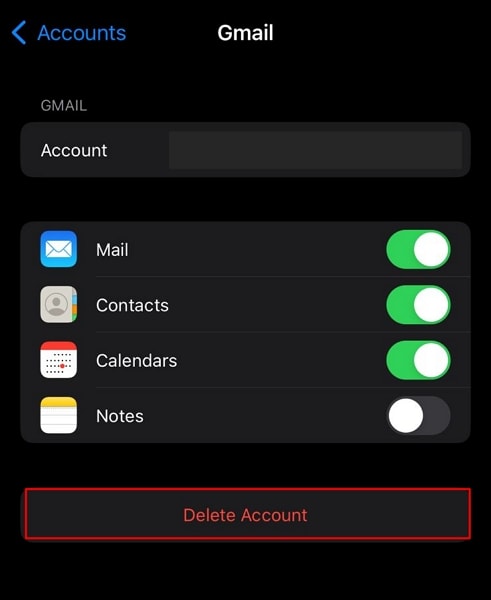
- Step 1. Open your iPhone’s “Settings” app and scroll down to the “Mail” option. You will find the “Accounts” option on the following screen, which you need to tap to proceed.
- Step 2. Discover the option of “Gmail” in the list of signed-in accounts and continue to the next screen. Select “Delete Account” to remove the account from your iOS device.
Part 4. Don’t Know Password of Device? Reset To Delete Gmail Account
What if you’ve forgotten the password to your smartphone device, and you have to delete your Gmail account permanently? In such cases, you are left with the option of accessing the Vivo Y100i device’s Recovery Mode and factory resetting the Vivo Y100i device, where possible. To know how it is done flawlessly, look through the steps provided next:
Android Devices
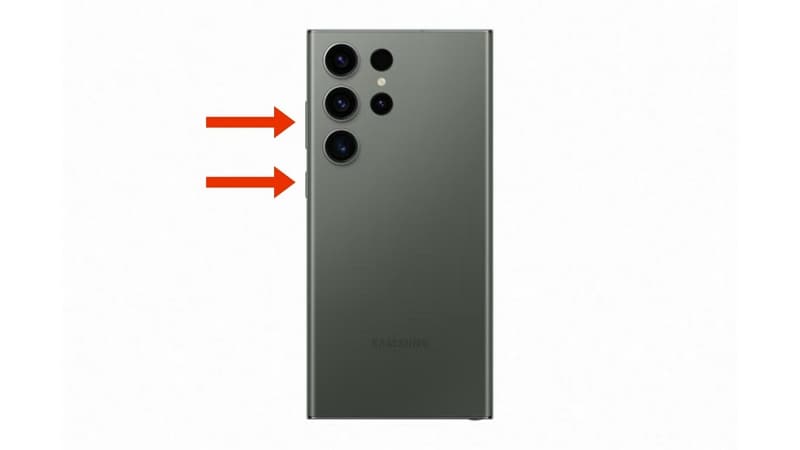
- Step 1. Those owning an Android device need to put it in Recovery Mode first. For that, use the combination of the “Power” and “Volume” keys to put the Vivo Y100i device in Recovery Mode.
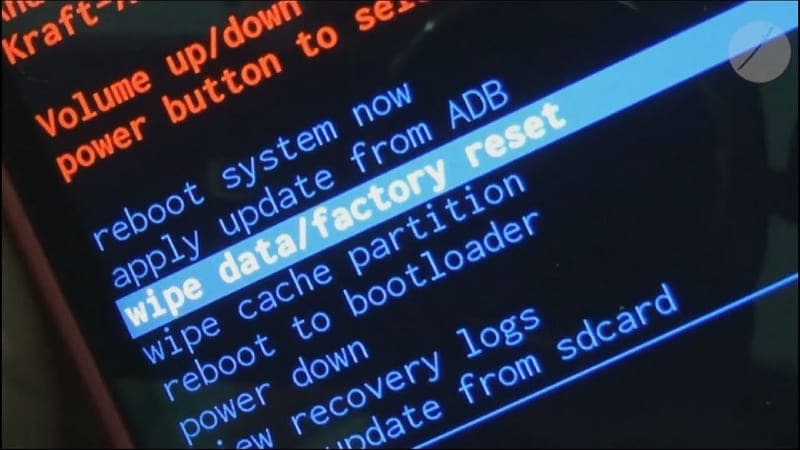
- Step 2. Once you boot into the Recovery Mode, use the Power and Volume buttons to scroll through the menu. Scroll down with the Volume buttons and select the “Wipe data/factory reset” option with the Power button.
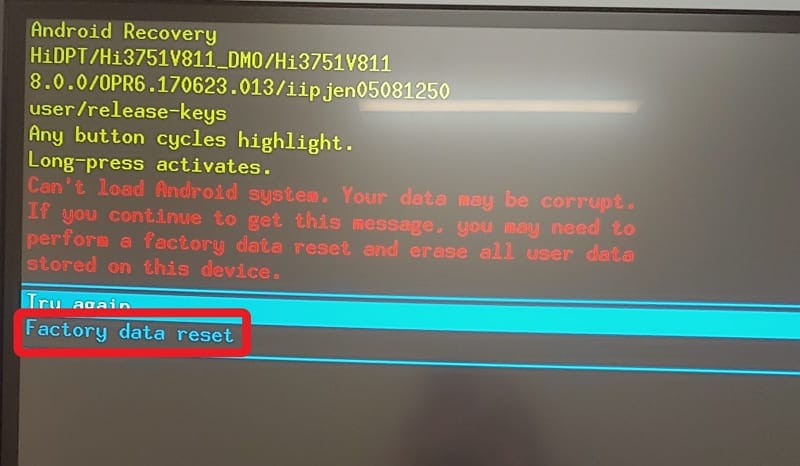
- Step 3. Select “Factory data reset” on the next screen and confirm that factory reset your Android device successfully. The device automatically gets out of Recovery Mode and starts normally after resetting.
iOS Devices
Step 1. You need to turn on Finder if you own a macOS Catalina or later device. Conversely, use iTunes if you have a macOS Mojave or earlier version or if you are using Windows. Connect your iPhone to the computer using the lightning cable and put it in Recovery Mode.
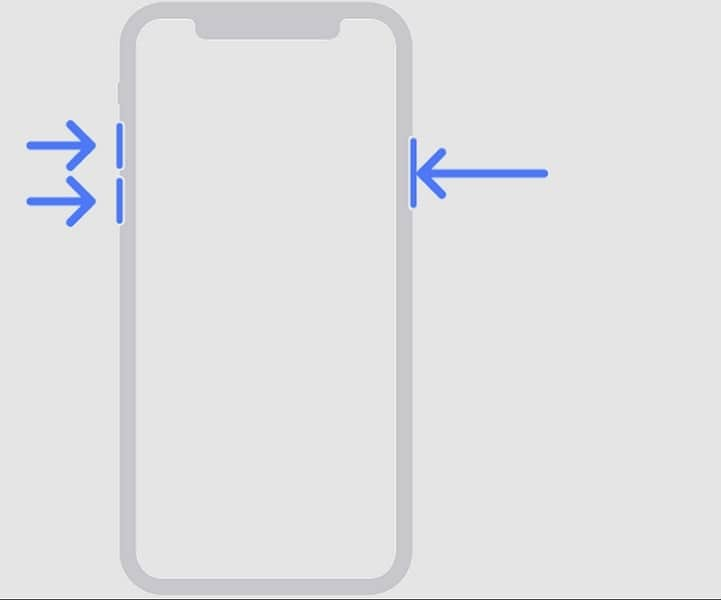
For iPhone X or Later Models: Press and release the “Volume Up” button, followed by the “Volume Down” button. Hold the “Side” button until the Recovery Mode screen appears.
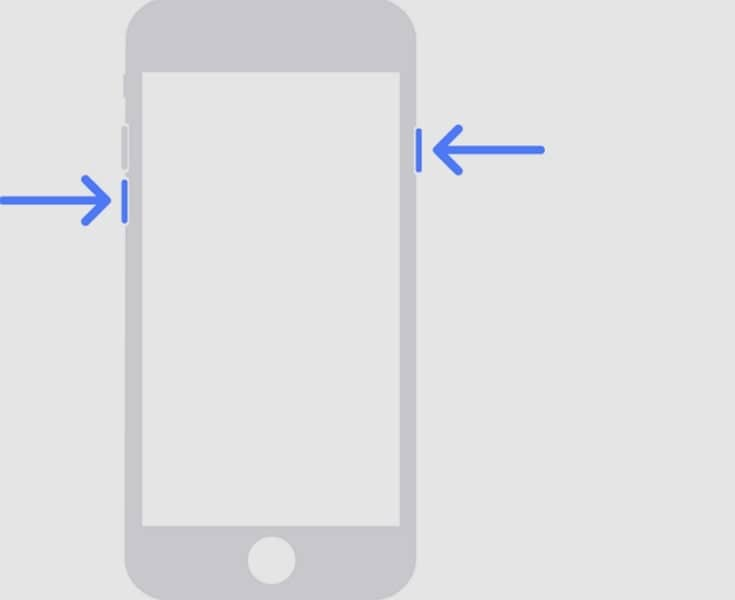
- For iPhone 7 Models: Hold the “Side” and “Volume Down” button until the Recovery Mode screen appears.
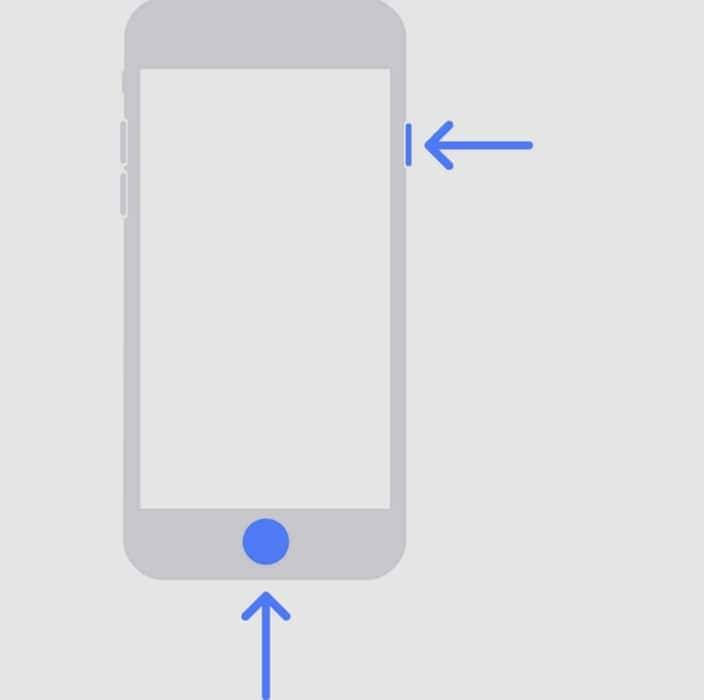
- For iPhone 6 and Earlier Models: Hold the “Side” and “Home” buttons simultaneously until the Recovery Mode screen appears.
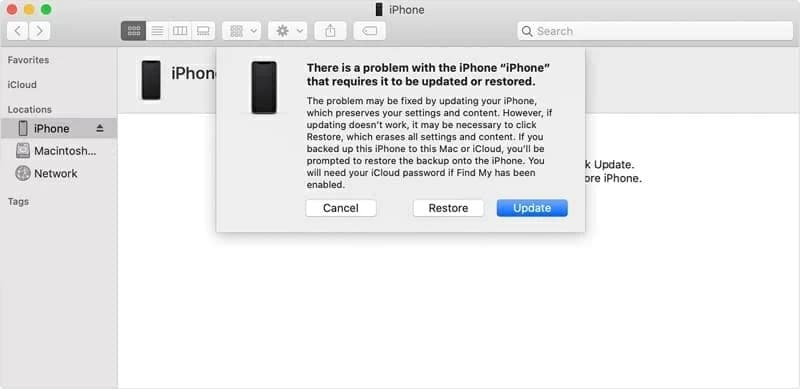
- Step 2. The device automatically gets detected on Finder/iTunes, and a pop-up appears on the screen. Click “Restore” to reset your iOS device to factory settings.
While you seek some appropriate way to close a Gmail account from a device whose password you’ve forgotten, you might get into Wondershare Dr.Fone. This all-in-one service offers a unique Screen Unlock feature that helps you restore your device. If you have forgotten the lock screen password of your Android device, Dr.Fone – Screen Unlock (Android) makes it exceptionally easy to recover.
Key Features of Wondershare Dr.Fone
![]()
Dr.Fone - Screen Unlock (Android)
The Best UnlockJunky Alternative to Bypass FRP and Solve Your Screen Locks
- Remove all Android screen locks (PIN/pattern/fingerprints/face ID) in minutes.
- Bypass the FRP lock of Samsung without a PIN or Google account.
- Everyone can handle the lock screen without any tech knowledge.
- Provide specific removal solutions to promise good success rate.
4,008,671 people have downloaded it
Whether it is your latest Samsung or other Android smartphone, the process is easy to work with. You might look for more details about this unique tool, for which some important features are highlighted as follows:
- It removes all major types of screen locks from your Android devices.
- Provides support to the latest Android devices, along with all mainstream brands.
- You can recover your device with and without data loss, according to your discretion.
Steps To Remove Google Account While Removing Screen Lock
The following steps highlight the way to remove screen lock from your Android device, which would also cover removing the Google Account automatically:
- Step 1.Launch Screen Unlock Feature
To start with the process, launch Dr.Fone on your computer and navigate to the “Toolbox” section. Proceed to the “Screen Unlock” feature, which opens a new window. After selecting “Android” as your device type, select “Unlock Android Screen” from the available options.
- Step 2.Select Device Brand and Unlock Mechanism
As you direct into the next window, select the brand of your Android device. Continue to select “100% Remove Screen Lock” from the following window.

- Step 3. Follow the Instructions and Successfully Remove the Screen Lock
According to your selected device brand, Dr.Fone provides guidelines for entering the specific mode. Follow the on-screen instructions to start unlocking the screen of your device. If the process is successful, click “Done” to conclude using Dr.Fone – Screen Unlock.

Conclusion
This article has specifically provided you with some important details on how to delete a Gmail account with ease. The article explains everything from the methods of deleting it from the computer to removing it from the Vivo Y100i device. Furthermore, it also serves as a guidance for those who have forgotten their device passwords. For that, they’ve provided an insight into Wondershare Dr.Fone – Screen Unlock and its unique functions.
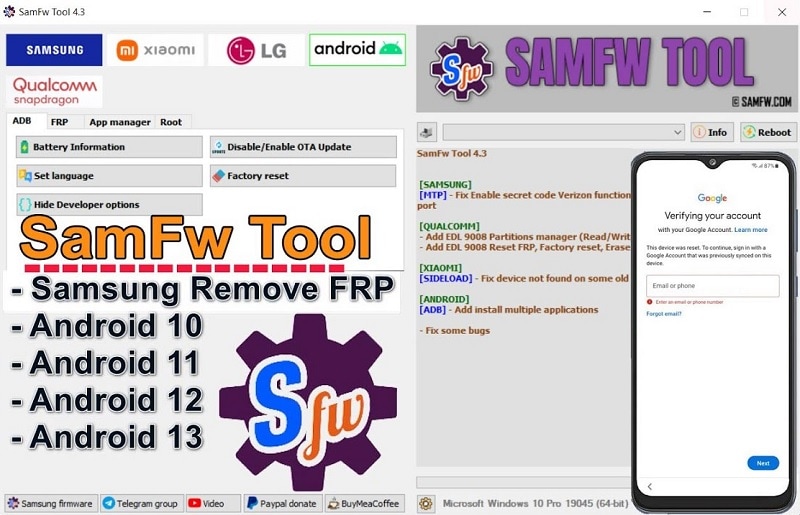
Downloading SamFw FRP Tool 3.0 for Vivo Y100i
FRP (Factory Reset Protection) is a security feature for Android devices to prevent unauthorized access after a factory reset. SamFw FRP Tool is a popular solution for bypassing FRP on Samsung devices. Downloading the tool is crucial for users locked out of their devices.
The page discusses and evaluates its effectiveness with a comprehensive review. After that, you’ll see considering another option is wise, and the article will also recommend an alternative. Stay tuned for our insights. For now, you can download the SamFw FRP Tool for free and explore its features. Read on to learn more.

Part 1. A Detailed Introduction of SamFw FRP Tool
For many Samsung users, encountering a Google FRP lock can be a frustrating experience. A user recently reached out, saying:
“I’m facing a Google FRP lock issue on my recently acquired Samsung Galaxy S23 from eBay. Has anyone successfully used SamFw to bypass FRP without the previous owner’s account credentials?”
SamFw FRP Tool is designed to unlock Samsung devices afflicted by Google FRP locks. The tool aims to provide a solution for bypassing FRP without the previous owner’s credentials. It is beneficial for their Samsung devices to be locked out due to a factory reset.
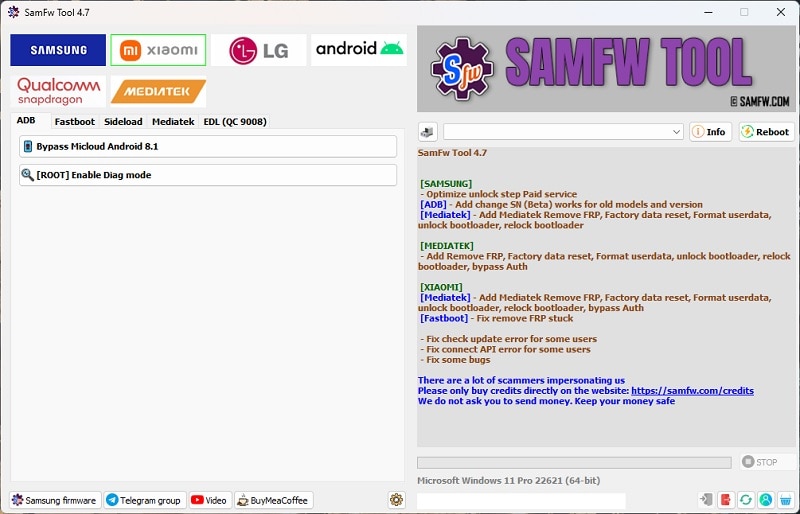
Key Features of SamFw FRP Tool
Explore the essential features of the SamFw FRP Tool. Learn its key features for efficient Android device security solutions.
- Unlock Samsung without data loss
SamFw FRP Tool can unlock Samsung devices without causing any data loss during the process. It ensures that your personal information and files remain intact.
- Remove various Android locks
The tool can also remove other Android security measures. It can bypass pins, passwords, facial IDs, patterns, and fingerprints.
- Wide compatibility
SamFw FRP Tool supports a broad range of Android versions. It’s compatible with Android 5 to the latest Android 13.
- User-friendly FRP bypass
SamFw FRP Tool offers a straightforward solution to remove Google FRP locks. Its intuitive interface makes the process accessible for beginners.
How To Use SameFw FRP Tool
Here’s a comprehensive guide to help you bypass FRP using the Sam FRP bypass tool.
- Step 1: Download the SamFw FRP tool on your computer. Install the app and launch it afterward. Connect your Samsung to your computer.
- Step 2: Choose your device’s brand and click the Remove FRP button. Your phone screen will then display a notification requesting USB debugging permission. Tap OK to proceed.

- Step 3: Allow the process to complete. Upon completion, your device will automatically reboot as part of the FRP removal process. The reboot signals that the process bypassed the FRP lock. Close the pop-up and enjoy unrestricted access to your device.

Note
It’s important to note that the _SamFw FRP Tool_ is only compatible with Windows OS. Users with Mac or Linux systems may need to explore alternative solutions for FRP bypass.
If you’re seeking a reliable and flexible alternative to the SamFw FRP tool, Wondershare Dr.Fone - Screen Unlock (Android) is the best choice. Its proven track record and various compatibilities offer a seamless solution for Android devices. In addition, it makes it easy to work on FRP lock without a PIN or Google Account. Let’s explore further below.
Part 2. Best SamFW FRP Tool Alternative: Wondershare Dr.Fone
Wondershare Dr.Fone - Screen Unlock (Android) is the go-to choice for many users seeking efficient FRP bypass methods. The app is available for Windows, Mac, and Linux, adding to its versatility. Here are some reasons why it’s the best alternative to the SamFw FRP Tool.

- Versatile lock screen removal. Dr.Fone excels in removing various Android lock screen types. It offers a comprehensive solution for users facing different security challenges.
- Pin and Google Account bypass. The tool bypasses FRP without the need for a PIN or Google Account. It provides a hassle-free experience for users.
- Fast unlock process. Dr.Fone ensures a swift unlocking process. With the ability to remove the lock screen within less than 5 minutes, it minimizes inconvenience.
- Extensive device compatibility. Supporting over 2000+ Android models, Dr.Fone Screen Unlock - Android boasts extensive compatibility. It’s a versatile and reliable choice for users with various devices.
How To Bypass FRP With Dr.Fone - Screen Unlock (Android)
Dr.Fone - Screen Unlock (Android) is the ultimate alternative to the SamFw FRP Tool. Follow the steps outlined to bypass FRP without complications using the platform.
- Step 1: Download and install Dr.Fone - Screen Unlock (Android) on your computer. Launch the program, and select Toolbox > Screen Unlock from the main menu. Click Android as the Vivo Y100i device type to continue.
Parental Control Software
- Step 2: Connect your Android device to the computer using a USB cable. Choose the Remove Google FRP Lock option.
- Step 3: Choose your Android device type and click Start to proceed to the next window. Afterward, choose All Android versions (One-Click Removal) if you don’t know the OS version of your phone. Click the Start button again to continue.

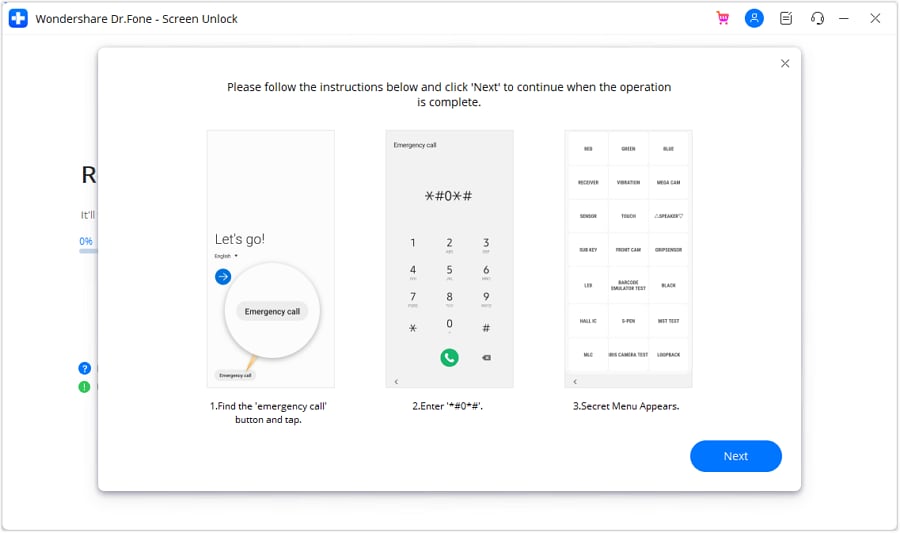
- Step 4: Next**,** follow the on-screen instructions. Locate the Emergency Call button on your Android and tap it. Dial “*#0*#” for a secret menu. Click Next in the app. Your Android will prompt the USB debugging option. Tap Allow on your phone, then click Authorized on your computer.
- Step 5: Dr.Fone will confirm the removal of the FRP locks from your Android device. After successful removal, the prompt window indicates completion. Click Done upon successful execution. If issues persist, retry the process with the Try Again option.

Part 3. Side-by-Side Comparison Between SamFw Tool and Dr.Fone
Choosing between SamFw Tool and Dr.Fone - Screen Unlock (Android) shouldn’t be hard. Here’s a concise side-by-side comparison evaluating their ease of use, speed, compatibility, features, and more.
| SamFw FRP Tool | Wondershare Dr.Fone | |
|---|---|---|
| Ease of Use | User-friendly interface, suitable for beginners | Intuitive design, making it accessible for all users |
| Unlock Speed | Efficient FRP bypass speed varies by device | Swift unlocking process, often under 5 minutes |
| Compatibility | Windows-only, limited OS compatibility | Wide compatibility with Windows and Mac, extensive Android device support |
| FRP Bypass Capability | Effective FRP removal, especially for Samsung devices | Bypasses FRP without a PIN or Google Account, versatile lock screen removal |
| Additional Features | Removes various Android lock screen types | Pin and Google Account bypass, extensive device compatibility |
Read More About FRP Bypass:
Top 5 Huawei Bypass FRP Tools for PC That Actually Work
Bypass FRP OPPO All Series like a Pro With/Without PC
Ways to Remove FRP Lock on Motorola Phones without a PC
Conclusion
SamFw FRP Tool is a viable option for users with FRP lock issues, particularly on Samsung devices. Its interface and effectiveness in removing FRP are noteworthy features. However, limitations arise with its Windows-only compatibility, which may impact user experience.
In comparison, Dr.Fone - Screen Unlock (Android) is a great alternative. Its design, fast unlocking process, and compatibility make it a versatile and reliable choice. The tool’s ability to bypass FRP without a PIN or Google Account adds to its appeal. Test both apps to see which one works best for your needs.
Tips: Forget your device password and can’t get access to it? No worries as Dr.Fone is here to help you. Download it and start a seamless unlock experience!
- Title: In 2024, A Perfect Guide To Remove or Disable Google Smart Lock On Vivo Y100i
- Author: Marry
- Created at : 2024-08-02 18:06:56
- Updated at : 2024-08-03 18:06:56
- Link: https://unlock-android.techidaily.com/in-2024-a-perfect-guide-to-remove-or-disable-google-smart-lock-on-vivo-y100i-by-drfone-android/
- License: This work is licensed under CC BY-NC-SA 4.0.