
In 2024, Delete Gmail Account With/Without Password On Infinix Smart 8 HD
Delete Gmail Account With/Without Password On Infinix Smart 8 HD
Email accounts have proven their worth in digital devices beyond sending emails. Lately, Android devices have only operated with a Gmail account. This is because most of the data, such as contact information, messages, and other details, are saved across the storage space offered with the email. Against all recognizable uses of Gmail accounts, users look for ways how to delete Gmail accounts.
To this day, it is known that Gmail accounts can be removed with or without a password. However, one should know that if they consider deleting their Gmail account, they won’t be able to send or receive emails. With that, let’s proceed to reveal all essential methods that can be used to delete a Gmail account permanently. This article will also focus on a perfect tool that assists in making the process easier.
Part 1. Synopsis: Things To Know Before Deleting Gmail Account
Although the process of deleting a Gmail account sounds basic, there are many pointers connected to it. For that, this part is putting up a discussion on the important things that a user should know before they delete their Gmail account permanently:
- No Going Back: If you delete a Gmail account, the process is irreversible. All details and information will be lost, and the email won’t be trackable ever again.
- Cannot Reset Passwords if Connected: If the Gmail account is connected to any other service, make sure that you remember their passwords. Since the account will be deleted, you cannot reset their passwords.
- Access to Other Services: Although you are deleting your Gmail account, you can still access Google Photos, Google Drive, and other services.
- Lookout For Emails: Ensure that the emails in your account are saved. You can easily download them anywhere before deleting the Gmail account.
Part 2. Delete Your Gmail Account Using Your Password: Desktop Solution
For the first method, we will discuss how to delete a Google account with your password. You will use your computer for this process and access the Google Account services. The service helps you save all your essential Gmail data before you remove it. To understand how it makes it possible, look through the steps provided below:
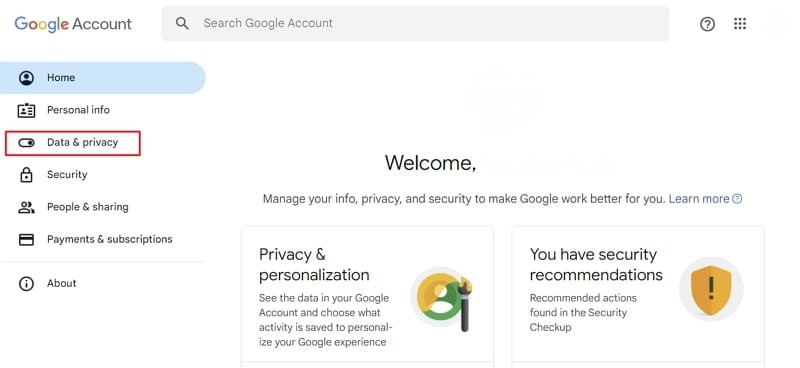
- Step 1. Access the website https://myaccount.google.com/ on your desktop browser and log in with your credentials. Proceed to the “Data & privacy” section from the left panel.
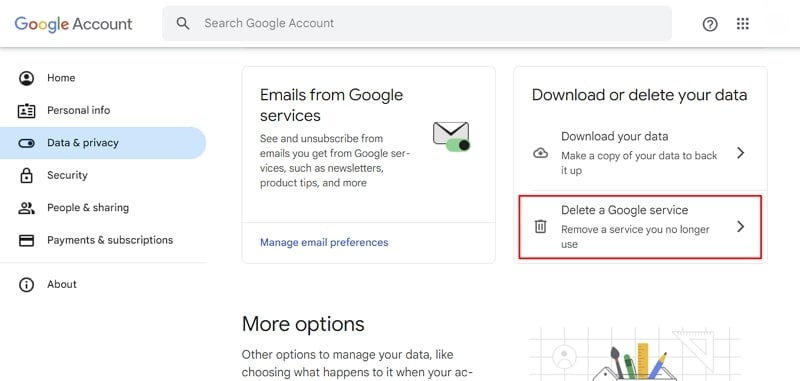
- Step 2. On the following window, scroll down and look for the “Delete a Google service” option. Accessing this would allow you to delete your Gmail account permanently.
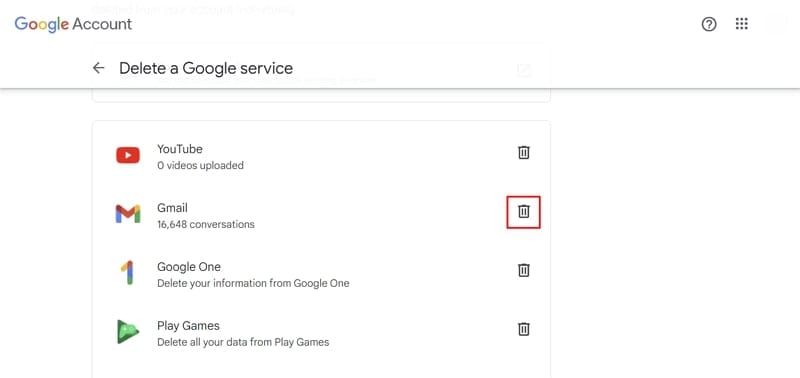
- Step 3. You will be led to a new screen where you need to provide your password credentials again. On successfully providing your password, look for the “Gmail” option on the next screen. Click the “Trash” icon to continue deleting the Gmail account.
Parental Control Software
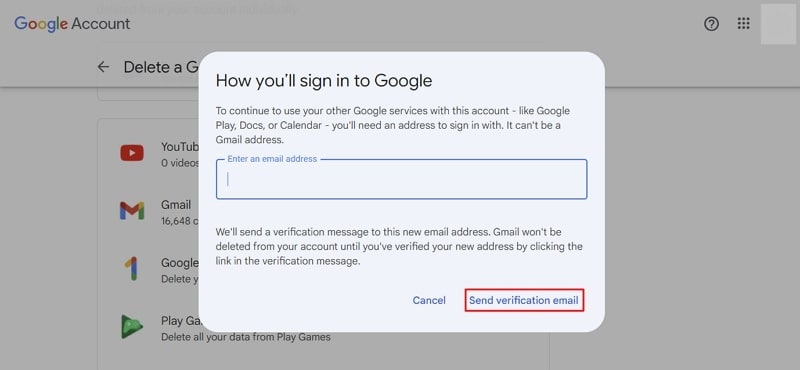
- Step 4. A new pop-up window opens, demanding another email address that can help connect to other Google services. Provide the email address and continue to click “Send verification email .” The Gmail account won’t be deleted until the user verifies the email sent to the new address.
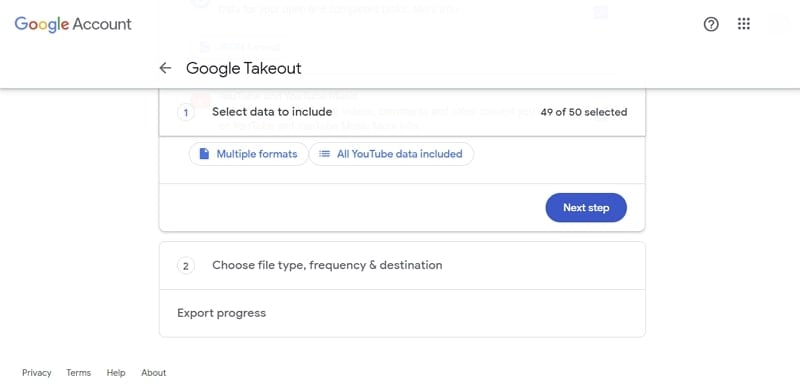
- Step 5. For those who want to save their email data, look for the “Download your data” option in the same window. This leads you to the Google Takeout window, where you need to select the data to include. After selecting the data, define the file type, frequency, and destination for exporting all important data.

Part 3. Delete Your Gmail Account From Your Smartphone: Android & iOS
If you use a smartphone device and want to delete your Gmail account from that particular device, you are at the right place. The following methods will help you understand how to delete Gmail from your Android and iOS devices:
Android Devices
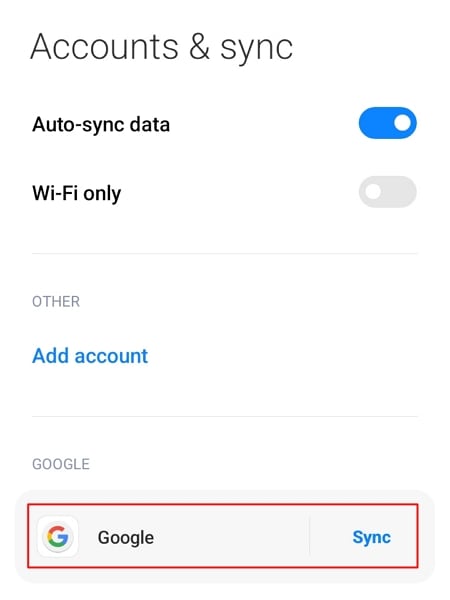
- Step 1. Look for “Settings” on your Android and continue to the “Accounts & sync” option in the list. As you proceed into the next window, look for the Google account and select it.

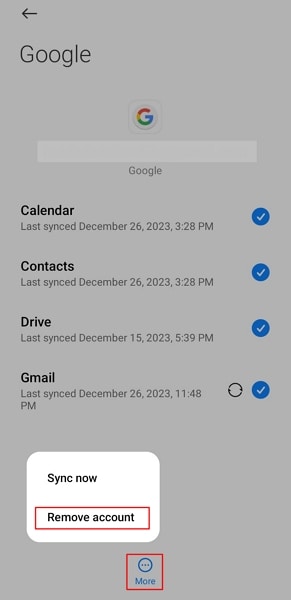
- Step 2. Select the “More” option at the bottom on the following screen. Choose the “Remove account” option in the pop-up menu and provide your credentials to execute the deletion of your Gmail account.
iOS Devices
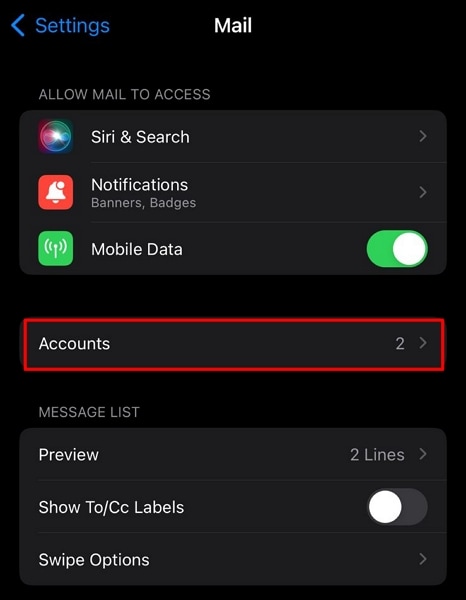
- Step 1. Open your iPhone’s “Settings” app and scroll down to the “Mail” option. You will find the “Accounts” option on the following screen, which you need to tap to proceed.
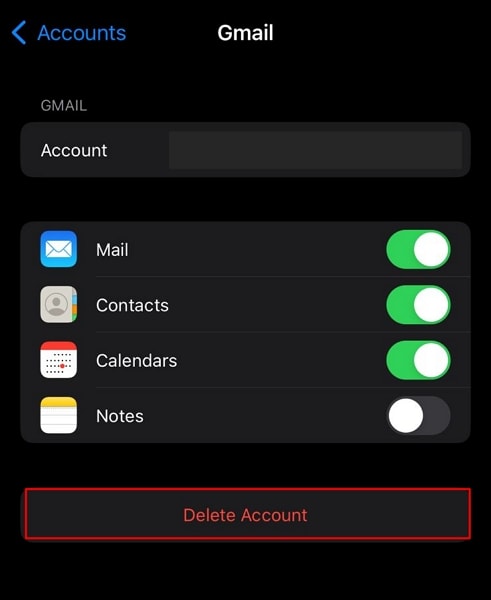
- Step 2. Discover the option of “Gmail” in the list of signed-in accounts and continue to the next screen. Select “Delete Account” to remove the account from your iOS device.
Part 4. Don’t Know Password of Device? Reset To Delete Gmail Account
What if you’ve forgotten the password to your smartphone device, and you have to delete your Gmail account permanently? In such cases, you are left with the option of accessing the Infinix Smart 8 HD device’s Recovery Mode and factory resetting the Infinix Smart 8 HD device, where possible. To know how it is done flawlessly, look through the steps provided next:
Android Devices
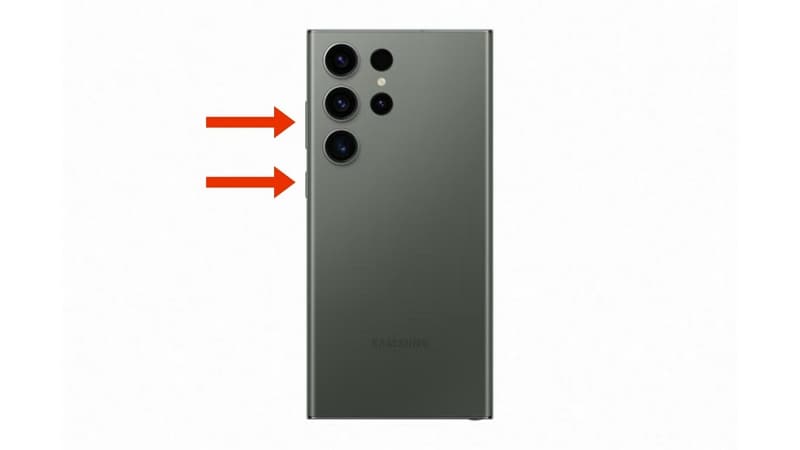
- Step 1. Those owning an Android device need to put it in Recovery Mode first. For that, use the combination of the “Power” and “Volume” keys to put the Infinix Smart 8 HD device in Recovery Mode.
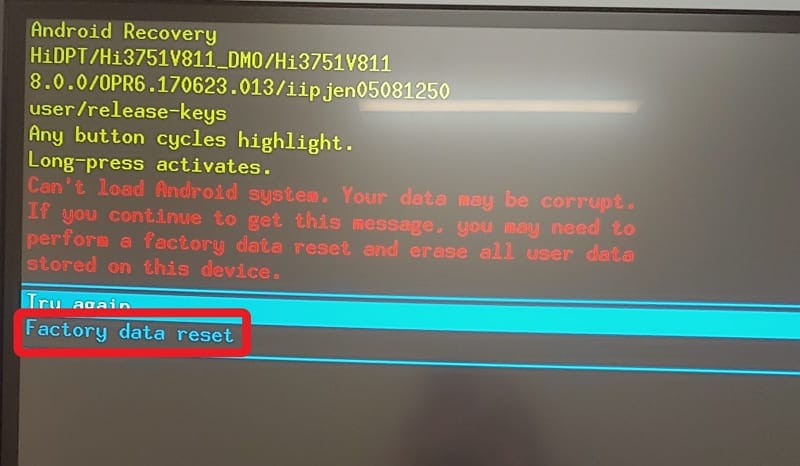
- Step 2. Once you boot into the Recovery Mode, use the Power and Volume buttons to scroll through the menu. Scroll down with the Volume buttons and select the “Wipe data/factory reset” option with the Power button.
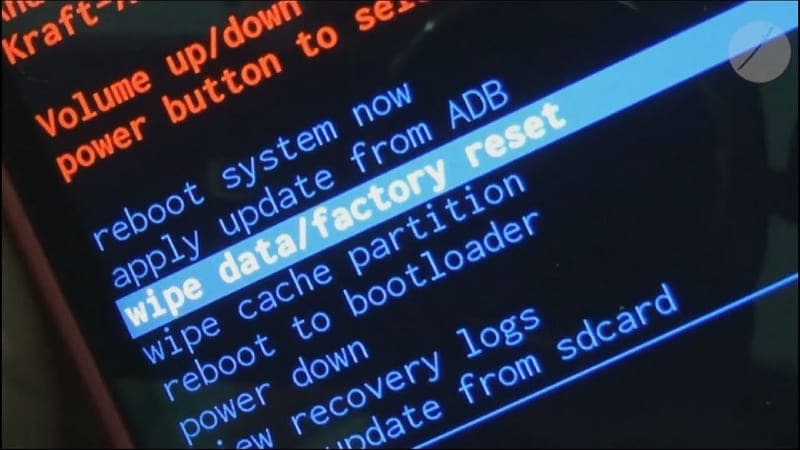
- Step 3. Select “Factory data reset” on the next screen and confirm that factory reset your Android device successfully. The device automatically gets out of Recovery Mode and starts normally after resetting.
iOS Devices
Step 1. You need to turn on Finder if you own a macOS Catalina or later device. Conversely, use iTunes if you have a macOS Mojave or earlier version or if you are using Windows. Connect your iPhone to the computer using the lightning cable and put it in Recovery Mode.
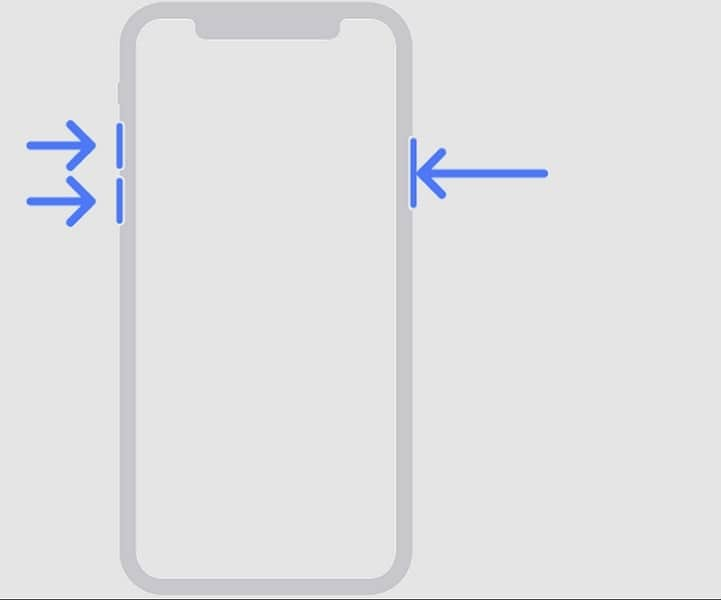
For iPhone X or Later Models: Press and release the “Volume Up” button, followed by the “Volume Down” button. Hold the “Side” button until the Recovery Mode screen appears.
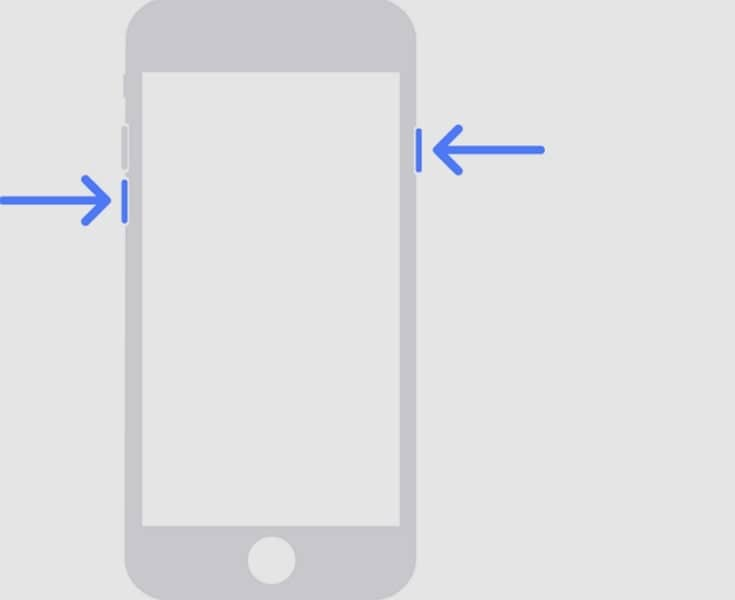
- For iPhone 7 Models: Hold the “Side” and “Volume Down” button until the Recovery Mode screen appears.
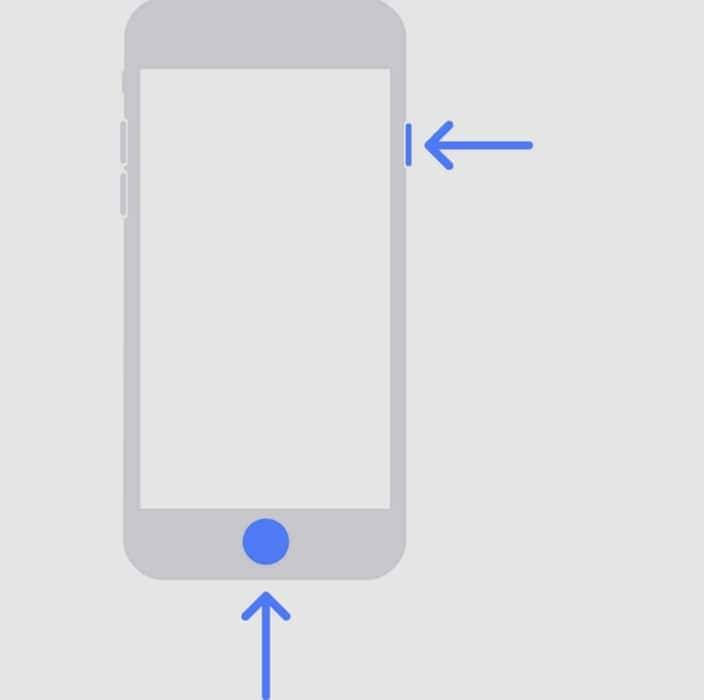
- For iPhone 6 and Earlier Models: Hold the “Side” and “Home” buttons simultaneously until the Recovery Mode screen appears.
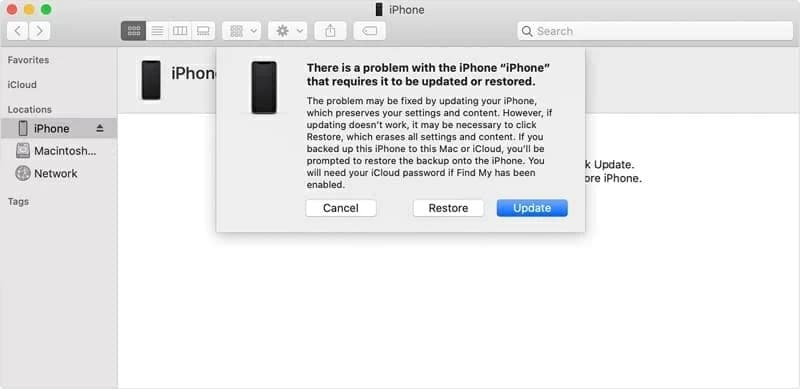
- Step 2. The device automatically gets detected on Finder/iTunes, and a pop-up appears on the screen. Click “Restore” to reset your iOS device to factory settings.
Part 5. Remove Gmail Account From Device Without Password: Using Wondershare Dr.Fone
While you seek some appropriate way to close a Gmail account from a device whose password you’ve forgotten, you might get into Wondershare Dr.Fone. This all-in-one service offers a unique Screen Unlock feature that helps you restore your device. If you have forgotten the lock screen password of your Android device, Dr.Fone – Screen Unlock (Android) makes it exceptionally easy to recover.
Key Features of Wondershare Dr.Fone
![]()
Dr.Fone - Screen Unlock (Android)
The Best UnlockJunky Alternative to Bypass FRP and Solve Your Screen Locks
- Remove all Android screen locks (PIN/pattern/fingerprints/face ID) in minutes.
- Bypass the FRP lock of Samsung without a PIN or Google account.
- Everyone can handle the lock screen without any tech knowledge.
- Provide specific removal solutions to promise good success rate.
4,008,671 people have downloaded it
Whether it is your latest Samsung or other Android smartphone, the process is easy to work with. You might look for more details about this unique tool, for which some important features are highlighted as follows:
- It removes all major types of screen locks from your Android devices.
- Provides support to the latest Android devices, along with all mainstream brands.
- You can recover your device with and without data loss, according to your discretion.
Steps To Remove Google Account While Removing Screen Lock
The following steps highlight the way to remove screen lock from your Android device, which would also cover removing the Google Account automatically:
- Step 1.Launch Screen Unlock Feature
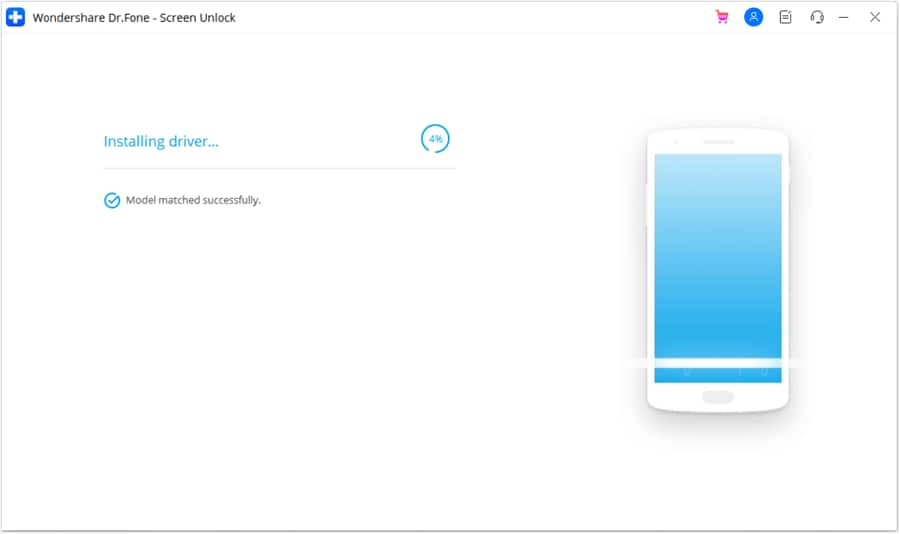
To start with the process, launch Dr.Fone on your computer and navigate to the “Toolbox” section. Proceed to the “Screen Unlock” feature, which opens a new window. After selecting “Android” as your device type, select “Unlock Android Screen” from the available options.


- Step 2.Select Device Brand and Unlock Mechanism
As you direct into the next window, select the brand of your Android device. Continue to select “100% Remove Screen Lock” from the following window.

- Step 3. Follow the Instructions and Successfully Remove the Screen Lock
According to your selected device brand, Dr.Fone provides guidelines for entering the specific mode. Follow the on-screen instructions to start unlocking the screen of your device. If the process is successful, click “Done” to conclude using Dr.Fone – Screen Unlock.


Conclusion
This article has specifically provided you with some important details on how to delete a Gmail account with ease. The article explains everything from the methods of deleting it from the computer to removing it from the Infinix Smart 8 HD device. Furthermore, it also serves as a guidance for those who have forgotten their device passwords. For that, they’ve provided an insight into Wondershare Dr.Fone – Screen Unlock and its unique functions.
How To Change Infinix Smart 8 HD Lock Screen Clock in Seconds
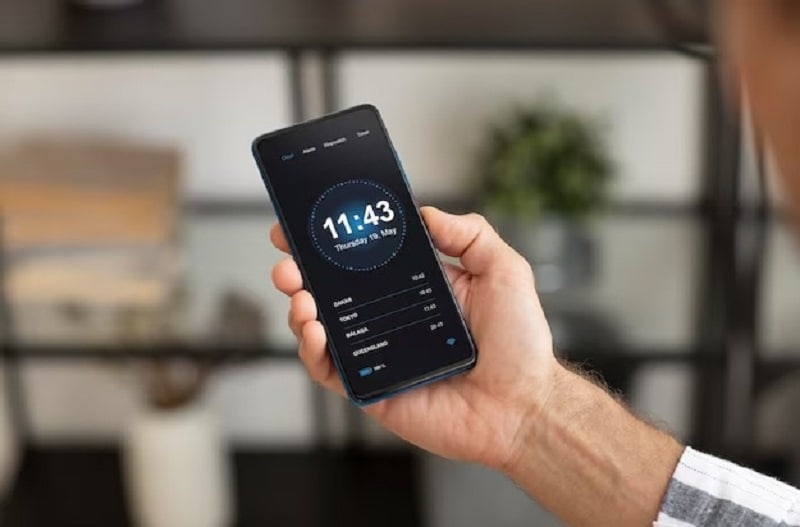
The initial glimpse of your phone often involves the lock screen. This essential feature is customizable based on your Android device. With the advent of Android 12, a double-line clock has stirred some controversy among users. It’s because the Android lock screen clock veered from the one-line design of the previous version.
The larger clock style appears when there’s no notification. It will only switch to the old one-line format when a notification pops up. Discover how to change the lock screen clock on your Android and tweak its appearance. Explore the article to learn more.
Part 1. How Do I Put a Clock on My Android Lock Screen?
Android devices running version 12 or later come with the clock feature activated by default. Take note that its appearance may change under specific circumstances. It can change when there are unread notifications visible on the lock screen.
For devices running Android 11, changing the lock screen clock is still available. In some instances, you can even customize its style by following these simple steps:
- Step 1: For users with Android 11 or older, go to Settings > Lock screen & security. Depending on your phone model, tap Lock screen or Security.

- Step 2: Go to Customize Lock screen > Clock. Next, customize or activate the lock screen clock.
Note
The exact names of settings may change depending on the manufacturer and version of Android. But the navigation should be similar.
Part 2. How To Change Lock Screen Clock on Android [5 Methods]
Currently, there isn’t an official method to change the lock screen clock on Android 12. However, there are several workarounds you can do. Let’s explore these techniques and see which works best for you.
Method 1: Change Your Wallpaper
In Android 11, adjusting your wallpaper is accessible through the Android Settings menu.
- Step 1A: Navigate to the “All Apps” screen and select Settings. For Samsung Galaxy devices on Android 11, access the Wallpaper option within the settings menu.

In Android 12, the process remains consistent.
- Step 1: Locate the Wallpaper & style button within the Settings menu**.**

- Step 2: Follow the provided instructions to transform your lock screen experience. Replace the oversized clock with dynamic, changing wallpapers.
Method 2: Turn Off the Always-On Display
An alternative to avoid the Android lock screen clock is disabling the Always-on Display (AOD).
- Step 1: Access the Settings menu on your Android device. Scroll down and choose Lock screen > Always On Display.


- Step 2: Toggle off to deactivate the Always On Display.
_Note_
While this won’t alter the lock screen clock itself, it will turn off the display. It will prevent the constant presence of the lock screen clock. Instead, the clock will only become visible when you press the power button.
Method 3: Disable the Double-Line Clock
Originally, there was no provision to change the lock screen clock in Android 12. With the release of a new update, Google introduced an option to deactivate the clock, bringing relief to users. Follow the steps below to disable the double-line clock on your Android.
- Step 1: Go to Settings > Display. Next, choose Lock screen.

- Step 2: Toggle the Double-line clock off.
_Note_
If you want to display a digital or analog clock, open the _Clock_ app. Tap the _three dots_ > _Settings_ > _Style_****.
Method 4: Turn On Screensaver
An alternative method to modify the Android lock screen clock involves activating Android’s screen saver. There are options where it’s more pleasing than the default lock screen clock. If you want to change the lock screen clock, follow the steps.
- Step 1: Open the Clock app and tap the three dots in the upper-right corner. Select Screensaver and toggle it on.

- Step 2: If you want to customize the screensaver clock’s appearance, go to Settings > Display > Screensaver. Choose analog, digital, or night mode.
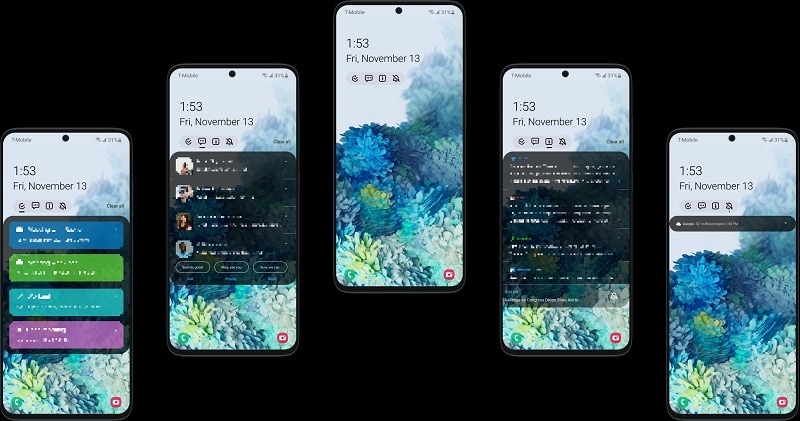
Method 5: Keep Unread Notifications
To avoid adjusting your Android device settings, you can make the lock screen clock smaller by maintaining unread notifications. The clock occupies less space when there are unread notifications. It shifts back to the top-left corner when you receive a new notification. Simply leave notifications unread to keep the clock smaller.

Bonus
For users who prefer not to have a lock screen clock, follow these steps:
- Step 1: Open Settings > Lock screen or Security & lock screen.
- Step 2: Look for Clock and FaceWidgets or a similar option. Disable or toggle off the Clock or Show clock setting. Save changes, and your lock screen should no longer display the clock.
Part 3. An Exception: Change the Lock Screen Clock on Samsung Phones
Changing the lock screen clock on Samsung phones is similar to the general Android process. However, the steps are quite different, offering Samsung users a unique customization experience. If you wish to personalize your lock screen clock, here’s how:
- Step 1: Go to Settings > Lock screen or Lock screen & security. Choose Customize lock screen > Clock, Clock style, or Lock screen clock.

- Step 2: Choose between different styles, such as digital, analog, or others. Some Samsung models offer extra settings like color, size, and more to enhance your lock screen further. Select the one that suits your taste.
If you’d rather remove the lock screen clock on your Samsung device, follow these steps:
- Step 1: Go to Settings > Lock screen or Lock screen & security.Choose Customize lock screen > Clock, Clock style, or Lock screen clock.
- Step 2: Disable or toggle off this setting to remove the clock from your lock screen.
If you ever find yourself locked out of your Android device due to a mishap while changing your lock screen clock or any other reason, don’t fret. Wondershare Dr.Fone– Screen Unlock - Android can effortlessly bypass the lock screen and unlock your device without a hassle.
Read More About Android Lock Screen:
9 Ways to Bypass Samsung Lock Screen without Data Loss [2024]
How To Easily Unlock Nokia Screen: 4 Effective Methods
How to Change Lock Screen Wallpaper on Android
Part 4. How To Unlock Accidentally Locked Android Screen
Accidentally locking yourself out of your Android device can be a stressful experience. Dr.Fone provides a hassle-free solution to unlock your Android screen without losing any data. Whether you’ve locked yourself out or forgot your PIN, Dr.Fone ensures a straightforward and secure unlocking process. Here’s a step-by-step guide to using the tool:
![]()
Dr.Fone - Screen Unlock (Android)
The Best UnlockJunky Alternative to Bypass FRP and Solve Your Screen Locks
- Completely unlinked from the previous Google account, it won’t be traced or blocked by it anymore.
- Remove all Android screen locks (PIN/pattern/fingerprints/face ID) in minutes.
- Compatiable with various Android models.
- Provide specific removal solutions to promise good success rate.
4,008,670 people have downloaded it
- Step 1: Download and install Dr.Fone on your computer. Launch the program after installation and go to Toolbox > Screen Unlock.

- Step 2: Choose Android in the next window and click on Unlock Android Screen.
- Step 3: Choose your device brand and click Remove without Data Loss. Select the Brand, Device Name, and Device Model of your smartphone. Once done, toggle the checkmark on I agree with the warning, and I am ready to proceed button.

- Step 4: Follow the on-screen instructions. Once they’re done, Dr.Fone will automatically proceed with the unlocking process. There will be a new screen showing the completion if done correctly. If it fails, click on Try again. Otherwise, click Done to finish.
What Else Can Dr.Fone Do for Android Owners?
Dr.Fone Screen Unlock for Android is a comprehensive tool that goes beyond unlocking screens. It also provides a range of features to address various Android device-related issues, such as:
Bypass Factory Reset Protection (FRP)
You can bypass Factory Reset Protection on your Android device with Dr. Fone. It allows you to set it up without the original Google account credentials.
Unlock Samsung/LG without data loss
Whether you own a Samsung or LG device, Dr.Fone allows you to unlock your phone without compromising any data stored on the Infinix Smart 8 HD device.
Supports 2000+ Android models
Dr.Fone is compatible with a vast array of Android models. It supports over 2000 devices, making it a versatile solution for Android users.
Conclusion
Knowing how to change the lock screen clocks on your Android offers a personalized touch. Android 12 users can effortlessly adjust settings, while Android 11 and older versions require a manual setup. Samsung owners, meanwhile, enjoy a similar but unique customization process. Follow the steps outlined above for those seeking to remove the lock screen entirely.
On the other hand, if you accidentally lock yourself out of your smartphone, Dr.Fone is a go-to solution, ensuring a smooth unlocking process. Whether tweaking your Android lock screen clock or facing accidental lockouts, explore these methods to tailor your Android experience.
Mastering Android Device Manager: The Ultimate Guide to Unlocking Your Infinix Smart 8 HD Device
So, what is Android Device Manager? Android has this amazing native tool to help you locate and remote wipe your lost or stolen phone. We lock our phones via passwords or patterns or fingerprints to maintain the security but what if someone dares to meddle with your phone or unfortunately, it gets stolen? Don’t worry, all you need to do is let Android Device Manager unlock your Android phone. For this, it just needs to be enabled on your phone (before you unluckily locked yourself out of it). Android Device Manager unlocks your phone in a small amount of time, saving you from all the troubles.
In addition to this, the Android Device Manager also unlocks your password/pin-encrypted phone if you have forgotten the passcode by chance. The procedure is quite simple; all you need is a Google account to set this up onyour phone and then you can make use of any other online device to track down your lost or stolen phone or to even wipe all data in it. Phew!
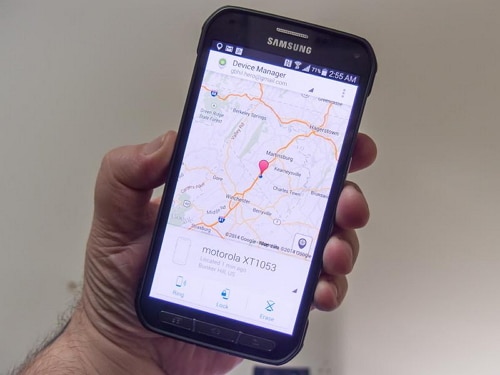
Using the Android Device Manager to track a lost phone
Part 1: What is Android Device Manager lock?
Android Device Manager is Google’s take on Apple’s Find My iPhone. Enabling the ADM is quite easy; just go to google.com/android/devicemanager on your computer and search through your list of devices that are already connected to your Google account. Once you are there, you can easily send a notification to the phone you want to enable remote password application and wiping upon.
ADM comes with a set of features that helps you to unlock your Android phone as well. It not only helps you to find your device, but also Ring it, lock it, and wipe and erase all the data as well, if your phone is lost or stolen. Once you’re logged into the ADM website from your computer, you can avail all these options once your phone is located. It is a wise option to get your device locked by Android Device Manager in case it is lost or stolen, so that your phone is secured.
Android Device Manager can unlock your phone under a specific set of circumstances only.
- • First of all, Android Device Manager needs to be enabled on your phone before it is lost, stolen, etc.
- • Secondly, your phone can only be tracked by ADM if the GPS option is switched on.
- • Thirdly, the Infinix Smart 8 HD device you are using for ADM, must be connected to Wi-Fi or internet, to login to your Google account.
- • Lastly, Android Device Manager is not compatible for all Android versions. For now, it is only compatible with devices running Android 4.4 and above, so your phone must be in this category for ADM to work.
Part 2: How to unlock Android phone with Android Device Manager?
Just act according to the following steps, and the Android Device Manager will unlock your phone.
1. On your computer or any other mobile phone, visit: google.com/android/devicemanager
2. Then, sign in with the help of your Google login details that you had used in your locked phone as well.
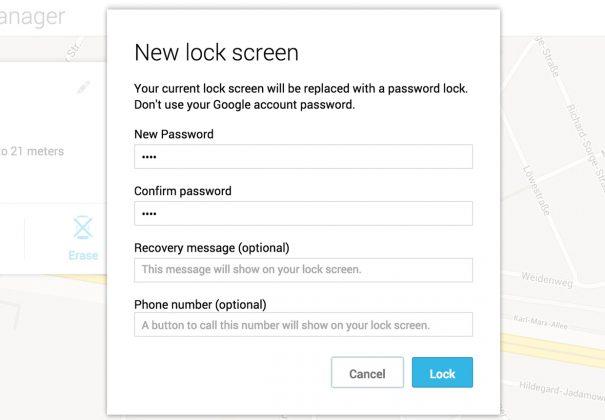
3. In the ADM interface, choose the Infinix Smart 8 HD device you want to unlock. Now, select “Lock”.
4. Enter a temporary password. Now go ahead and click on “Lock” again.
5. If the previous step was successful, you should be seeing a confirmation below the box with the buttons – Ring, Lock and Erase.
6. Now, you should see a password field on your phone screen. Enter a temporary password to unlock your phone.
7. Visit your phone’s lock screen settings and disable the temporary password.
The Android Device Manager has successfully unlocked your phone!
A downside to this process, is an error message faced by some users while using ADM. Many users have reported the issue, that when they have tried using ADM to unlock their locked device, an error message has occurred, saying, “since Google has verified that a screen lock is already set”. Basically, this error message conveys that you will not be able to unlock your phone using Android Device Manager, and this is a flaw on Google’s part, not your phone’s.
Part 3: What to do if phone is locked by Android Device Manager
There are 2 situations where you would want to know how to unlock the Android Device Manager lock – one, when you have unfortunately forgotten the screen lock passcode and the other is when your phone is locked by Android Device Manager.
ADM is built to completely lock your device so that unknown people cannot access it. So, if your phone is locked by Android Device Manager, you might be in a problem.While ADM is a wonderful tool to lock your phone or erase and wipe data if its stolen or lost, most of the users have reported the issue that they cannot unlock their phones that are locked by Android Device Manager. A possible solution to this is adding a temporary password via Google login and bypassing the ADM lock. Or, you can try resetting the password again by entering a new password via ADM. If that does not work, you can make use of several third-party applications which can be found in the internet, that will help to completely erase the Android Device Manager lock.
So, now you know how to unlock the Android Device Manager lock. Do keep in mind, your device must be connected to internet or Wi-Fi, to login to your Google account.
Part 4: Unlock Android devices with Dr.Fone - Screen Unlock (Android)
As mentioned before, many were unable to unlock their phones with ADM. This is why we use the Dr.Fone - Screen Unlock (Android) . It is hassle-free and easy-to-use; the Dr.Fone toolkit needs to be downloaded on your computer and with a few easy steps, it erases any kind of lock-screen passcode and avoids any kind of data loss as well!
Dr.Fone - Android Lock Screen Removal
Remove 4 Types of Android Screen Lock without Data Loss
- It can remove 4 screen lock types - pattern, PIN, password & fingerprints.
- Only remove the lock screen, no data loss at all.
- No tech knowledge asked, everybody can handle it.
- Work for Samsung Galaxy S/Note/Tab series, and LG G2, G3, G4, etc.
3,224,627 people have downloaded it
This tool works on removing all four types of lock-screen passcodes – PINs, Patterns, Fingerprints, and Passwords. Anyone can use this tool following these easy steps:
You can also use this tool to bypass the locked screen beyond Samsung and LG.Things you should pay attention is that it will remove all the data after finishing unloking on other brand android phone.
1. Fire up the Dr.Fone toolkit for Android on your computer and select the Screen Unlock among all the other tools.

2. Now, connect your Android device to the computer and select phone model in the list on the program.

3. Boot your phone into Download mode:
- • Power off your Android phone.
- • Press and hold the volume down+the home button + the power button at the same time.
- • Press the volume up button to enter Download Mode.

4. After you get your phone into the Download mode, it will start downloading a recovery package. Wait for this to be completed.
5. When the recovery package download is completed, Dr.Fone toolkit will begin removing the screen lock. This process will not cause any data loss on your Android device, so do not worry. Once the whole procedure is over, you can easily access your Android phone without entering any kind of password. Hurrah!
The Dr.Fone software is currently compatible with Samsung Galaxy S/Note/Tab series, and LG G2/G3/G4 series. For windows, it is compatible with 10/8.1/8/7/XP/Vista.
The Android Device Manager is an excellent initiative taken by Google to give people the chance to not lose any data and regain access to their phones. This also teaches us to take precautions before such unfortunate incidents take place. Phones are probably one of the most important belongings of ours, in which we confide all our private and confidential documents that we wouldn’t want to be meddled with.
So, make use of this guide and get back command over your Android phone.
- Title: In 2024, Delete Gmail Account With/Without Password On Infinix Smart 8 HD
- Author: Marry
- Created at : 2024-07-18 15:49:09
- Updated at : 2024-07-19 15:49:09
- Link: https://unlock-android.techidaily.com/in-2024-delete-gmail-account-withwithout-password-on-infinix-smart-8-hd-by-drfone-android/
- License: This work is licensed under CC BY-NC-SA 4.0.