
In 2024, How Can We Unlock Our Xiaomi Redmi A2 Phone Screen?
How Can We Unlock Our Xiaomi Redmi A2 Phone Screen?
A phone lock acts as your Android phone’s shield against unauthorized users. Some users have new security features, such as fingerprint impression unlocks for an Android lock screen.
However, certain people like to create a PIN and password on their Google account as their Android screen lock. It tends to be distressing and tedious when you fail to remember the code of your Android phone. Surprisingly, being fully locked out of your device is awful. Also, it can be hard at first to unlock your Android.
Anyway, no one can escape such a situation. Yet, sit back and relax! We know several techniques on the best way to unlock your phone and set a screen lock. You can attempt software like Wondershare Dr.Fone - Screen Unlock for Android to assist you with unlocking your phone in a couple of steps. Besides this, there are various other ways.
Part 1: What Is Your Xiaomi Redmi A2 Phone Lock System?
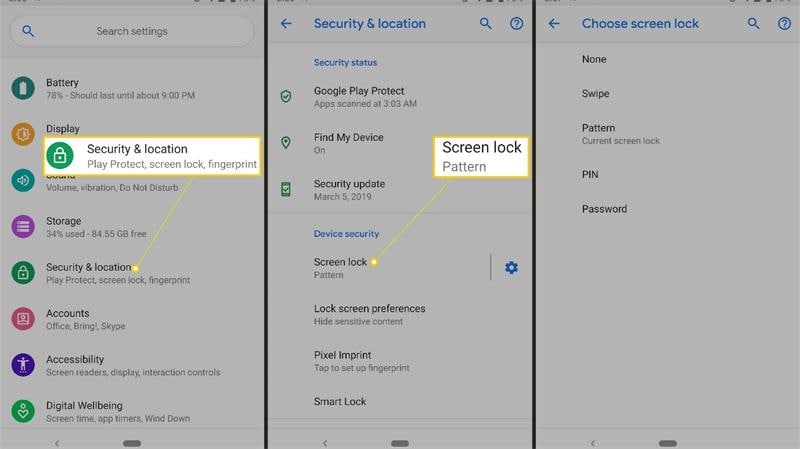
There are three types of standard lock types available for Android. You can set a PIN/password, fingerprint, or a pattern as your phone lock. All have their pros and cons. However, everyone should select the ideal one based on their liking and ease of use.
Once you decide on the phone lock type, you can enable or disable them from the Security tab in your Android phone’s settings. After you set a screen lock, your Android will require it every time you try to open your device.
Here you will see how to set up a screen lock on your Android device:

Part 2: Quickly Unlock Your Screen By Dr.Fone
Parental Control Software
### Dr.Fone - Screen UnlockFor a quick, easy, and hassle-free unlocking experience, we suggest you download Dr.Fone - Screen Unlock. Dr.Fone not only unlocks your phone but keeps your data secured during the process. It has a simple interface, and even an amateur can use it to unlock their device.
So, look no further if you want to remove your Android screen lock in just a few clicks. Install Dr.Fone and enjoy using your device again.
![]()
Dr.Fone - Screen Unlock (Android)
The Best Tool to unlock Android Phone Screen!
- Remove all Android screen locks (PIN/pattern/fingerprints/face ID) in minutes.
- Bypass the FRP lock of Samsung without a PIN or Google account.
- Everyone can handle the lock screen without any tech knowledge.
- Provide specific removal solutions to promise success rate.
4,008,672 people have downloaded it
Step 1. Open Dr.Fone on your PC and select the “Screen Unlock” tool.

Step 2. Select Unlock Android Screen
This is the page to start your unlock process with two options here, please select” Unlock Android Screen” to unlock your device screen.

Step 3. Select device model
For most Brands, it should be “100% Remove Screen Lock”. These two solutions unlock screens for almost all Android devices, for example, Samsung, Huawei, OPPO, Vivo, Lenovo, LG, etc.

In the supported device brands list, please find the right one for you.

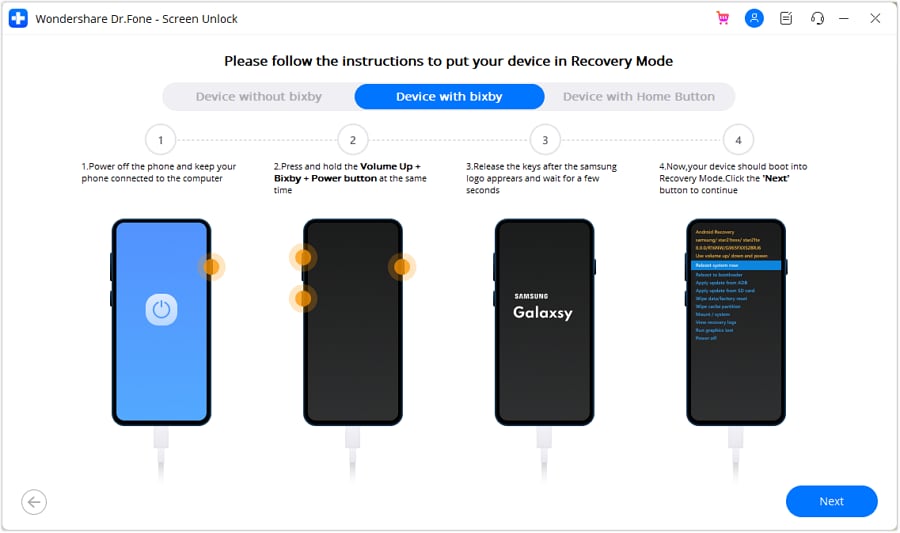
Step 4. Enter into Recovery Mode
Before unlocking your device screen, the instructions below are here to help you to get into Recovery Mode. We take 3 Samsung phones as an example.
Get into Recovery Mode on Samsung phone with Bixby:
Get into Recovery Mode on Samsung phone without Bixby:

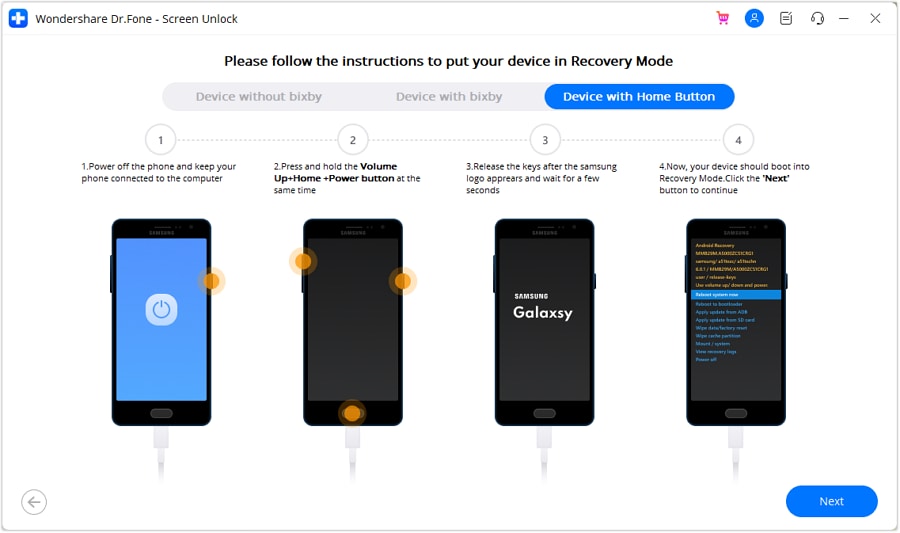
Get into Recovery Mode in Samsung phone with Home Button:
Step 5. Instructions to Wipe Cache Partition
During the steps in Recovery Mode, please don’t pick the wrong choices!
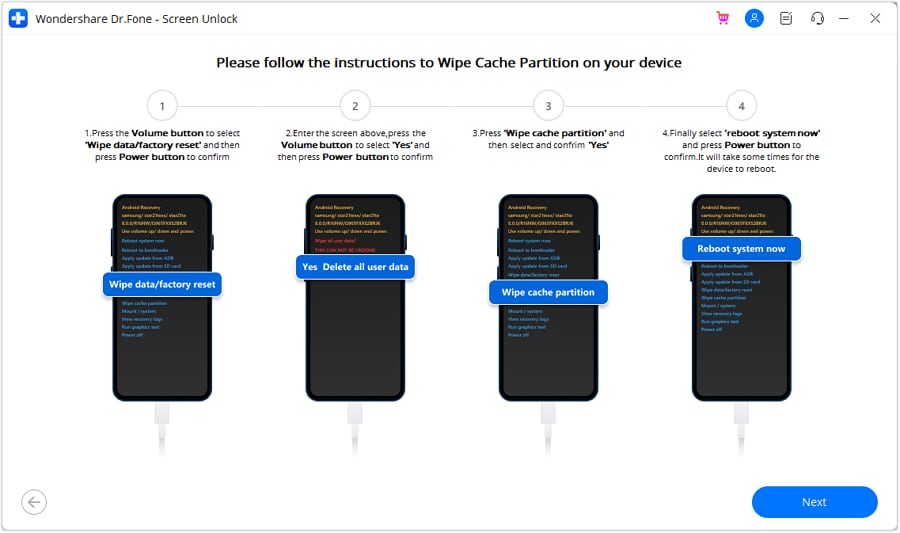
You’re now able to access your Android device again when the whole process is over. And you no longer need a password or pattern!

Part 3: Solutions to Unlock Android Screen
1. Google Find My Device
Step 1: Open the “Find my Device” webpage from a browser on your PC.

Step 2: Click “Erase my device,” which you will see on the left half of your screen. After affirming the Delete capability, your phone will boot into recovery and begin playing out a production line reset. It is difficult to stop or drop on your android gadget when you endorse this activity. Regardless of whether you shut down your Android phone - the reboot will continue on startup.
### 2\. Recovery ModeDepending on your phone, the steps for this process might vary a little. Most phones will allow you to reset by getting to the recovery mode. Follow the steps below to remove the Android screen lock:
Step 1: Turn on the Xiaomi Redmi A2 device and enter the boot menu. If you want to know how to do so, you can do a speed search on the internet.
Step 2: Access the safe mode, use the volume keys to navigate, and press the Power key to click.
Step 3: Search for the Wipe Data option and select it.

After that, your Android will start the process, which can require a few minutes. However, this process will erase all your user data.
3. Use ADB
This method is very confusing, so follow the steps cautiously on your Android phone to remove the phone lock. With your phone connected to your PC, and the cmd open, type the accompanying commands altogether:
- adb shell
- disc/data/data.com.android.providers.settings/databases
- sqlite3 settings.db
- update system set value=0 where name=’lock_pattern_autoblock’;
- update system set value=0 where name=’lockscreen.lockedoutpermanently’;
- .quit
After you’ve finished this, reboot your Android phone. If this doesn’t reset your lock screen, proceed to the following stage.
With your Android phone connected and the cmd opens, enter:
- abd shell rm/data/system/gesture.key
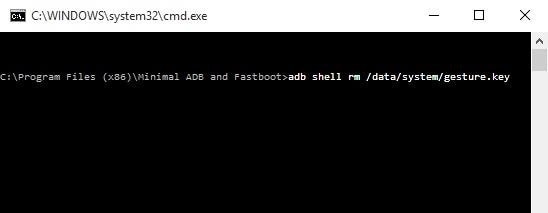
After entering, reboot your phone once more.
4. Boot into Safe Mode
Step 1: For most phones and your Android, you can do this by opening the power menu and holding the “Power Off.” A message will spring up on your screen, asking whether you might want to Reboot to Safe Mode. Press Ok.
Step 2: Clear data from your lock screen application, uninstall and reboot your phone to escape the Safe mode. When you do so, your Android screen lock will unlock.
5. Crash Lock Screen
This strategy to sidestep a locked screen is only a crisis workaround for the phones in this classification.
- Enter ten asterisks (*) through the dialer application.

- Copy and paste asterisks on the dialer until the “Paste” choice no longer appears.
- Get back to the lock screen and tap on the camera symbol.
- Go to the settings on your Android after pulling down the notifications bar. Now you will have the chance to enter the password, and you must continue the same thing here. Continue to paste until the Android lock screen crashes.
Conclusion
Passwords shield our phones from unapproved access, yet we get locked out unexpectedly on our phone lock. Failing to remember your PIN can be irritating. However, we can assist you in reaccessing your locked phone without a factory reset by using Dr.Fone - Screen Unlock. Dr.Fone is an expert in solving such problems in just a few minutes. So download this expert tool immediately for a quick solution.
Delete Gmail Account With/Without Password On Xiaomi Redmi A2
Email accounts have proven their worth in digital devices beyond sending emails. Lately, Android devices have only operated with a Gmail account. This is because most of the data, such as contact information, messages, and other details, are saved across the storage space offered with the email. Against all recognizable uses of Gmail accounts, users look for ways how to delete Gmail accounts.
To this day, it is known that Gmail accounts can be removed with or without a password. However, one should know that if they consider deleting their Gmail account, they won’t be able to send or receive emails. With that, let’s proceed to reveal all essential methods that can be used to delete a Gmail account permanently. This article will also focus on a perfect tool that assists in making the process easier.
Part 1. Synopsis: Things To Know Before Deleting Gmail Account
Although the process of deleting a Gmail account sounds basic, there are many pointers connected to it. For that, this part is putting up a discussion on the important things that a user should know before they delete their Gmail account permanently:
- No Going Back: If you delete a Gmail account, the process is irreversible. All details and information will be lost, and the email won’t be trackable ever again.
- Cannot Reset Passwords if Connected: If the Gmail account is connected to any other service, make sure that you remember their passwords. Since the account will be deleted, you cannot reset their passwords.
- Access to Other Services: Although you are deleting your Gmail account, you can still access Google Photos, Google Drive, and other services.
- Lookout For Emails: Ensure that the emails in your account are saved. You can easily download them anywhere before deleting the Gmail account.
Part 2. Delete Your Gmail Account Using Your Password: Desktop Solution
For the first method, we will discuss how to delete a Google account with your password. You will use your computer for this process and access the Google Account services. The service helps you save all your essential Gmail data before you remove it. To understand how it makes it possible, look through the steps provided below:
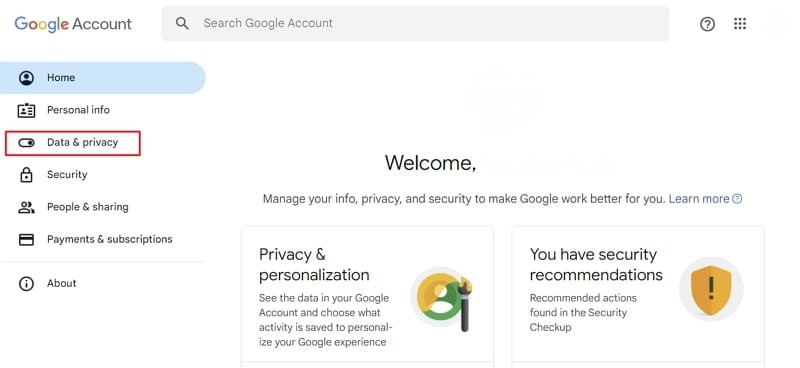
- Step 1. Access the website https://myaccount.google.com/ on your desktop browser and log in with your credentials. Proceed to the “Data & privacy” section from the left panel.
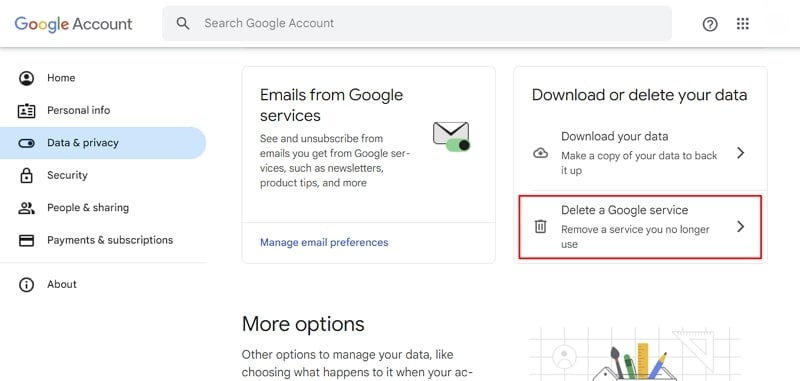
- Step 2. On the following window, scroll down and look for the “Delete a Google service” option. Accessing this would allow you to delete your Gmail account permanently.
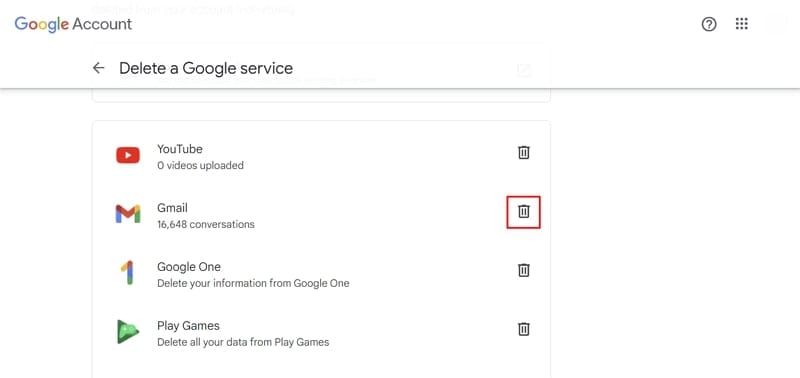
- Step 3. You will be led to a new screen where you need to provide your password credentials again. On successfully providing your password, look for the “Gmail” option on the next screen. Click the “Trash” icon to continue deleting the Gmail account.
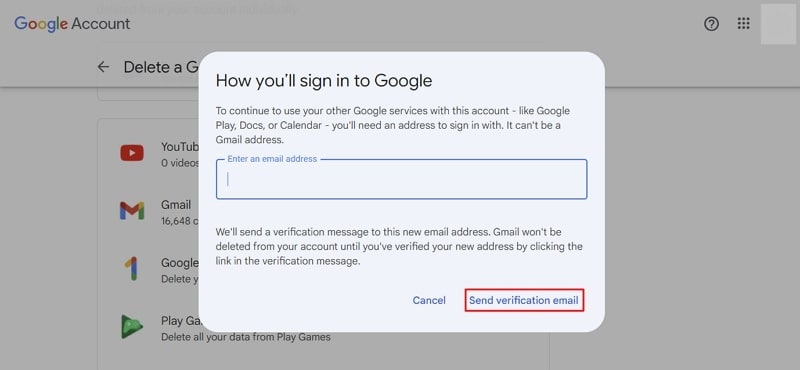
- Step 4. A new pop-up window opens, demanding another email address that can help connect to other Google services. Provide the email address and continue to click “Send verification email .” The Gmail account won’t be deleted until the user verifies the email sent to the new address.
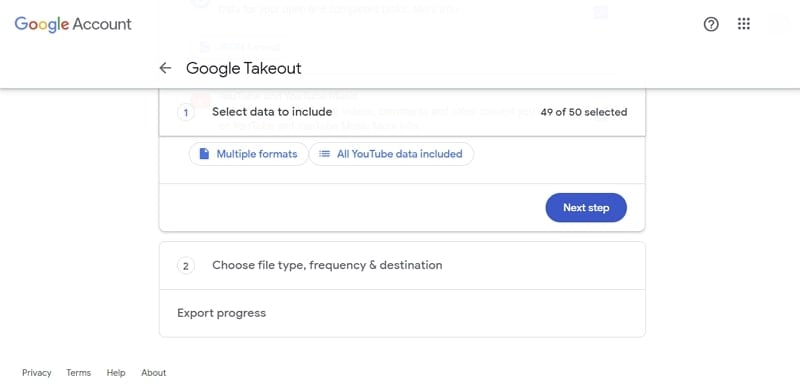
- Step 5. For those who want to save their email data, look for the “Download your data” option in the same window. This leads you to the Google Takeout window, where you need to select the data to include. After selecting the data, define the file type, frequency, and destination for exporting all important data.
Part 3. Delete Your Gmail Account From Your Smartphone: Android & iOS
If you use a smartphone device and want to delete your Gmail account from that particular device, you are at the right place. The following methods will help you understand how to delete Gmail from your Android and iOS devices:
Android Devices
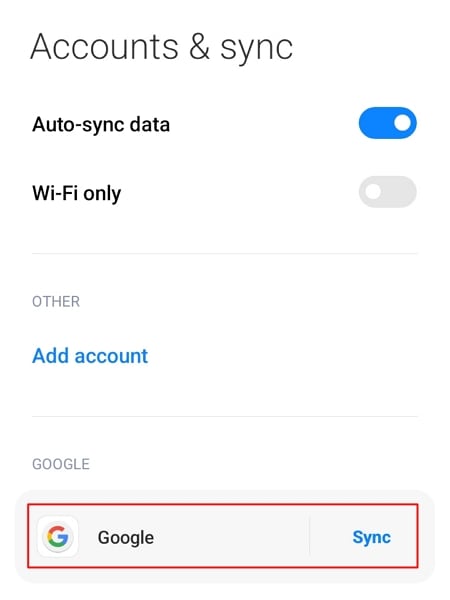
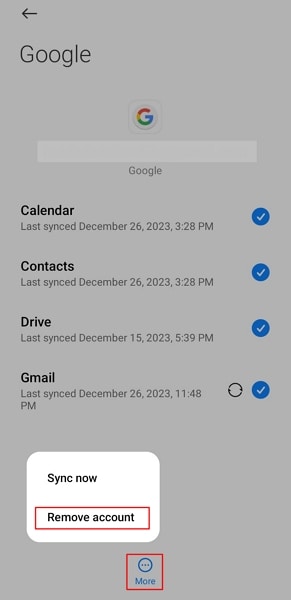
- Step 1. Look for “Settings” on your Android and continue to the “Accounts & sync” option in the list. As you proceed into the next window, look for the Google account and select it.
- Step 2. Select the “More” option at the bottom on the following screen. Choose the “Remove account” option in the pop-up menu and provide your credentials to execute the deletion of your Gmail account.
iOS Devices
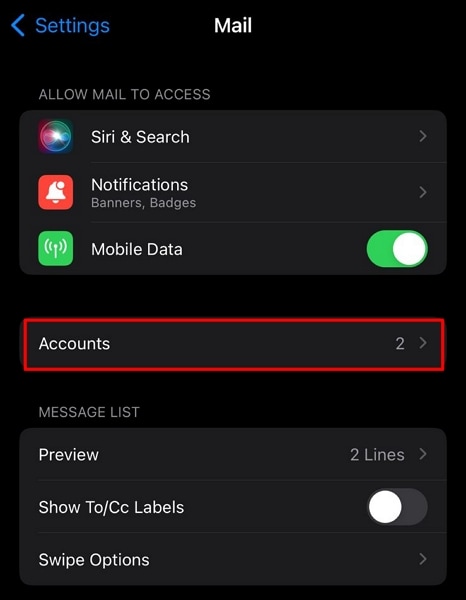
- Step 1. Open your iPhone’s “Settings” app and scroll down to the “Mail” option. You will find the “Accounts” option on the following screen, which you need to tap to proceed.
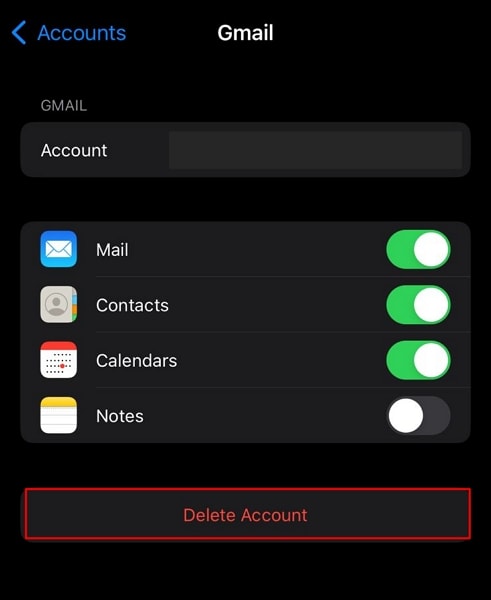
- Step 2. Discover the option of “Gmail” in the list of signed-in accounts and continue to the next screen. Select “Delete Account” to remove the account from your iOS device.

Part 4. Don’t Know Password of Device? Reset To Delete Gmail Account
What if you’ve forgotten the password to your smartphone device, and you have to delete your Gmail account permanently? In such cases, you are left with the option of accessing the Xiaomi Redmi A2 device’s Recovery Mode and factory resetting the Xiaomi Redmi A2 device, where possible. To know how it is done flawlessly, look through the steps provided next:
Android Devices
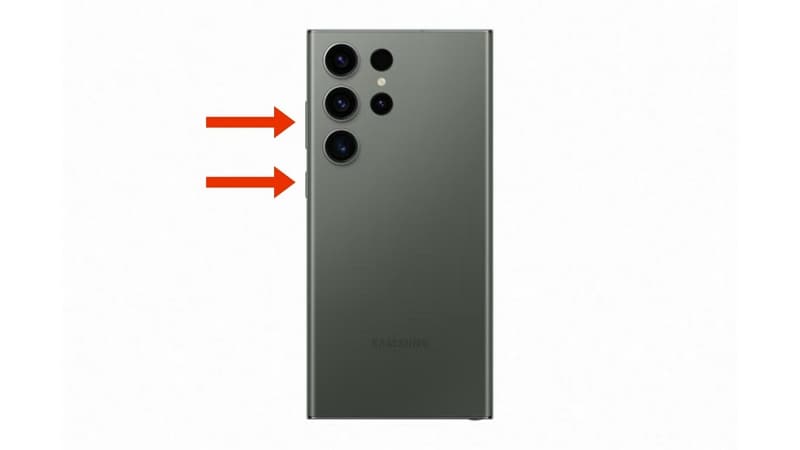
- Step 1. Those owning an Android device need to put it in Recovery Mode first. For that, use the combination of the “Power” and “Volume” keys to put the Xiaomi Redmi A2 device in Recovery Mode.
- Step 2. Once you boot into the Recovery Mode, use the Power and Volume buttons to scroll through the menu. Scroll down with the Volume buttons and select the “Wipe data/factory reset” option with the Power button.
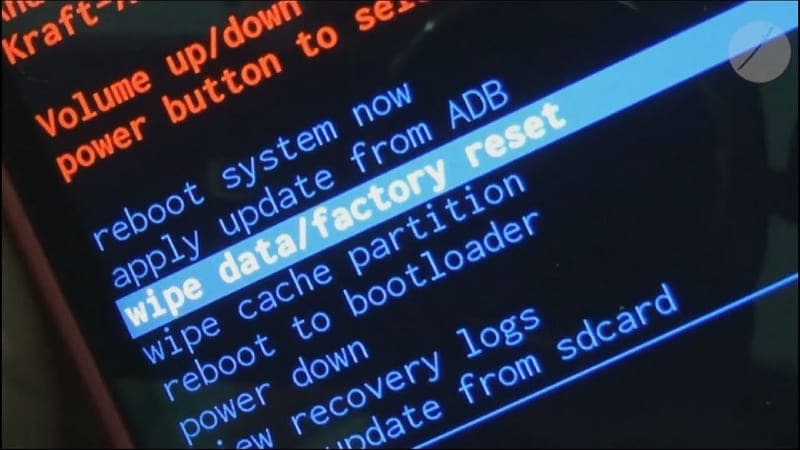
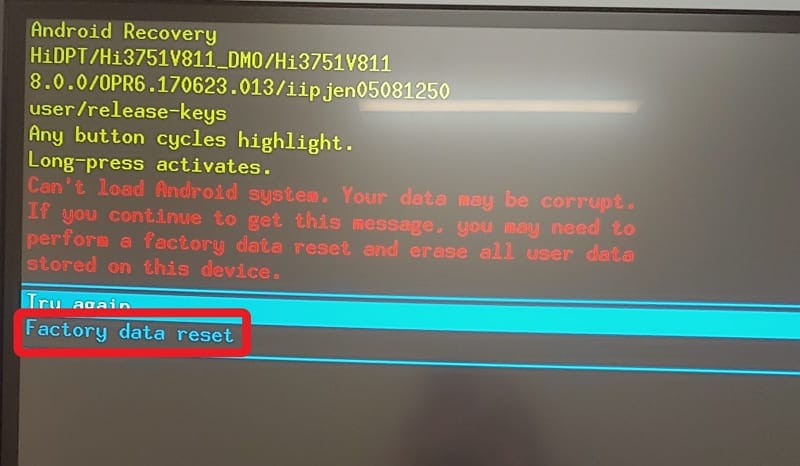
- Step 3. Select “Factory data reset” on the next screen and confirm that factory reset your Android device successfully. The device automatically gets out of Recovery Mode and starts normally after resetting.
iOS Devices
Step 1. You need to turn on Finder if you own a macOS Catalina or later device. Conversely, use iTunes if you have a macOS Mojave or earlier version or if you are using Windows. Connect your iPhone to the computer using the lightning cable and put it in Recovery Mode.
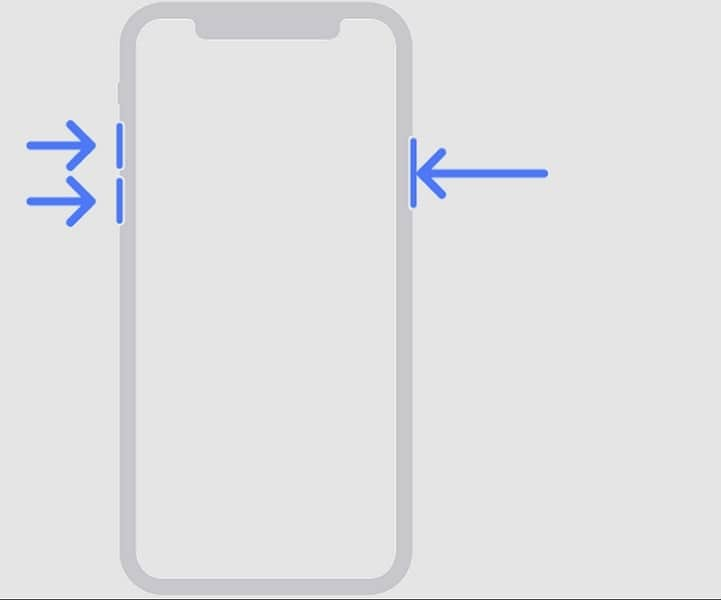
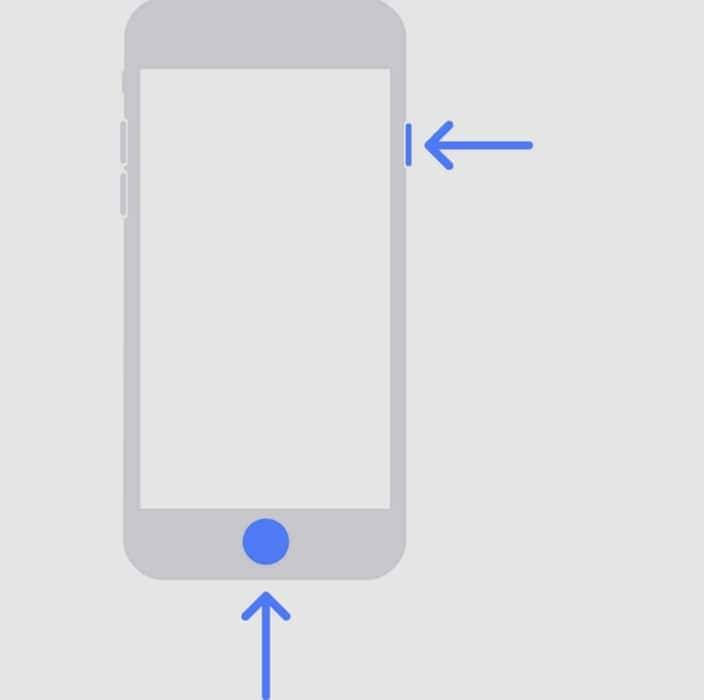
For iPhone X or Later Models: Press and release the “Volume Up” button, followed by the “Volume Down” button. Hold the “Side” button until the Recovery Mode screen appears.
- For iPhone 7 Models: Hold the “Side” and “Volume Down” button until the Recovery Mode screen appears.
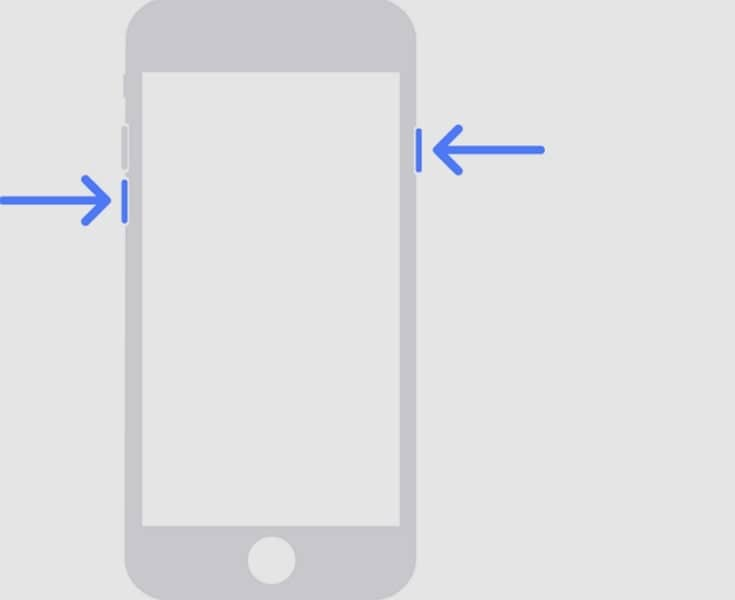
- For iPhone 6 and Earlier Models: Hold the “Side” and “Home” buttons simultaneously until the Recovery Mode screen appears.

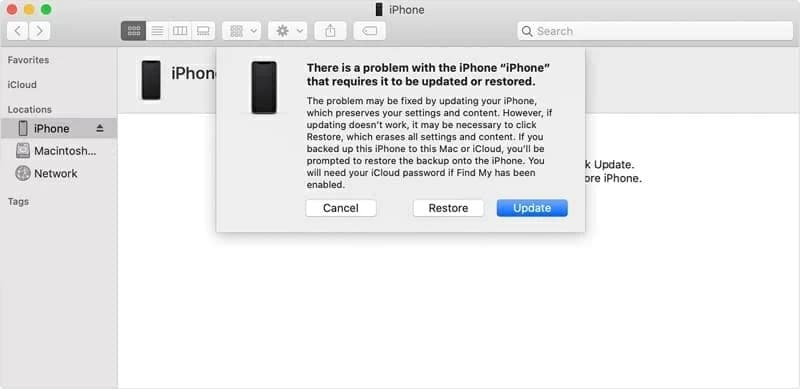
- Step 2. The device automatically gets detected on Finder/iTunes, and a pop-up appears on the screen. Click “Restore” to reset your iOS device to factory settings.
Part 5. Remove Gmail Account From Device Without Password: Using Wondershare Dr.Fone
While you seek some appropriate way to close a Gmail account from a device whose password you’ve forgotten, you might get into Wondershare Dr.Fone. This all-in-one service offers a unique Screen Unlock feature that helps you restore your device. If you have forgotten the lock screen password of your Android device, Dr.Fone – Screen Unlock (Android) makes it exceptionally easy to recover.
Key Features of Wondershare Dr.Fone
![]()
Dr.Fone - Screen Unlock (Android)
The Best UnlockJunky Alternative to Bypass FRP and Solve Your Screen Locks
- Remove all Android screen locks (PIN/pattern/fingerprints/face ID) in minutes.
- Bypass the FRP lock of Samsung without a PIN or Google account.
- Everyone can handle the lock screen without any tech knowledge.
- Provide specific removal solutions to promise good success rate.
4,008,671 people have downloaded it
Whether it is your latest Samsung or other Android smartphone, the process is easy to work with. You might look for more details about this unique tool, for which some important features are highlighted as follows:
- It removes all major types of screen locks from your Android devices.
- Provides support to the latest Android devices, along with all mainstream brands.
- You can recover your device with and without data loss, according to your discretion.
Steps To Remove Google Account While Removing Screen Lock
The following steps highlight the way to remove screen lock from your Android device, which would also cover removing the Google Account automatically:
- Step 1.Launch Screen Unlock Feature
To start with the process, launch Dr.Fone on your computer and navigate to the “Toolbox” section. Proceed to the “Screen Unlock” feature, which opens a new window. After selecting “Android” as your device type, select “Unlock Android Screen” from the available options.
- Step 2.Select Device Brand and Unlock Mechanism
As you direct into the next window, select the brand of your Android device. Continue to select “100% Remove Screen Lock” from the following window.

- Step 3. Follow the Instructions and Successfully Remove the Screen Lock
According to your selected device brand, Dr.Fone provides guidelines for entering the specific mode. Follow the on-screen instructions to start unlocking the screen of your device. If the process is successful, click “Done” to conclude using Dr.Fone – Screen Unlock.

Conclusion
This article has specifically provided you with some important details on how to delete a Gmail account with ease. The article explains everything from the methods of deleting it from the computer to removing it from the Xiaomi Redmi A2 device. Furthermore, it also serves as a guidance for those who have forgotten their device passwords. For that, they’ve provided an insight into Wondershare Dr.Fone – Screen Unlock and its unique functions.
How To Fix OEM Unlock Missing on Xiaomi Redmi A2?
Original Equipment Manufacturer (OEM) Unlock is a function on Android devices. It allows you to unlock your phone bootloader. A bootloader or bootstrap loader gathers the operating system files, loads them into memory, and hands over control, essentially starting your device. Unlocking the bootloader assists you in installing custom ROMs, flashing custom kernels, and rooting your phone.
However, this freedom comes with some trade-offs. Most manufacturers will void your warranty if you unlock the bootloader, and it can also make your phone face higher risks of malware and other security threats. Additionally, it can be difficult to relock the bootloader once you unlock it.
If you encounter the OEM unlock missing on your Android phone despite wanting to unlock your bootloader, this article can help. You will learn the step-by-step guide for the different methods to fix the missing OEM unlock option. Before diving into solutions, let’s explore why this option might be unavailable in the first place.

Part 1: Why Is OEM Unlock Missing on Your Device?
Finding that OEM Unlock is missing on your Android phones can be frustrating, particularly if you plan to modify your software or install a custom ROM. But don’t worry. There are several possible explanations for this. Let’s explore some of the most common reasons:
Manufacturer Restrictions
The Missing OEM Unlock option can often be due to restrictions imposed by your device’s manufacturers. They may intentionally remove this option to safeguard device security and compatibility. It is common with carrier-locked devices. As a result, the OEM Unlock option may not show.
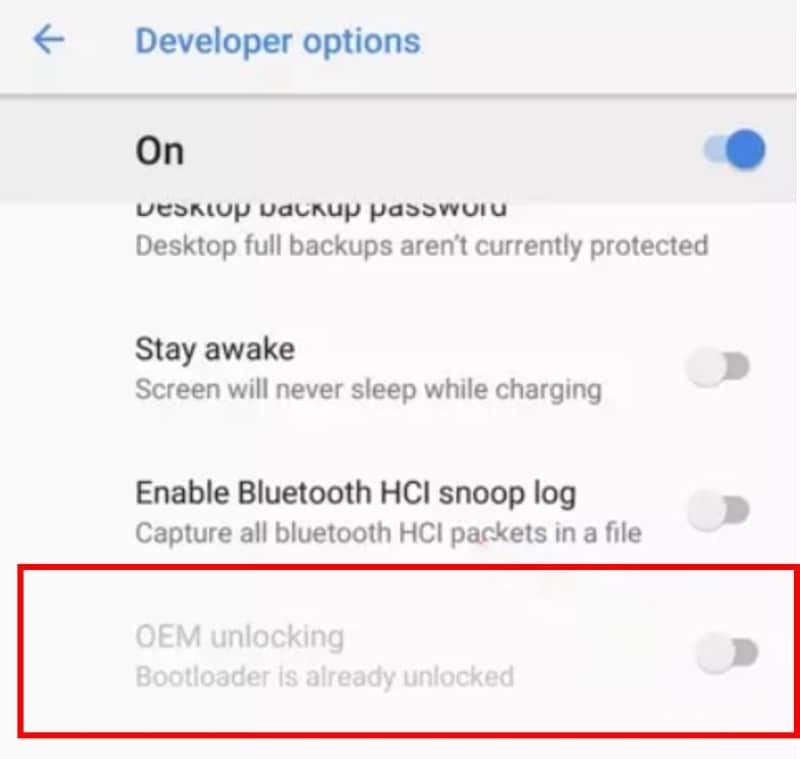
Bootloader Already Unlocked
In some cases, the Android OEM Unlock Missing issue arises when the bootloader has already been unlocked. Relocking the bootloader might make the option reappear. But exercise caution as this process can erase device data.
Developer Options Not Enabled
It might seem obvious, but sometimes the simplest things get overlooked. The OEM Unlock option can only be accessed from within Developer Options. If this menu isn’t enabled, you won’t see it.
Carrier-Locked Devices
The OEM Unlock Missing issue can also occur if your device is carrier-locked. Carriers often impose restrictions to prevent users from switching networks, and bootloader unlocking is one way to do that. Unfortunately, the missing OEM Unlock option is usually intentional, and unlocking your device can be more complicated.
Security Features
Enhanced security features, like Samsung’s KNOX, can sometimes conceal the OEM Unlock option. Temporarily turning off these features might show the option, but it’s crucial to be aware of the potential security implications of doing so.
Corrupted Bootloader
A corrupted bootloader can also lead to the Android OEM Unlock missing problem. The bootloader plays a role in the boot process, and if it’s damaged, it might not display the necessary options. This can be caused by software glitches, failed flashing attempts, or even hardware issues. In this scenario, you might need to consult your device’s manufacturer or a technical specialist to help repair or re-flash the bootloader.
Connectivity Issues
A poor connection between your device and computer can also prevent the OEM Unlocking from showing up. Check your cables and try using different USB ports to ensure a stable connection.
Part 2: How To Enable Missing OEM Unlock Without a Password?
Unlocking your phone’s bootloader (OEM Unlock) varies across models and brands. Some need a passcode or PIN after rebooting the phone, while others don’t. Even if your phone doesn’t require a separate password, your existing screen lock (password, PIN, pattern) will usually be needed to enable the missing OEM unlock option.
But what if you forgot that, too? Wondershare Dr.Fone - Screen Unlock can help bypass forgotten passwords and unlock your phone even if you don’t have the technical knowledge. Here’s a quick breakdown of its key features in this area:
- Success Rate
High success rate for bypassing various lock screen types, including PIN code, pattern lock, passwords, and fingerprints.
- Ease of Use
Provides a concise and intuitive interface that guides users with clear instructions and on-screen prompts.
- Comprehensive Features
Dr.Fone - Screen Unlock tool can remove the Android phone lock screen without resetting your Samsung or LG device. It can also help you bypass Google Factory Reset Protection (FRP) on mainstream Android brands.
- Extensive Device Compatibility
Aside from Samsung and LG, it covers a wide range of popular Android brands like Vivo, Huawei, Xiaomi, Oppo, etc.
Regain control in minutes with Dr.Fone. First, download the app to your desktop and install it. Once it’s up and running, launch Dr.Fone and prepare to unlock your device with ease. You’ll find detailed instructions below – even if you don’t know your phone’s lock screen, Dr.Fone has you covered.
- Step 1: Select Screen Unlock from the Toolbox homepage. Then, establish a connection between your locked Android device and your computer using a USB cable.
- Step 2: Specify the Xiaomi Redmi A2 device type for screen lock removal.

- Step 3: Select Unlock Android Screen to proceed.
- Step 4: Choose the brand of your phone from the supported brands.

Note:
The following steps will vary based on your device’s manufacturer. Please refer to the instructions on your screen to proceed into Download or Recovery mode.
- Step 5: The screen unlock process is underway. If it encounters trouble, click Try Again. Once Dr.Fone successfully unlocks your Android device, tap Done.
Now that you’ve regained access to your device thanks to Dr.Fone - Screen Unlock, you can move forward with enabling the OEM unlock missing option. Next up, we’ll guide you through the steps in several ways. Let’s start with the Developer options.
Part 3: How To Enable OEM Unlock Missing From the Developer Options?
Developer Options, a hidden menu in Android, offers advanced features like app debugging and custom ROM installation. But if the Android OEM unlock option is missing, you can’t unlock your device’s bootloader. Below is a step-by-step guide for you so the OEM unlock missing option will show in the Developer Options. Remember, this process may erase your device data, so a complete backup is essential before proceeding.
- Step 1: Open the Settings app on your Android phone.
- Step 2: Navigate to About Phone at the bottom of the list, then tap Software information.

- Step 3: Tap on the Build number repeatedly (7 times) until you see a message saying, “You are now a developer!“ or similar.
- Step 4: Go back to Settings > System and find the Developer options menu.
- Step 5: Scroll down and tap the toggle switch next to Enable OEM Unlock to turn it on.

- Step 6: A warning message explaining the risks of turning on the OEM unlock will appear. Read it carefully and tap Enable if you want to proceed.

- Step 7: Enter your PIN or password to confirm the unlock when prompted
- Step 8: Your device will reboot, and OEM Unlocking will be enabled.
Part 4: How To Fix OEM Unlock Missing by Adjusting Date and Time?
Some manufacturers intentionally delay the availability of the OEM unlock after a software update for security reasons. Changing the date to a past date before the update rolled out can trick the system into displaying the option, as it thinks the update hasn’t happened yet. It is a temporary fix, and the option will likely disappear again later when the Xiaomi Redmi A2 device automatically syncs the correct date.
If you intend to try this method, follow these steps to enable OEM unlock missing or greyed out after an Android update:
- Step 1: Open the Settings app.
- Step 2: Go to System or General management, depending on your Android version.
- Step 3: Tap on Date and Time.
- Step 4: Turn off Automatic date and time.

- Step 5: Tap on Set date and choose the desired older date from the calendar.
- Step 6: Tap on Set time and choose the desired time from the clock.
- Step 7: Tap on Done to save the changes.
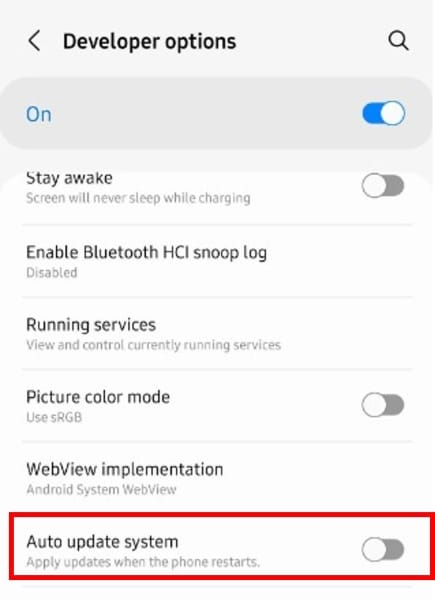
- Step 8: Go back to the Developers options and turn off the Auto update system option.
- Step 9: Go to Settings > Software update, then turn off Auto download over Wi-Fi.

This method should enable the OEM unlock missing issue. Otherwise, proceed to the next section for another solution.
Part 5: How To Fix OEM Unlock Missing by Removing SIM Card?
Certain carriers restrict bootloader unlocking on their devices to ensure compatibility and prevent unauthorized modifications. For these phones, unlocking the SIM card becomes crucial before you can toggle the OEM unlock option. Here are the steps to fix the OEM Unlock missing or greyed out using SIM card removal:
- Step 1: Use the SIM ejector tool (often included with your phone) or a small pin to push the tray out.
- Step 2: Go to Settings > General Management > Reset, then select Factory data reset. Enter your PIN or password if needed.

- Step 3: Review the warning and tap Reset to confirm.
- Step 4: Once the reset is complete, your phone will restart. Connect to Wi-Fi when prompted.
- Step 5: Skip any prompts to log in to your Google or email account. Then, repeat the process to open the Developer Options in the previous sections.
Conclusion
Having the OEM Unlock missing or greyed out can leave Android users feeling locked out of customization possibilities. Fortunately, this article has outlined helpful solutions like enabling the Android OEM Unlock missing option via the Developer Options. You can also try other methods above, like adjusting date and time settings or even a sim card removal trick. For those facing forgotten lock screens, we’ve offered guidance on bypassing them using the Dr.Fone - Screen Unlock tool to access the necessary phone settings.
While these methods provide a solid foundation, it’s always wise to research steps specific to your phone model. And never forget – caution is key. If things get technical, don’t hesitate to seek help from online communities or professional repair services.
Tips: Forget your device password and can’t get access to it? No worries as Dr.Fone is here to help you. Download it and start a seamless unlock experience!
- Title: In 2024, How Can We Unlock Our Xiaomi Redmi A2 Phone Screen?
- Author: Marry
- Created at : 2024-07-18 13:35:54
- Updated at : 2024-07-19 13:35:54
- Link: https://unlock-android.techidaily.com/in-2024-how-can-we-unlock-our-xiaomi-redmi-a2-phone-screen-by-drfone-android/
- License: This work is licensed under CC BY-NC-SA 4.0.