
In 2024, How To Change Xiaomi Redmi Note 12 Pro 4G Lock Screen Clock in Seconds
How To Change Xiaomi Redmi Note 12 Pro 4G Lock Screen Clock in Seconds
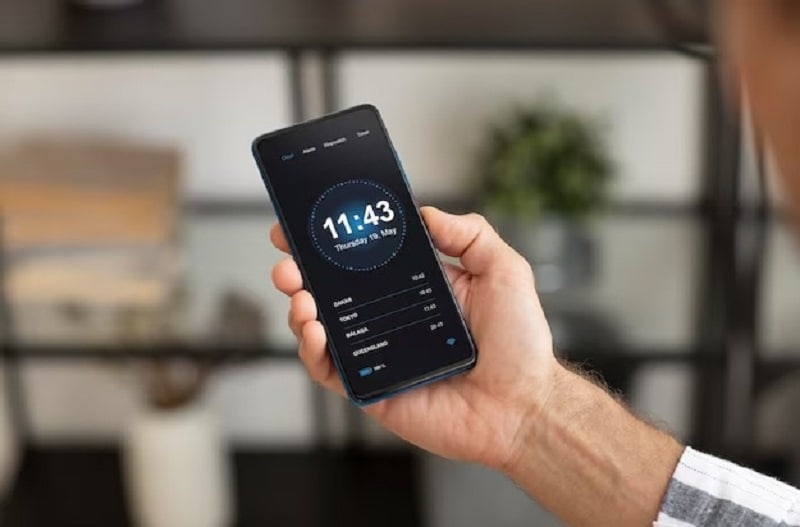
The initial glimpse of your phone often involves the lock screen. This essential feature is customizable based on your Android device. With the advent of Android 12, a double-line clock has stirred some controversy among users. It’s because the Android lock screen clock veered from the one-line design of the previous version.
The larger clock style appears when there’s no notification. It will only switch to the old one-line format when a notification pops up. Discover how to change the lock screen clock on your Android and tweak its appearance. Explore the article to learn more.

Part 1. How Do I Put a Clock on My Android Lock Screen?
Android devices running version 12 or later come with the clock feature activated by default. Take note that its appearance may change under specific circumstances. It can change when there are unread notifications visible on the lock screen.
For devices running Android 11, changing the lock screen clock is still available. In some instances, you can even customize its style by following these simple steps:
- Step 1: For users with Android 11 or older, go to Settings > Lock screen & security. Depending on your phone model, tap Lock screen or Security.

- Step 2: Go to Customize Lock screen > Clock. Next, customize or activate the lock screen clock.
Note
The exact names of settings may change depending on the manufacturer and version of Android. But the navigation should be similar.
Part 2. How To Change Lock Screen Clock on Android [5 Methods]
Currently, there isn’t an official method to change the lock screen clock on Android 12. However, there are several workarounds you can do. Let’s explore these techniques and see which works best for you.
Method 1: Change Your Wallpaper
In Android 11, adjusting your wallpaper is accessible through the Android Settings menu.
- Step 1A: Navigate to the “All Apps” screen and select Settings. For Samsung Galaxy devices on Android 11, access the Wallpaper option within the settings menu.

In Android 12, the process remains consistent.
- Step 1: Locate the Wallpaper & style button within the Settings menu**.**

- Step 2: Follow the provided instructions to transform your lock screen experience. Replace the oversized clock with dynamic, changing wallpapers.
Method 2: Turn Off the Always-On Display
An alternative to avoid the Android lock screen clock is disabling the Always-on Display (AOD).
- Step 1: Access the Settings menu on your Android device. Scroll down and choose Lock screen > Always On Display.

- Step 2: Toggle off to deactivate the Always On Display.
_Note_
While this won’t alter the lock screen clock itself, it will turn off the display. It will prevent the constant presence of the lock screen clock. Instead, the clock will only become visible when you press the power button.

Method 3: Disable the Double-Line Clock
Originally, there was no provision to change the lock screen clock in Android 12. With the release of a new update, Google introduced an option to deactivate the clock, bringing relief to users. Follow the steps below to disable the double-line clock on your Android.
- Step 1: Go to Settings > Display. Next, choose Lock screen.

- Step 2: Toggle the Double-line clock off.
_Note_
If you want to display a digital or analog clock, open the _Clock_ app. Tap the _three dots_ > _Settings_ > _Style_****.
Method 4: Turn On Screensaver
An alternative method to modify the Android lock screen clock involves activating Android’s screen saver. There are options where it’s more pleasing than the default lock screen clock. If you want to change the lock screen clock, follow the steps.
- Step 1: Open the Clock app and tap the three dots in the upper-right corner. Select Screensaver and toggle it on.

- Step 2: If you want to customize the screensaver clock’s appearance, go to Settings > Display > Screensaver. Choose analog, digital, or night mode.
Method 5: Keep Unread Notifications
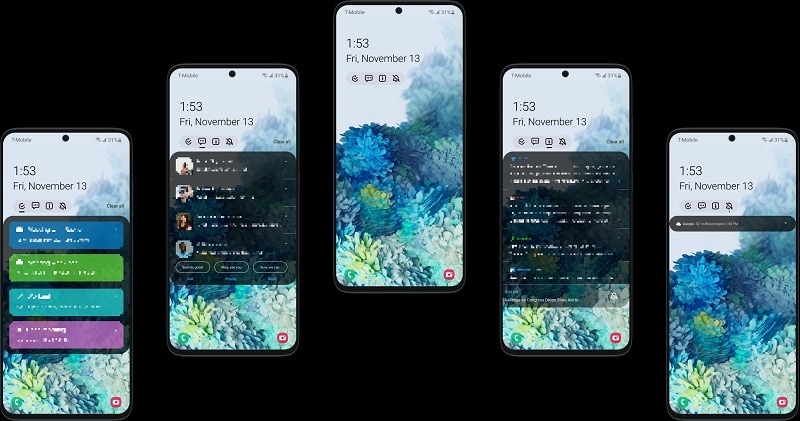
To avoid adjusting your Android device settings, you can make the lock screen clock smaller by maintaining unread notifications. The clock occupies less space when there are unread notifications. It shifts back to the top-left corner when you receive a new notification. Simply leave notifications unread to keep the clock smaller.
Bonus
For users who prefer not to have a lock screen clock, follow these steps:
- Step 1: Open Settings > Lock screen or Security & lock screen.
- Step 2: Look for Clock and FaceWidgets or a similar option. Disable or toggle off the Clock or Show clock setting. Save changes, and your lock screen should no longer display the clock.
Part 3. An Exception: Change the Lock Screen Clock on Samsung Phones
Changing the lock screen clock on Samsung phones is similar to the general Android process. However, the steps are quite different, offering Samsung users a unique customization experience. If you wish to personalize your lock screen clock, here’s how:
- Step 1: Go to Settings > Lock screen or Lock screen & security. Choose Customize lock screen > Clock, Clock style, or Lock screen clock.
- Step 2: Choose between different styles, such as digital, analog, or others. Some Samsung models offer extra settings like color, size, and more to enhance your lock screen further. Select the one that suits your taste.
If you’d rather remove the lock screen clock on your Samsung device, follow these steps:
- Step 1: Go to Settings > Lock screen or Lock screen & security.Choose Customize lock screen > Clock, Clock style, or Lock screen clock.
- Step 2: Disable or toggle off this setting to remove the clock from your lock screen.
If you ever find yourself locked out of your Android device due to a mishap while changing your lock screen clock or any other reason, don’t fret. Wondershare Dr.Fone– Screen Unlock - Android can effortlessly bypass the lock screen and unlock your device without a hassle.
Read More About Android Lock Screen:
9 Ways to Bypass Samsung Lock Screen without Data Loss [2024]
How To Easily Unlock Nokia Screen: 4 Effective Methods
How to Change Lock Screen Wallpaper on Android
Part 4. How To Unlock Accidentally Locked Android Screen
Accidentally locking yourself out of your Android device can be a stressful experience. Dr.Fone provides a hassle-free solution to unlock your Android screen without losing any data. Whether you’ve locked yourself out or forgot your PIN, Dr.Fone ensures a straightforward and secure unlocking process. Here’s a step-by-step guide to using the tool:
![]()
Dr.Fone - Screen Unlock (Android)
The Best UnlockJunky Alternative to Bypass FRP and Solve Your Screen Locks
- Completely unlinked from the previous Google account, it won’t be traced or blocked by it anymore.
- Remove all Android screen locks (PIN/pattern/fingerprints/face ID) in minutes.
- Compatiable with various Android models.
- Provide specific removal solutions to promise good success rate.
4,008,670 people have downloaded it
- Step 1: Download and install Dr.Fone on your computer. Launch the program after installation and go to Toolbox > Screen Unlock.

- Step 2: Choose Android in the next window and click on Unlock Android Screen.

- Step 3: Choose your device brand and click Remove without Data Loss. Select the Brand, Device Name, and Device Model of your smartphone. Once done, toggle the checkmark on I agree with the warning, and I am ready to proceed button.
- Step 4: Follow the on-screen instructions. Once they’re done, Dr.Fone will automatically proceed with the unlocking process. There will be a new screen showing the completion if done correctly. If it fails, click on Try again. Otherwise, click Done to finish.

What Else Can Dr.Fone Do for Android Owners?
Dr.Fone Screen Unlock for Android is a comprehensive tool that goes beyond unlocking screens. It also provides a range of features to address various Android device-related issues, such as:
Bypass Factory Reset Protection (FRP)
You can bypass Factory Reset Protection on your Android device with Dr. Fone. It allows you to set it up without the original Google account credentials.
Unlock Samsung/LG without data loss
Whether you own a Samsung or LG device, Dr.Fone allows you to unlock your phone without compromising any data stored on the Xiaomi Redmi Note 12 Pro 4G device.
Supports 2000+ Android models
Dr.Fone is compatible with a vast array of Android models. It supports over 2000 devices, making it a versatile solution for Android users.
Conclusion
Knowing how to change the lock screen clocks on your Android offers a personalized touch. Android 12 users can effortlessly adjust settings, while Android 11 and older versions require a manual setup. Samsung owners, meanwhile, enjoy a similar but unique customization process. Follow the steps outlined above for those seeking to remove the lock screen entirely.
On the other hand, if you accidentally lock yourself out of your smartphone, Dr.Fone is a go-to solution, ensuring a smooth unlocking process. Whether tweaking your Android lock screen clock or facing accidental lockouts, explore these methods to tailor your Android experience.
Complete Review & Guide to Techeligible FRP Bypass and More For Xiaomi Redmi Note 12 Pro 4G
In today’s tech-driven world, safeguarding your devices is crucial. FRP, or Factory Reset Protection, is a shield against unauthorized access, yet accessing your device can sometimes be a hurdle. That’s where FRP bypass tools come to the rescue, offering solutions to unlock your device hassle-free.
Among these tools, Techeligible FRP stands out, known for its reliability and efficiency in bypassing FRP barriers. Let’s delve into the realm of FRP bypass, explore the significance of these tools, and uncover how Techeligible FRP bypass simplifies unlocking your device securely.

Part I. A Comprehensive Overview of Techeligible
Techeligible is a useful platform that offers useful solutions to help most Android users. It’s especially useful for individuals stuck with FRP locks or wanting to unlock their mobile devices. But Techiligible’s arsenal doesn’t stop there. Third-party tools are available for practically any Android problem. There’s even a Techeligible app called Quick Shortcut Maker, which allows you to create shortcuts to your Android device’s settings.
Techeligible FRP bypass tools give solutions and customized advice for popular brands and models. It provides a ton of instructions for Samsung Galaxy M22, M21, Oppo A53, and LG devices. These courses are constantly updated to ensure compatibility with the most recent Android operating system.

Useful Features of Techeligible
Check out the main features that Techeligible has to offer below:
- **Bypassing FRP Accounts.**Techeligible excels at bypassing FRP accounts.
- **Unlocking Android Smartphones.**The tools assist users in unlocking Android smartphones. It also does not require passwords or Google account information.
- **FRP APK Download.**Techeligible makes it simple to obtain FRP APK utilities.
- **File Management.**It assists in the management of critical files to improve the overall user experience.
Where and How To Download FRP Tools by Techeligible
To access Techeligible’s tools, you can download them from their official website. The installation package size is modest, ensuring swift downloads without burdening your device’s memory. They’ve supplied a number of solutions based on your individual needs. Here’s how to download Techeligible FRP tools:
- Step 1: Navigate to Techelegible’s official website and select Download FRP Tools from the main menu.
Step 2: Choose the tool that you want to download. Techeligible offers varied sections for FRP bypass. They are as follows:
APKs and Files for FRP Bypass
They describe how to unlock FRP on any Android smartphone without using a PC. A list of all FRP bypass APKs, such as the Quick Shortcut Maker Techeligible app, can be found here.
- FRP Bypass Applications
Direct FRP bypass apps provide a broader range of FRP bypass options.
- Computer FRP Tools
These tools function similarly to a bridge. To begin, connect the Android device to the computer. Then, using the computer Techiligible FRP tools, you can bypass the Google Account lock.
- Step 3: To begin downloading, click the Download button.
_Note:_ Download the APK directly from your phone to install it when FRP locks the Xiaomi Redmi Note 12 Pro 4G device. APK can also be installed using OTG or ADB.
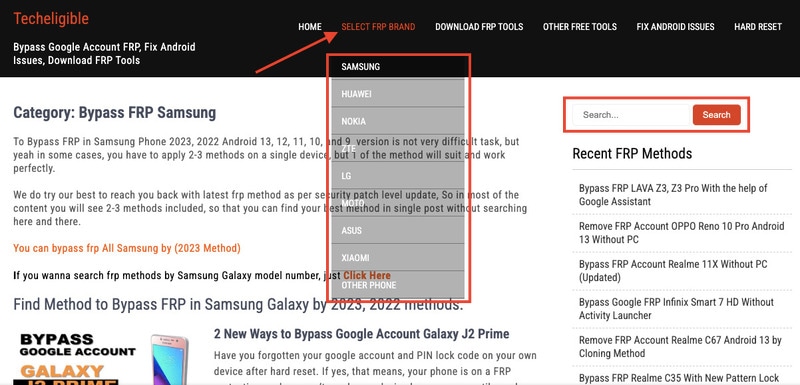
Phone Brands Supported by Techeligible
Techeligible extends its support across multiple phone brands, making it versatile for various users. For further information, you may also search for your device’s model number in their website’s search box.
|
Samsung
Huawei
LG
ZTE
Asus
Oppo
Xiaomi
Sony
Tecno
Symphony
|
BQ Aquarius
Alcatel
Vivo
QMobile
Itel
Google Pixel
Coolpad
Oneplus
Doogee
TCL
|
Nokia
Motorola
Lenovo
Micromax
HTC
Infinix
Panasonic
Honor
Realme
Blu
|
| — | — | — |
Pros of Techeligible
In general, Techeligible FRP tools can provide the convenience for users below:
- **User-Friendly Interface.**Simple steps for hassle-free device unlocking.
- **Tool Variety.**Various tools cater to different FRP bypass needs.
- Works with a wide range of diverse Android devices.
Cons of Techeligible
On the other side, these points disclose the inconvenience Techeligible is facing:
- Limited success with certain device models
- Occasional updates required for improved performance
- Website contains several floating advertisements
Techeligible FRP simplifies the bypass process with its straightforward interface and an array of tools catering to different device models. Accessible across various phone brands, it offers a user-friendly solution to unlocking your device from FRP barriers.
Part II. How To Bypass a Phone Using Techeligible?
How do you use the Techeligible FRP bypass tools now that you have them? There are a few crucial steps to using them. Let’s have a look at these Techeligible FRP bypass steps:
To use Techeligible, you must possess the following three sections:
- Account Manager for Google
- FRP bypass APK tools
- PC FRP software
Using the appropriate Google Account Manager, you may effortlessly download the files. This account assists you in locating the proper gadget. Furthermore, this stage assists you in your search for the appropriate gadgets. The setup can be selected from the official website.

FRP Bypass APK Tools
If you want to reset your devices, you can utilize several bypass APK programs that will be connected to your PC. The graphic below shows several distinct sorts of APK tools.
PC FRP Tools
PC FRP utilities assist you in connecting devices to the PC. These tools are simple to use and make it simple to reset the Xiaomi Redmi Note 12 Pro 4G devices. You only need to download the relevant file to get started.
Step-by-Step Guide
Now check out below the steps on how to use the Techeligible FRP Bypass feature:
- Step 1: Go to the official website and select the link for your device’s brand. You will now be led to a category page containing FRP bypass solutions.
- Step 2: On Techeligible, choose your gadget model from the category page. You can also use the in-site search at the top of the sidebar to rapidly locate solutions for certain models.
- Step 3: A full guide will appear on the screen. Download the tools required for your specific phone model according to the guide. Then, follow the instructions for removing your specific device’s FRP lock.
Part III. Wondershare Dr.Fone: Best Alternative to Techeligible FRP
Unlocking an Android device locked by FRP barriers is a little complicated with Techeligible. But fear not, a simpler path awaits with Dr.Fone - Screen Unlock (Android). It stands tall as a user-friendly alternative to the complex process of using Techeligible. It’s designed to streamline the FRP bypass, ensuring a smoother unlocking experience for Android users.
Advantages of Dr.Fone - Screen Unlock
Revel in the benefits that Dr.Fone – Screen Unlock has to offer, making it an excellent choice for unlocking Android devices:
- **Simplicity at Its Core.**You don’t need to be a tech whiz; the process is designed for simplicity, making it accessible to all users.
- **Zero Data Loss.**Users can rest easy knowing that unlocking does not jeopardize data integrity. Your photographs, chats, and apps are safe and secure.
- **Wide Compatibility.**Works seamlessly across various Android devices.
- **Fast and Efficient.**Fone - Screen Unlock operates swiftly, saving you time in unlocking your Android device.
- **Secure and Safe.**It ensures data safety during the unlocking process, preserving your personal information.
- It’s not only about opening a locked screen; Dr.Fone provides a variety of unlock modes targeted to certain conditions, such as a forgotten password, PIN, pattern, or fingerprint.
- **High Rate of Success.**Fone - Screen Unlock delivers a dependable solution, even for difficult lock cases, with a high success rate in unlocking locked screens.
Step-by-Step Guide to Unlocking Android With Dr.Fone
Dr.Fone - Screen Unlock simplifies the daunting task of unlocking an Android device. Its user-friendly interface and effective functionality offer a smoother, more accessible alternative to Techeligible. This ensures that unlocking your Android device becomes a hassle-free experience. Learn how to use Dr.Fone – Screen Unlock (Android) below:
- Step 1: Download the most recent Wondershare Dr.Fone version and connect your Android device to your computer via a USB cable. Access the unlock screen tool after connecting by navigating to the Toolbox and selecting Screen Unlock.

- Step 2: Select Android to unlock your Android screen lock when prompted. You’ll see two options on the next screen. Select Unlock Android Screen.
- Step 3: You will then be led to a new screen where you may select the brand of your mobile device.

- Step 4: From the two options displayed on the screen, select Remove without Data Loss.
- Step 5: To unlock the Android screen, you must first select the Brand, Device Name, and Device Model. To advance, click the associated checkbox to enable the option that states I agree with the warning and am ready to proceed. Click Next to proceed with unlocking the screen.

- Step 6: When prompted to confirm the process, enter 000000. To start the software, input the code and then click Confirm.
- Step 7: Once you’ve identified your Android device’s model, Dr.Fone will guide you through entering Download Mode. Following the on-screen directions will take you to the next steps, where you may complete the operation. The following screens show the status of the screen unlocking procedure, which includes downloading the platform’s required drivers and configuration files.

- Step 8: A new screen will appear, signaling the operation is finished. If your device’s screen unlock problem has been resolved, click Done. If this is not the case, click the Try Again button.
Learn More About FRP Bypass:
Ways to Remove FRP Lock on Motorola Phones without a PC
Bypass FRP OPPO All Series like a Pro With/Without PC
Bypassing Google FRP Lock on Xiaomi, Redmi, and Poco Easily
Tips: Forget your device password and can’t get access to it? No worries as Dr.Fone is here to help you. Download it and start a seamless unlock experience!
Conclusion
In the realm of device security, FRP barriers stand tall, ensuring protection but sometimes causing inconvenience. That’s where Techeligible FRP bypass tools come in, easing your access to locked devices. However, in this article, you learned that navigating through FRP challenges becomes simpler with Dr.Fone - Screen Unlock (Android).
Its user-friendly approach and efficiency make it an ideal alternative to Techeligible FRP. Remember, while safeguarding your devices is crucial, finding an easy-to-use solution matters too. Choose Dr.Fone for a smoother, hassle-free experience in unlocking your Android device. Keep your device secure while making accessibility a breeze with Dr.Fone.
How to Reset a Xiaomi Redmi Note 12 Pro 4G Phone that is Locked?
We all have been there when put a tough to crack the lock on the smartphone and forget the password all along. Such circumstances can be tedious at times, but there is a way around it. If you have spent countless hours on how to reset a Xiaomi Redmi Note 12 Pro 4G phone that is locked, or how to get into a locked Xiaomi Redmi Note 12 Pro 4G phone quickly with or without Factory Reset. This is the right article for you. Here we will describe all the different ways in which you can reset your phone with the convenience of software to even reset it manually. So, without making further due, let’s jump right into it.
Part 1: What should I be aware of before resetting a Xiaomi Redmi Note 12 Pro 4G Phone that is locked?
Before you go to reset your locked Xiaomi Redmi Note 12 Pro 4G phone, it’s crucial to learn about a few key factors. These factors will enable you to make a well-informed choice and help avoid potential complications during the factory reset process.
1. Data Loss
Resetting your locked Xiaomi Redmi Note 12 Pro 4G phone typically involves performing a factory reset. The process erases all data and settings on the Xiaomi Redmi Note 12 Pro 4G device. This includes your files, apps, contacts, and other information stored on the phone. You can easily restore these data if you have backed up data before. It’s crucial to back up essential data regularly to avoid data loss.
2. Factory Reset Protection (FRP)
Xiaomi Redmi Note 12 Pro 4G , like many other Android manufacturers, implements Factory Reset Protection. It acts as a preemptive safeguard against unauthorized access to a device after a reset. If your phone is linked to a Google account, you will need to input the accurate login credentials after a reset.
Failing to do so may lead to your device being locked. Understanding how to bypass or recover from FRP lock is essential if you find yourself in this situation.
Part 2: How to Reset a Xiaomi Redmi Note 12 Pro 4G Phone That is Locked With Google Find My Device?
Resetting a locked Xiaomi Redmi Note 12 Pro 4G phone through Google Find My Device presents a convenient solution. It, however, needs you to have activated this functionality on your device. To initiate the reset, please adhere to the following steps:
Step 1: Open a web browser on any computer or alternative device and navigate to the Google Find My Device website. Sign in with the same Google account associated with your locked Xiaomi Redmi Note 12 Pro 4G phone.
Step 2: Upon successful login, a list of devices linked to your Google account will be displayed. Locate your locked Xiaomi Redmi Note 12 Pro 4G phone from the list and select it. Select the “Erase Device” option from the left-hand panel, and it will trigger a remote factory reset for your locked phone.
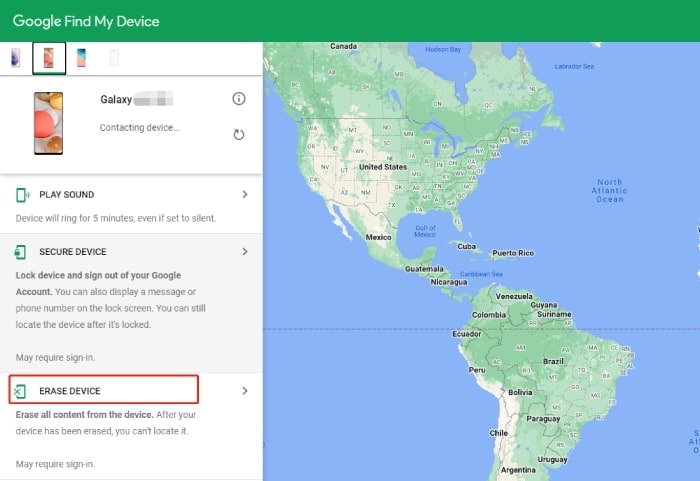
Step 3: A confirmation dialog will appear, prompting you to input your Google account password. Finally, click the “Erase” button to initiate the factory reset process.
Part 3: How to reset a Xiaomi Redmi Note 12 Pro 4G phone that is locked without a password?
In order to reset your Xiaomi Redmi Note 12 Pro 4G phone without a password, you need to have a single software known as Dr.Fone - Screen Unlock (Android) . It’s a powerful and versatile software tool designed to help you unlock your devices under various circumstances. Whether you’ve forgotten your device’s password, PIN, pattern, or fingerprint, or you’re dealing with a locked device due to a broken screen, Dr.Fone - Screen Unlock (Android) can assist you. In order to reset phone correctly, go through the steps given below:
Before resetting your Xiaomi Redmi Note 12 Pro 4G phone that is locked, you can install the Dr.Fone application on your Windows PC or Mac first.
![]()
Dr.Fone - Screen Unlock (Android)
The Best Unlock Tool to Reset a Xiaomi Redmi Note 12 Pro 4G Phone That Is Locked Without a Password!
- Remove all Android screen locks (PIN/pattern/fingerprints/face ID) in minutes.
- Work for forgotten passwords, second-hand Xiaomi Redmi Note 12 Pro 4G devices, etc.
- Everyone can handle the lock screen without any tech knowledge.
- Provide specific removal solutions to promise good success rate.
4,008,671 people have downloaded it
Step 1: Launch the Program
First of all, launch the Dr.Fone Screen Unlock on your computer, and you will be greeted with a welcome screen like this. Now, head over to the “Screen Unlock” section.
Step 2: Connect Device
Now, you need to connect your Xiaomi Redmi Note 12 Pro 4G phone to the computer via a USB cable and select “Android” > “Unlock Android Screen.” This particular step is an application for all the Android phones out there.
Step 3: Choose Device Model
Here you need to select the exact brand of your phone. In your case, you can just tap “Xiaomi Redmi Note 12 Pro 4G .” The program then will start the process for the lock screen removal.
Step 4: Unlock Screen
Go along with the instructions on the screen and remove all the settings of the Xiaomi Redmi Note 12 Pro 4G device. Within a short while, the screen will be unlocked.
After the entire process is completed, you can easily access your Xiaomi Redmi Note 12 Pro 4G Phone without the need to enter your password. All the restrictions that were set properly to unlock will be removed so that you can use your phone as intended.
Part 4: How to reset a Xiaomi Redmi Note 12 Pro 4G phone that is locked with a hard reset
Disclaimer: Only perform this step if you are well accustomed to the Android recovery system or at least know your way around your Xiaomi Redmi Note 12 Pro 4G phone.
That being said, you should only resort to using a hard reset if you don’t have any important data on your phone. Further including, resetting your phone with the hard reset option will wipe out any data that’s been stored in it. Now, proceed forward will all the steps are given below:
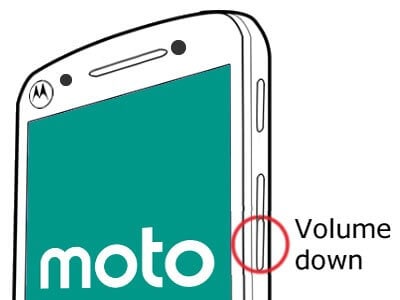
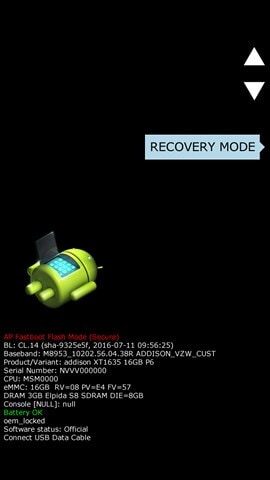
Step 1: Charge Device
Charge your Xiaomi Redmi Note 12 Pro 4G Phone so that it has a batter of at least 30% or higher. Then turn off the phone.
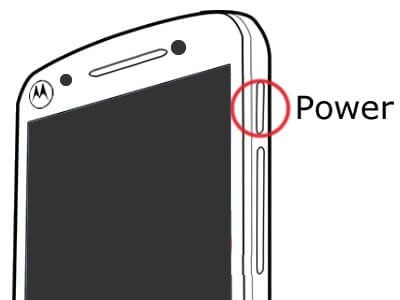
Step 2: Press keys
Now, you need to press the Volume Down + Power button simultaneously until the Xiaomi Redmi Note 12 Pro 4G device logo shows up on the screen.
Step 3: Enter Recovery Mode
Now, press the Volume Down button to navigate to the Recovery Mode.

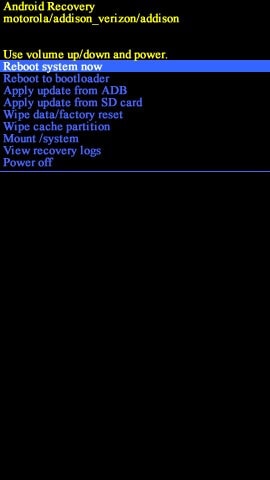
Step 4: Factory Reset
Use the buttons to navigate to the “Wipe data/factory reset” option and select it by pressing the Power button. Now, choose the option ”Factory data Reset” and wait for a few seconds till it is completed.

Step 5: Reboot Now
Again use the Volume buttons and select the “Reboot system now.”
After you have successfully reset your Xiaomi Redmi Note 12 Pro 4G phone, it would take a few minutes to boot up. Once that is done, you are left with a clean slate, just like a completely new smartphone.
Part 5: Unlock locked Xiaomi Redmi Note 12 Pro 4G phone with Gmail ID and password
It is imperative to understand that unlocking your Xiaomi Redmi Note 12 Pro 4G Phone using a Gmail ID and password should be your last resort and especially if you are using an older version of Android. Among all the tricks of how to reset a Xiaomi Redmi Note 12 Pro 4G phone that is locked, it only works if you are running around version 4.4 KitKat or older than that. Neither less to say, in order for the step to work properly, you need your Gmail account to be properly configured with the Xiaomi Redmi Note 12 Pro 4G device.
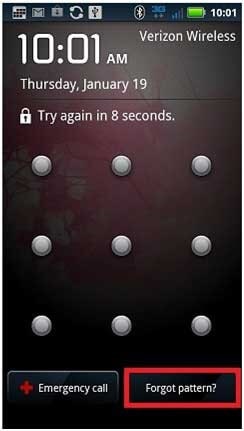
Step 1: Attempt Passwords
At first, you need to make five attempts to unlock your device. Whether you have used a PIN or Pattern lock, Android will always give you five attempts to get the password right. Once you get that, it will trigger the “Forget Password/Pattern” option on Your Xiaomi Redmi Note 12 Pro 4G. This way, you can sneak back into the system once again.
Step 2: Enter Credentials
Once you hit the option, you will be redirected to another page, where you need to enter your Gmail id and password. Make sure that you get the information right, and select “Sign in.”
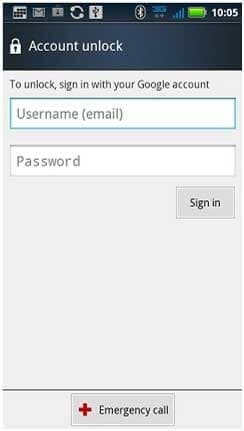
Once you get everything right, this will bypass any password or pattern you once had put on your Phone. Just remember, you need to have a stable internet connection in order for the step to work seamlessly.
Bonus Tip: Are There Preventive Measures To Avoid Future Lockouts?
Want to prevent future lockouts and ensure a smoother smartphone experience? Consider implementing the following preventive measures:
1. Setting Up Alternative Lock Methods
One way to avoid getting locked out of your Xiaomi Redmi Note 12 Pro 4G phone is to set up alternative lock methods. In addition to PINs, passwords, and patterns, you can use biometric methods. These include fingerprint recognition or facial recognition if your device supports them. Such options provide convenient and secure ways to unlock your phone.
2. Regularly Backing Up Your Data
Regular data backups are crucial to safeguarding your essential files and information. Utilize cloud backup services or local backup solutions to routinely save your data. In case of a lockout or a factory reset, you can quickly restore your data without loss.
3. Using Secure and Memorable Passwords
When setting up lock methods, opt for strong, unique, and memorable passwords. Avoid using easily guessable information like birthdays or simple patterns. Strong passwords can enhance security while minimizing the chances of forgetting your credentials.
Conclusion
There is no point in arguing that looking through how to reset a Xiaomi Redmi Note 12 Pro 4G phone that is locked after you have forgotten the password is indeed a hectic process. But, there is a way around it too. By going through all the steps mentioned above, you can always get an unlocked phone with ease.
To our recommendation, we would suggest going through Dr.Fone - Screen Unlock (Android) so that you can make the entire process as seamless as possible. It is by far the easiest and most convenient process to work around. Neither less to say, there are a ton of video tutorials that can assist you in case you get stuck in the middle of the process.
- Title: In 2024, How To Change Xiaomi Redmi Note 12 Pro 4G Lock Screen Clock in Seconds
- Author: Marry
- Created at : 2024-07-18 13:26:28
- Updated at : 2024-07-19 13:26:28
- Link: https://unlock-android.techidaily.com/in-2024-how-to-change-xiaomi-redmi-note-12-pro-4g-lock-screen-clock-in-seconds-by-drfone-android/
- License: This work is licensed under CC BY-NC-SA 4.0.