
In 2024, How To Remove or Bypass Knox Enrollment Service On Xiaomi Redmi A2+
How To Remove or Bypass Knox Enrollment Service On Xiaomi Redmi A2+
In today’s digitally-driven work environment, many companies rely on Knox Enrollment Service to secure their employees’ phones and safeguard sensitive data. However, you might have a Knox-enrolled phone you wish to unlock for personal use.
This article will guide you through removing or bypassing the serviceon your phone. However, it’s important to note that this should ideally be done with your employer’s consent. For transitioning to personal use or other reasons, understanding how to remove or bypass Knox Enrollment Service can be crucial for some users.

Part 1: What Is the Knox Enrollment Service?
Knox Enrollment Service is an integral part of Samsung’s Knox, a toolbox of security features for enterprise-level management of mobile devices. This service is pivotal in how companies manage and secure their mobile devices, especially in a corporate environment.

What It Is
Knox Enrollment Service by Samsung is a tool businesses use to automatically enroll Samsung devices into their management systems when the Xiaomi Redmi A2+ device is connected to the internet. It’s designed for IT administrators to easily deploy, manage, and enforce policies across devices in their network, ensuring consistency and security.
What It Does
The service allows IT administrators to pre-configure settings and apps and manage other aspects of the Xiaomi Redmi A2+ device’s functionality. When a device is enrolled, it can be remotely controlled and monitored. The administrators can push updates, track device locations, remotely wipe data for security, and enforce specific compliance policies. This automation of device enrollment simplifies the setup process for both the IT department and the end-user.
Advantages
Of course, Samsung Knox would not be popular without any advantages. Here are some of them:
- Enhanced security. Knox Enrollment Service ensures corporate devices have robust security features. This helps in safeguarding sensitive data against unauthorized access.
- **Streamlined management.**It simplifies the Xiaomi Redmi A2+ device management, allowing administrators to configure devices without physical access.
- The service enables the customization of devices to fit specific business needs, including installing necessary applications and restrictions on unauthorized apps.
- Compliance Assurance. With the ability to have policies remotely, companies can ensure that all devices comply with corporate standards and regulations.
Disadvantages
However, it also has some disadvantages:
- **Restrictive for users.**For employees, this can mean reduced control over their devices. After all, certain functionalities might be restricted by the employer.
- Potential privacy concerns. The ability of IT administrators to monitor and control devices may raise privacy concerns among employees.
- Complexity in management. While it simplifies many aspects, managing many devices through Knox can become complex. This is particular in diverse environments with different user needs.
Knox Enrollment Service is a powerful tool for enterprise mobile management, offering enhanced security and simplified device management. However, it also introduces challenges, particularly regarding user autonomy and privacy. Understanding these advantages and disadvantages is crucial before removing or bypassing this service.
Part 2: How To Remove Knox Enrollment Service on Your Xiaomi Redmi A2+
In most cases, an administrator can only effectively remove the Knox Enrollment Service through the Samsung Knox Portal. This typically requires cooperation from your employer.
Here’s a step-by-step guide to removing itfrom the Admin’s Portal:
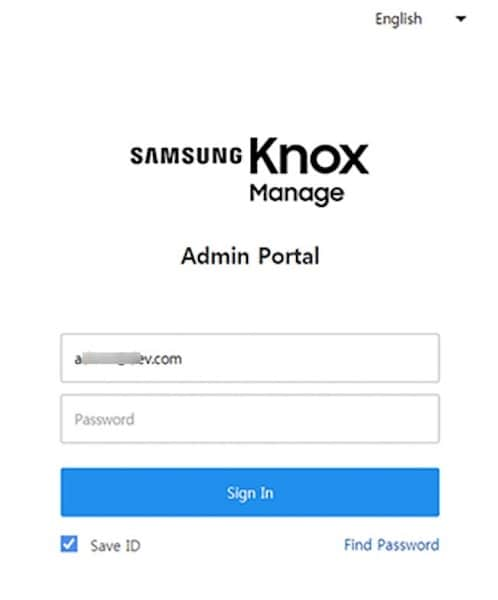
- Step 1: Sign in to the Samsung Knox Portal using administrative credentials.
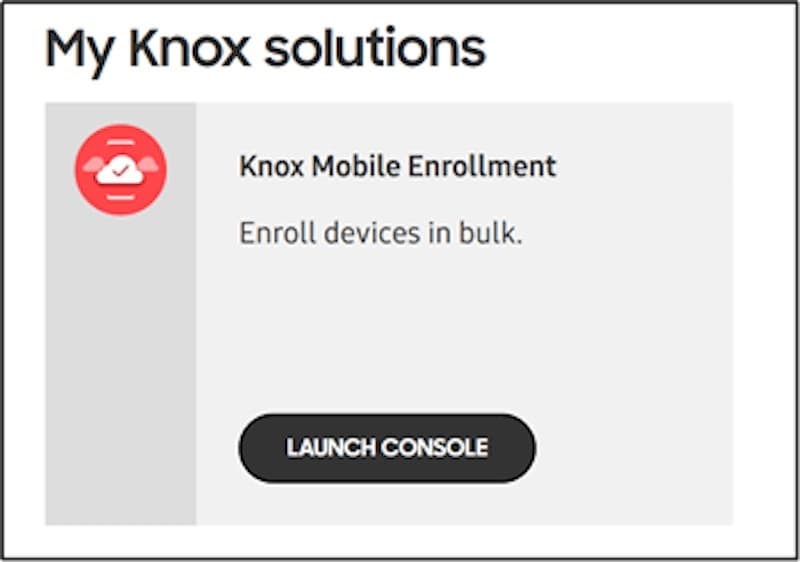
- Step 2: Navigate to Samsung Knox Mobile Enrollment, then click Devices.
- Step 3: Select the Xiaomi Redmi A2+ device in question and click Actions.
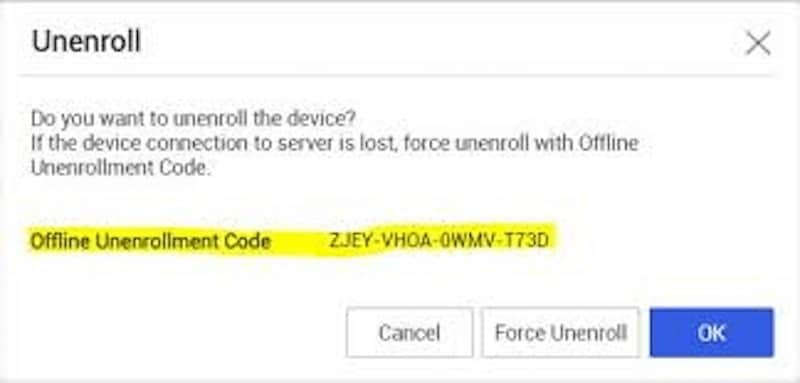
- Step 4: Choose the Clear Profile option to remove all profiles from the Xiaomi Redmi A2+ device. This action will disassociate the Xiaomi Redmi A2+ device from any existing Knox configurations.

After removing the Xiaomi Redmi A2+ device from Knox Enrollment via the admin account, you may still need to uninstall the Knox app from the Android device. This can usually be done through the Xiaomi Redmi A2+ device’s settings. Navigate to ‘Apps’ in the settings menu, locate the Knox app, and select ‘Uninstall’ or ‘Disable’. Be aware that this option might not be available on all devices, depending on how Knox was configured.
Rooting and Flashing a New ROM To Remove Knox Enrollment Service
For the more tech-savvy users, another method to bypass Knox Enrollment Service is by rooting the Xiaomi Redmi A2+ device and flashing a new ROM. This process involves gaining root access to the Xiaomi Redmi A2+ device’s operating system, which allows you to modify the software extensively. After rooting, you can flash a new ROM that doesn’t include the Knox software.
However, this method is risky and not recommended for the average user. It will void your warranty and potentially ‘brick’ your device, rendering it unusable. Furthermore, this action could notify your employer of your attempt to remove Knox, which could have professional repercussions. Proceed with this method only if you know the risks and consequences.
Removing Knox Enrollment Service from your phone is feasible but requires careful consideration, especially in a corporate context. Always ensure you have the necessary permissions and understand the risks of modifying your device’s software.
If You Can’t Use the Above Methods
If none of the above methods are feasible, and you find your phone locked or restricted due to Knox, read through the next section. It will provide additional insights on what to do next.
Part 3: How To Bypass a Locked Phone With a Professional Tool
When faced with a locked phone due to Knox security features, and if conventional methods don’t yield results, turning to a third-party tool can be a viable solution. One such tool known for its efficiency in bypassing phone locks is Wondershare Dr.Fone - Screen Unlock.
Wondershare Dr.Fone is a versatile software suite that tackles various smartphone issues, including unlocking screens. Its Screen Unlock feature is useful for bypassing security barriers without requiring extensive technical knowledge. It hosts several features, such as those you need for data recovery, system repairs, and other smartphone services.
Dr.Fone’s Screen Unlock Feature
The Screen Unlock feature in Dr.Fone is specifically designed to bypass screen locks. Often, you can use it for issues such as forgotten passwords or the like. The great thing is that it can also bypass those locks enforced by Knox. You can do all these without causing data loss or significant changes to your device’s system.
![]()
Dr.Fone - Screen Unlock (Android)
The Best UnlockJunky Alternative to Bypass FRP and Solve Your Screen Locks
- Remove all Android screen locks (PIN/pattern/fingerprints/face ID) in minutes.
- Bypass the FRP lock of Samsung without a PIN or Google account.
- Everyone can handle the lock screen without any tech knowledge.
- Provide specific removal solutions to promise good success rate.
4,008,669 people have downloaded it
How To Use Dr.Fone - Screen Unlock
- Step 1: Open Dr.Fone and select the Screen Unlock module under Toolbox. Connect your locked phone to the computer using a USB cable.

- Step 2: On the next pages, select Android > Unlock Android Screen.

- Step 3: Find the brand of your device.

- Step 4: Select Remove without Data Loss.

- Step 5: Enter “000000” to start the process after confirming device details.

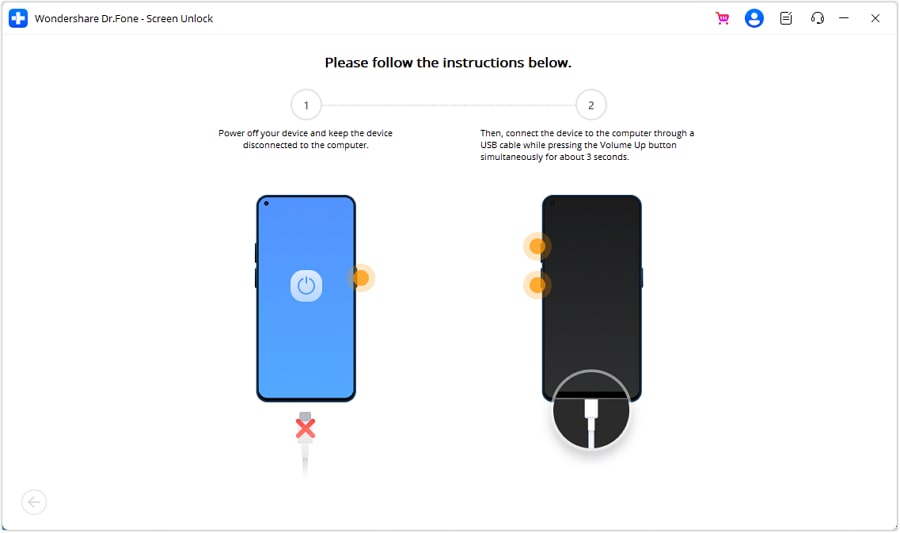
- Step 6: Follow the instructions to put your device into Download Mode.


- Step 7: After the process is completed, click Done. Don’t be afraid to retry the process if it doesn’t work.

If you find yourself locked out of your phone due to Knox and unable to use conventional methods to regain access, Wondershare Dr.Fone offers a reliable and user-friendly alternative. Its Screen Unlock feature is designed to bypass such security features effectively, ensuring you can regain phone access with minimal fuss.
You May Also Interested:
Tutorial to Change Android IMEI without Root
8 Safe and Effective Methods to Unlock Your iPhone Without a Passcode
How to Unlock OPPO Phone Without Password?
Conclusion
In this article, you’ve explored the intricacies of the Knox Enrollment Service and the steps to remove or bypass it. Key takeaways include understanding what Knox is and its removal or bypass methods. However, securing authorization from your organization or phone provider is important before proceeding. This precaution is crucial to avoid potential complications.
For those facing a locked phone due to Knox and unable to follow conventional methods, Wondershare Dr.Fone emerges as a reliable solution. Its Screen Unlock feature offers a safe and efficient way to regain access to your device, ensuring you stay connected without compromising security.
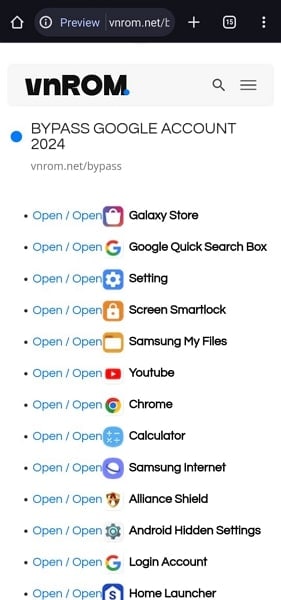
Bypassing Google Account With vnROM Bypass For Xiaomi Redmi A2+
Encountering the need to bypass a Google account can be crucial nowadays. This is especially true during device resets or when locked out due to forgotten credentials. Such a need also arises when users encounter factory resets , buy a second-hand device, or forget their login details. In such scenarios, specialized tools like vnROM Bypass come into play. They offer solutions to bypass Google’s verification process.
This article will provide a detailed review of vnROM Bypass, exploring its efficacy and usability. Additionally, alternatives to this tool will be examined. The aim is to provide users with a comprehensive understanding towards this tool and guide them to use. Ultimately, we will determine the best options for bypassing Google account security.
Part 1. A Comprehensive Introduction to vnROM Bypass and What It Does?
The vnROM Bypass tool is crafted to bypass Google account verification on Android devices. Its primary utility lies in scenarios where users face an FRP lock after a factory reset or forgotten login credentials. The tool operates through the exploitation of Android OS weaknesses. It empowers users to reclaim entry to their devices without needing the Google account details.
The tool provides a straightforward and user-friendly interface. This makes it relatively easy for users to navigate and perform the necessary steps for bypassing the FRP lock . Moreover, it offers compatibility with a range of Android devices. The app specifically targets those running on Android OS versions 5.0 to 8.1.
How To Download vnROM Bypass
Downloading vnROM FRP Bypass involves obtaining the tool from reputable sources online. The following are the steps you need to follow to download vnROM Bypass:
- Step 1. On your Android device, open a web browser and visit the vnROM official website. Now tap the three lines icon from the top left corner and press “Bypass FRP.”
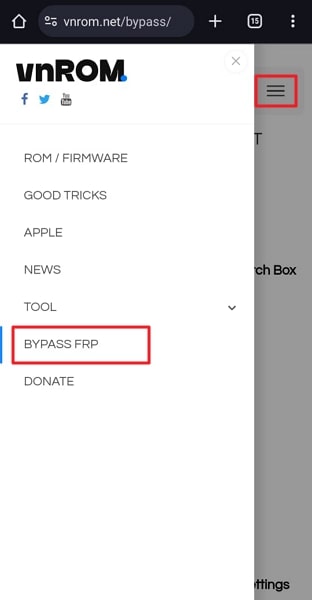
- Step 2. You will be guided to the vnROM Bypass tool, and by tapping “Download,” the download process begins. Ensure you have enabled installations from unknown sources on your device before moving forward.
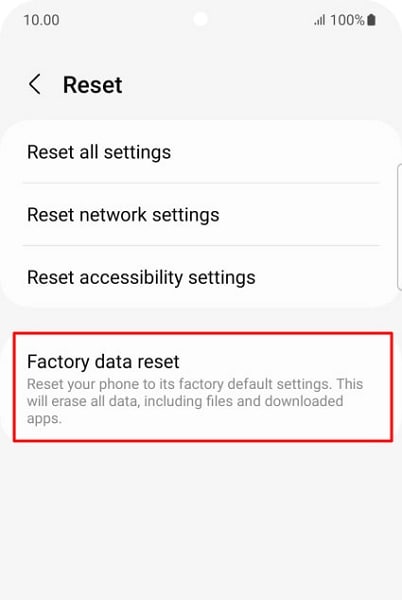
- Step 3. After you’ve downloaded the tool, proceed with its installation. Once installed, open the “Settings” app and find the “General Management” option. Now select the “Reset” option and head to the next step.

- Step 4. Following this, choose “Factory Data Reset.” Confirm the choice by hitting the “Reset” button and afterward restart your device and input your Google account information.
Steps To Use vnROM Bypass
Using the vnROM Bypass on your devices turns out to be a simple procedure. Below are the steps for utilizing the vnROM Bypass:
- Step 1. Access vnROM’s official website via your browser and download the APK file onto a USB drive. This APK serves as the primary application for initiating the bypass. Power up the locked phone and follow the on-screen instructions to set up the mobile device. During the setup process, connect the USB drive to your phone using an OTG cable when prompted to verify your account.
- Step 2. Install the vnROM bypass APK from the USB drive onto the Xiaomi Redmi A2+ device. Once the APK is installed, navigate to the Xiaomi Redmi A2+ device’s “Settings” menu and perform a factory reset. Upon completion of the factory reset, the Xiaomi Redmi A2+ device will automatically restart. Proceed to set up your phone without providing your Google account credentials.
Part 2. Some Prominent Limitations of vnROM Bypass
vnROM Bypass offers a solution for bypassing FRP lock on certain Android devices. Yet, it comes with several notable limitations that necessitate exploring alternative options. The following are some of the limitations of vnROM Bypass:
1. Limited Compatibility
vnROM Bypass primarily supports Android versions 5.0 to 8.1 (Lollipop to Oreo). Hence, it fails to function on devices operating on more recent Android versions. Android 9 through 14 users might encounter compatibility issues and inefficacy when utilizing this tool.
2. Security Risks
Using bypass tools like vnROM Bypass can potentially expose devices to security risks. One significant factor contributing to this situation is the absence of an official website for the tool. Furthermore, it has not received updates for quite a while. This makes it a potential security risk for newer Android models.
3. Functional Restrictions
This tool has not received updates for some time, so its proper functionality cannot be guaranteed. It seems primarily compatible with older Android devices running on versions 5 through 8.1. Moreover, serious concerns exist about the tool’s effectiveness, even for older devices.
4. Complexity and Reliability Issues
The bypass process using vnROM Bypass can be complex. For users unfamiliar with such tools, it could lead to potential errors. The reliability of the tool’s effectiveness varies across different devices and firmware versions. This results in inconsistent outcomes.
Part 3. Listing Some Quick APK Alternatives of vnROM Bypass
In situations requiring the bypassing of FRP lock via APK services, several alternatives to vnROM Bypass exist. They offer unique functionalities and capabilities catering to different user preferences. The following notable alternatives provide users with different approaches to bypassing Google account locks:
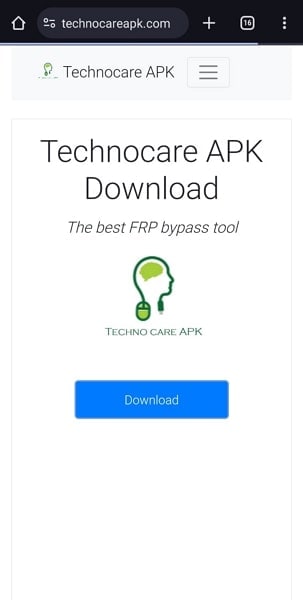
1. Technocare APK
Technocare APK offers a simplified approach to bypassing Google account verification. This tool specializes in bypassing FRP (Factory Reset Protection) locks. It aids users in regaining access to their devices without the original Google account credentials. Its ease of use and compatibility with many Android devices make it notable.
2. Pangu FRP Bypass APK
Pangu FRP Bypass APK provides an effective solution for bypassing Google account verification. This tool bypasses FRP locks caused by factory resets or forgotten credentials. It offers a straightforward process to bypass the FRP lock. The tool’s compatibility with various Android versions makes it a suitable choice. This app is especially handy for users encountering Google account lock issues.
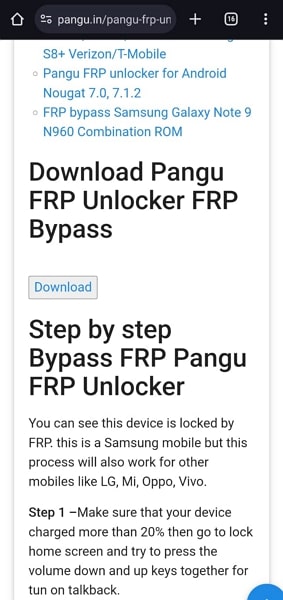
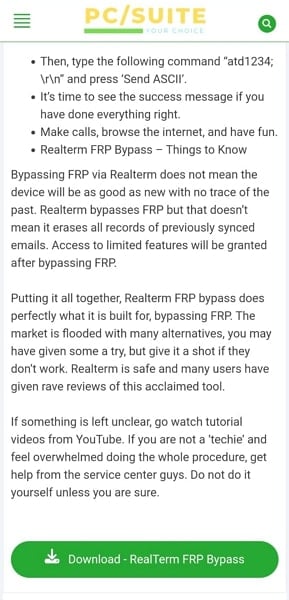
3. Realterm FRP Bypass APK
Realterm FRP Bypass APK offers an alternative method to bypass Google account verification. It does so by leveraging Realterm software. This tool assists users in overcoming FRP locks and gaining access to their Android devices. Yet, it’s important to note that Realterm FRP Bypass might need more technical know-how. This is the case for successful implementation compared to other alternatives.
4. Wondershare Dr.Fone - Screen Unlock (Android)
Wondershare Dr.Fone distinguishes itself as an extensive and easily navigable utility. Crafted to bypass Google account verification and unlock Android devices, it excels as a user-friendly tool. With its intuitive interface, this software assists users in bypassing various screen locks. These include PIN, pattern, password, and Google account locks. Dr.Fone’s effectiveness lies in its compatibility with various Android devices and OS versions.
This guarantees an increased likelihood of bypassing Google account verification successfully. Furthermore, it bypasses the Android FRP lock without requiring a PIN or Google account. Moreover, it supports well-known Android brands such as Samsung, Huawei, LG, Xiaomi, and others. However, Wondershare Dr.Fone – Screen Unlock does not come as an APK but offers a comprehensive platform.

 safe & secure
Part 4. [Effective Alternative] Wondershare Dr.Fone Making Google Account Bypass Easy
Do you own an Android with version higher than 8.1? Or do you have a specific Android brand which cannot be bypassed by vnROM Bypass? At such a stage, you might feel stuck with the need to bypass your Google account. While there seems to be no way, Dr.Fone - Screen Unlock (Android) emerges as the perfect remedy in such a situation. This intuitive toolkit provides a comprehensive system of bypassing FRP lock.
With its diversified OS support, it offers better functionality than tools like vnROM Bypass. Along with that, you can also find dedicated support for a huge variety of Android brands. This provides versatility in bypassing Google FRP (Factory Reset Protection) locks. Its intuitive interface makes it accessible even to users with limited technical expertise.
![]()
Dr.Fone - Screen Unlock (Android)
The Best UnlockJunky Alternative to Bypass FRP and Solve Your Screen Locks
- Remove all Android screen locks (PIN/pattern/fingerprints/face ID) in minutes.
- Bypass Android FRP lock without a PIN or Google account.
- Everyone can handle the lock screen without any tech knowledge.
- Provide specific removal solutions to promise good success rate.

4,008,669 people have downloaded it
Step-by-Step Guide To Bypass Google FRP Account in Dr.Fone
Dr.Fone makes bypassing Google FRP lock a breeze and effortless process. Here are the detailed steps you need to follow to complete this procedure:
How To Bypass FRP on Samsung Devices?
- Step 1. Samsung Device Connection and Google FRP Lock Removal Setup
To begin, initiate Wondershare Dr.Fone on your computer and connect the Samsung device. Next, navigate to “Screen Unlock” in “Toolbox”, and on the next screen, opt for “Android”. Select “Remove Google FRP Lock” on the following screen. Afterward, select “Samsung” and proceed by clicking the “Start” button.
- Step 2. OS Version Selection and Hidden Menu Access
Choose the Android OS version on your Samsung device. If you want to use the quickest way to remove Google Lock, opt for the “All Android versions (One-Click Removal)” option. Now, click “Start”, locate and tap the “Emergency Call” button on your Android device. Then input #0# to access a hidden menu and click “Next”.

- Step 3. Authorization and FRP Lock Removal Confirmation
Next, an activation prompt for USB debugging will appear on your Android screen. Upon allowing this on your Samsung device, click “Authorized.” Subsequently, the following screen on your computer will indicate the removal of the FRP lock from your Android device. A prompt window will confirm completion once the FRP lock removal is successful. Click “Done” to conclude the process.

safe & secure
How To Bypass FRP on Xiaomi/Redmi/OPPO/RealMe/Vivo Devices?
Dr.Fone got you covered if you use a device other than a Samsung device. You can follow these steps to bypass FRP lock on Xiaomi/Redmi/OPPO/RealMe/Vivo Devices:
- Step 1: Unlocking FRP on Android Devices Using Wondershare Dr.Fone
Open Wondershare Dr.Fone on your computer, navigate to the Toolbox and click Screen Unlock. To bypass the FRP lock, opt for the Android option once the screen appears. Then, choose ‘Remove Google FRP Lock’ from the provided options. Next, select your specific Android phone brand from the options displayed on the screen.
- Step 2: FRP Lock Removal Initialization
Upon selecting your device brand, Dr.Fone initiates the download of the necessary driver. Once downloaded, turn off your device and connect it to the computer. While connecting, press the Volume Up and Down buttons for approximately 3 seconds. The FRP lock removal process will commence and may take a few minutes. Once the lock is removed, simply tap “Done” to finalize the process.
Conclusion
In summary, this article explored bypassing Google account verification on Android devices. We explored vnROM Bypass, highlighting its functionalities and limitations. Additionally, we presented various APK alternatives, emphasizing the need for a more effective solution. Wondershare Dr.Fone - Screen Unlock (Android) emerged as a standout option for its support for all Android versions and user-friendly interface.
Tips and Tricks for Setting Up your Xiaomi Redmi A2+ Phone Pattern Lock
Failing to remember the pattern lock of a phone is one of the most puzzling situations for Android users. Unlike the famous OS, Android gives a seamless method to eliminate the issue.
You can attempt the methods below or an expert tool if you have forgotten the pattern lock on your gadget and reset it. However, we suggest you try Dr.Fone - Screen Unlock for a quick and safe solution. To make things more straightforward, we have given you other techniques as a workaround to the issue.
So, keep following us to unlock the lock screen pattern and use your phone again.
Part 1: What Is Android Pattern?
A pattern lock is used to identify the actual user by your Android phone. It is a widely used phone locking system and a secured one. Simply put, a pattern lock includes a line pattern you choose that you can draw to unlock a lock screen. You can enable this lock screen feature from the security menu in the settings application.
So, if you have set a pattern lock as a screen lock for your device, you will need to draw the exact pattern every time you log in.
Part 2: Best Tool to Unlock Your Pattern
Dr.Fone - Screen Unlock
The most effective and quick tool to unlock a pattern lock is Dr.Fone - Screen Unlock by Wondershare. Dr.Fone is an all-in-one tool for all your Android needs and has been in the business for a long time. We suggest you use Dr.Fone. The following steps will help you unlock your device:
Step 1. Select the “Screen Unlock” option in the Dr.Fone interface.
Step 2. Select Unlock Android Screen
To unlock the pattern lock on your device, the “Unlock Android Screen” will guide you to finish the whole process.
Step 3. Select unlock mode
If you click “Remove without Data Loss,” only some limited Samsung or LG phone models can be unlocked without losing data. To unlock most phone brands’ screens, “100% Remove Screen Lock” is a better choice.

You can find the brand compatible with your phone in the following list.
Step 4. Go into Recovery Mode
Read the program instructions carefully; entering recovery mode is the prerequisite to unlocking the pattern lock.
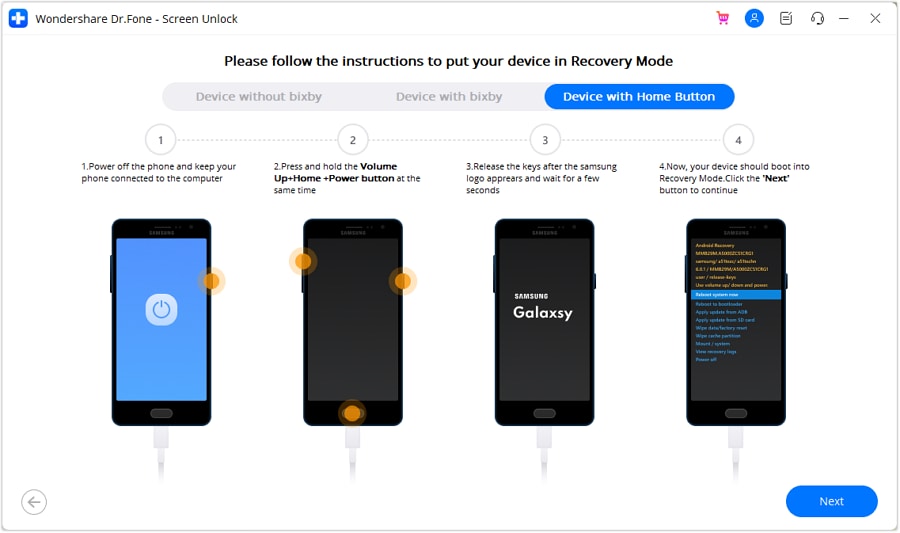
(Here are 3 examples of Samsung phones)
How to get into recovery mode with Bixby
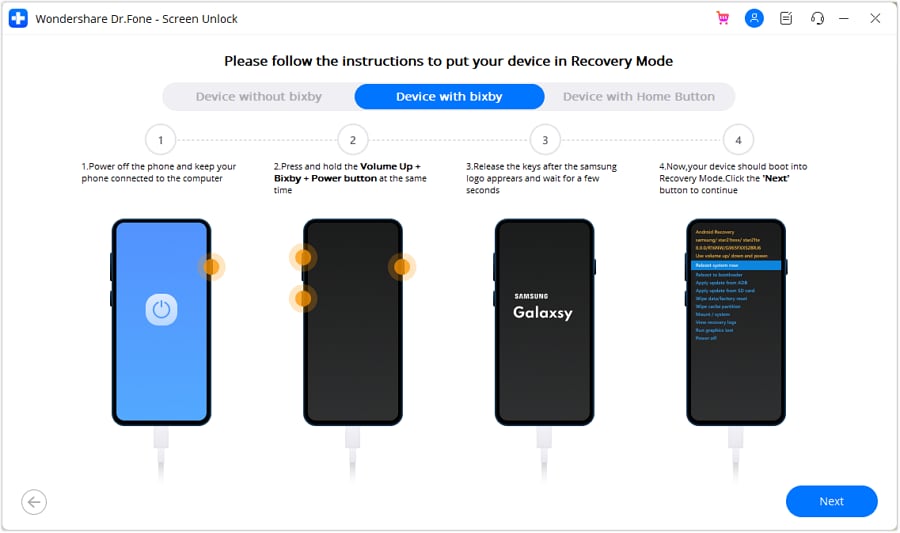
How to get into recovery mode without Bixby

How to get into recovery mode with Home button
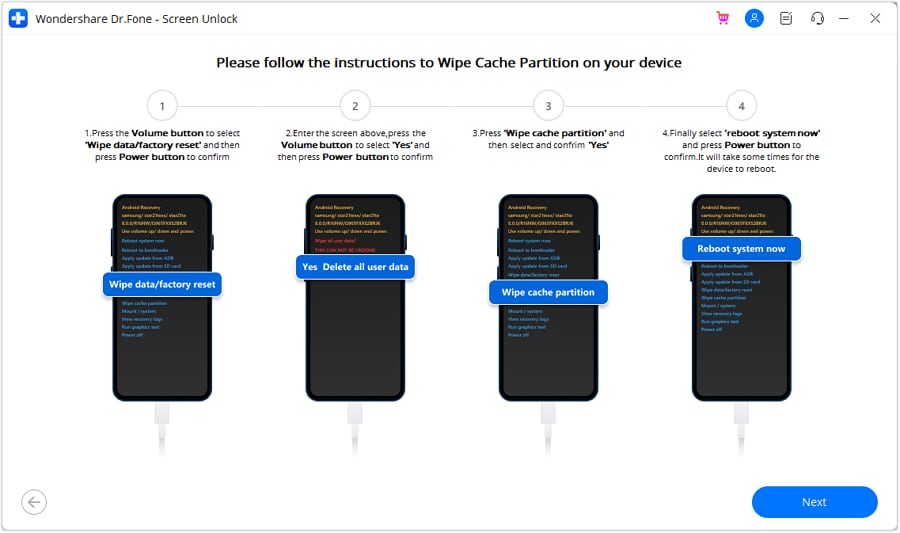
Step 5. Instructions to Wipe Cache Partition
Now you’re in recovery mode, pick these options in the image below.
When the “Unlocked successfully” appears on the screen, you can access your device without a pattern lock or other locks!

Part 3: How to Bypass Android Pattern When You Forgot It?

1. Google Find My Device (For Android7.1.1 or later)
Step 1. Open the Android Device Manager site by typing https://www.google.com/android/find in an internet browser.
Step 2. You must give your Google ID credentials to sign in. Remember that this should be a similar Google account connected to your phone.
Step 3. After logging in, select your device.
Step 4. You will get three choices here, i.e., lock, erase, and ring.
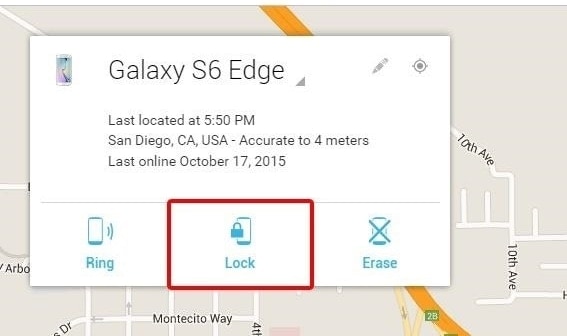
Step 5. Click on the “Lock” button to reset its pattern.
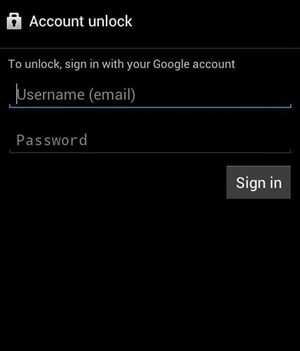
Step 6. It will open another spring-up window. From here, you can give the new password to your phone.
Step 7. After affirming your PIN/password, you can give a recovery message and number (in case of theft only).
Step 8. Complete the process and sign out of your account on the browser.
2. Forgot Pattern (For Android 4.4 or earlier)
Step 1. First and foremost, give some wrong patterns to your phone. It will tell you that you attempted the incorrect pattern lock.
Step 2. On a similar window, click the “Forgot pattern” choice on the base.
Step 3. That will open another screen, which you can use to sidestep the forgotten pattern of Android. Select the choice for entering the Google Account credentials and continue.
Step 4. To reset the lock screen pattern, you must give the correct details of the Google ID previously logged into the Xiaomi Redmi A2+ device.
Step 5. After giving the correct details, you can provide another pattern lock to the phone.


Step 6. Affirm your decision and set another pattern lock on your phone.
3. Emergency Call Trick (For Android 5 or 5.1.1)
Step 1: Tap the Emergency Call button and enter ten asterisks (*).
Step 2: Copy and paste the asterisks on the dialer until you no longer see the paste choice.
Step 3: Return to the lock screen and tap on the camera symbol.
Step 4: Press the settings choice on your Android gadget after pulling down the notification tray. Now you will have the chance to enter the PIN/password, and you ought to continue unlocking your Android phone. Continue to paste until the lock screen UI crashes.
4. Safe Mode Boot (For Android 4.1 or later)
Step 1: You can bring up the power menu and hold the “Power Off” button for most phones, especially Android phones. A warning will spring up, asking whether you might want to Reboot to Safe Mode. Here, it would help if you had to press Ok.
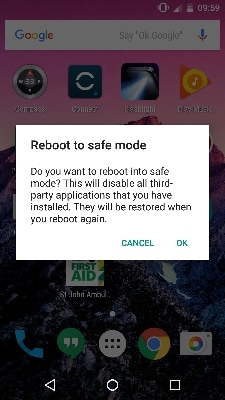
Step 2: Clear your lock screen application’s data.
Clean data off your lock screen app, uninstall it, and then reboot your device to escape safe mode. When you do so, your phone or Android device will unlock.
5. Use ADB (USB required for Android 10 and lower)
- Connect your device to your PC using a USB connector.
- On your PC, open a terminal window (or command prompt).
- Type in the commands given below. Press Enter after each line:
adb shell
album/data/data/com.android.providers.settings/databases
sqlite3 settings.db
update system set value=0 where name=’lock_pattern_autolock’;
update system set value=0 where name=’lockscreen.lockedoutpermanently’;
.quit
exit
adb reboot
- After your gadget has rebooted, enter the command below:
adb shell
rm/data/framework/gesture.key
exit
adb reboot
- Your phone will reboot. After it reboots and requests a security pattern, you can utilize any pattern, and it will unlock.
Conclusion
This guide provides insight into the most common Android issue. Here, we have discussed different techniques to bypass the pattern lock on your Android phone. However, we suggest you go for a professional tool while carrying this out. Therefore, you should choose an expert tool like Dr.Fone - Screen Unlock to open the lock screen pattern.
- Title: In 2024, How To Remove or Bypass Knox Enrollment Service On Xiaomi Redmi A2+
- Author: Marry
- Created at : 2024-07-18 13:32:49
- Updated at : 2024-07-19 13:32:49
- Link: https://unlock-android.techidaily.com/in-2024-how-to-remove-or-bypass-knox-enrollment-service-on-xiaomi-redmi-a2plus-by-drfone-android/
- License: This work is licensed under CC BY-NC-SA 4.0.