
In 2024, How to Reset Gmail Password on Infinix Smart 8 Plus Devices
How to Reset Gmail Password on Infinix Smart 8 Plus Devices
Nowadays, along with Windows or Apple devices, Android devices are starting to take its place as one of the most popular, reliable, and efficient technical equipment brands. As a result, the use of Android as an operating system for both PC and portable tools is becoming an extremely hot trend.
Android devices pride themselves on providing their customers with the best features possible. Not only do they support offline features, but Android devices are also capable of offering users with several services online. One of them is the ability to make use of Gmail - a very famous email site nowadays.
Gmail being used directly by an Android tool is a great advantage, but it still contains some small drawbacks that users may have to go through. According to a recent survey, the majority of Android users were likely to wonder if they were able to reset Gmail password on Android devices.
Luckily for you, this performance is possible. In this article, a very informative and detailed description will be delivered to you to help you solve the problem of resetting your Gmail password.

Part 1: Reset Gmail Password When you Forget it
There will be times when you come into the situation of not knowing what your Gmail password is, or you just simply forget it. You want to change your password but you don’t have access to a computer or laptop to perform this task. Now with the help of Android, you can do it through your own Android devices.
Step 1: Visit the Gmail login page from your Android device. Click on the Need helpline, which is highlighted in blue.

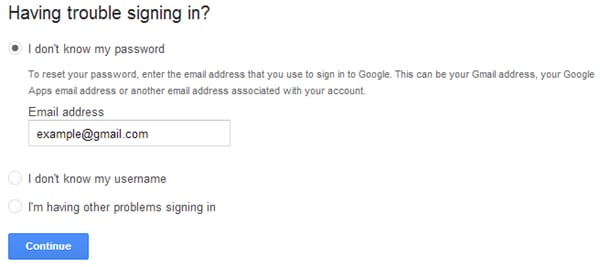
Step 2: After that, you will be moved to the Google Account Recovery page. There will be 3 main options which indicate 3 frequent problems. Select the first one, which is entitled “I don’t know my password”. Once you have chosen it, you will be required to fill in your Gmail address in the bar provided. Click on the Continue button as long as you have made sure to finish all these tasks.
Step 3: In this step, you may be asked to fill in a CAPCHA form. Just simply do it and move to the next page. There you had better type in the last password that you are still able to recall if possible, then click on the Continue button to move. Or else, you can skip this step by clicking on I don’t know button.

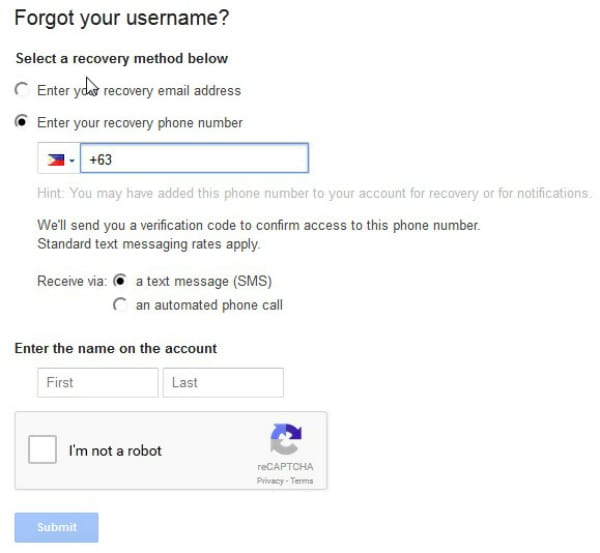
Step 4: Finally, you will be shown a list of options on how to reset your Gmail password on Android devices. You can either use your alternative email address or your phone number to receive a verification code. Bear in mind to fill in any required information and put a check in the CAPCHA box to submit the process.
Step 5: In this step, a blank bar will appear and it will demand you to type in your verification code. Just do it carefully to make sure there is no error. Once you have done it, a new screen will appear to tell you.

Step 6: After you have done all the previous steps, you will know how to reset your Gmail password directly from your Android device.
Part 2: Change Gmail Password When You Still Know it
Besides not knowing your password, there are still circumstances when you wish to change your current password for various reasons. Just simply follow these steps.
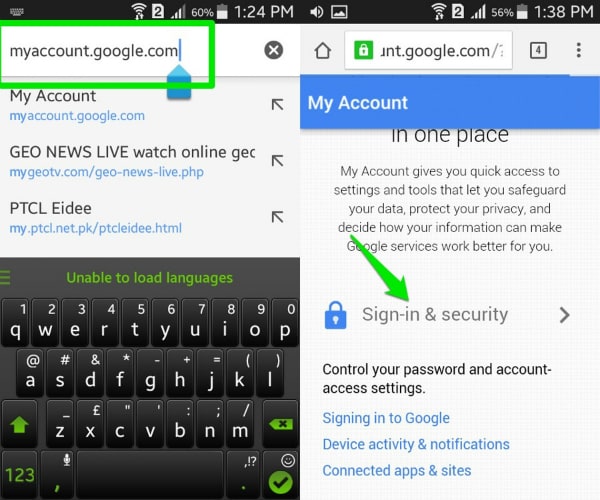
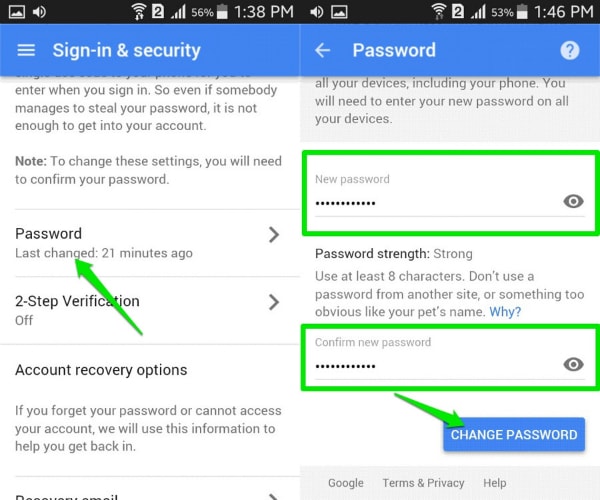
Step 1: Make sure your Android device is connected with the Internet. Then get access to the link myaccount.google.com. After logging into your account (or maybe you have already done this), scroll down, find the Sign-in and security option and choose it.
Step 2: Find the Password option in the list. Tap on it to be moved to another screen. In the menu, type in your new password that you wish to exchange, confirm it and then click on the Change password button.
Part 3: Bonus Tips
Gmail is undoubtedly a marvelous tool to use on Android devices, but have you really understood all the tips and tricks to take the best advantage of it? Below are the 5 most helpful tips that we want to offer you.
- Far from your imagination, Gmail on Android devices is capable of allowing you to make use of several accounts at the same time, even if it’s not a Gmail account. This performance not only helps you to organize your work better, but it also increase the efficiency of your job. Just simply log in your Gmail account on Gmail app, click on the down arrow which is placed next to your avatar and name, then choose Add account. You will be moved to another page, choose Personal (IMAP/POP) choice and follow the detailed guide on the screen.
- If your Android device is used by only one user, and you are guaranteed about the security of it, try to keep the Gmail logged in. It would help you to avoid wasting unnecessary time to sign in your account every time you need, not to mention that it prevent you from being confused of not knowing your account/password.
- You are capable of sorting your mails with a certain level of accuracy once you are fully aware of the features of Gmail app on Android devices. Just click on the email, then choose Settings menu and mark it as “Mark as not important”, “Mark important” or “Report to spam” owing to the priority of your email.
- Gmail app provided you with the ability to have conversations online, and whenever a message comes, there will be a sound. In case you are in a vital conference, or you don’t want to be disturbed by the noise, you can mute it. All you have to do is to tap into the conversation, choose the three dots icon then click on the Mute option in the menu.
- Enhance the speed and the accuracy of your search with the use of certain phrases. Let’s take an instance to see what Gmail can do for you in this case. If you want to search for the mails which have been sent by a certain person, typefrom:(name of the person on Gmail) in the searching bar. And in case you would love to look for a private message from that person, please type is:chat:(name of the person on Gmail) .

Part 4: Video on How to Reset Gmail Password on Android Devices
How to Unlock Infinix Smart 8 Plus Pattern Lock if Forgotten? 6 Ways
“How to unlock pattern lock on my Android phone? I have changed my pattern lock and can’t seem to remember it now!”
Lately, we have got lots of feedback and queries like this from our readers who like to perform a pattern unlock on their devices. It doesn’t matter if you have forgotten the password/pattern of your Android device or would like to access someone else’s phone, there are plenty of ways to know how to unlock the pattern on an Android phone. In this comprehensive guide, we will let you know about 6 different ways to perform pattern unlock without any trouble.
Part 1: How to Unlock Android Phone Pattern Lock with Dr.Fone - Screen Unlock (Android)?
If you want to unlock the pin, pattern, password, fingerprint, or any other kind of lock on an Android device, then simply take the assistance of Dr.Fone - Screen Unlock (Android) . It is a highly useful and advanced application that can let you move past the lock screen on your Android phone without losing data (if your phone model is not Samsung or LG devices in this list , it will erase the data after unlocking the screen).

Dr.Fone - Screen Unlock (Android)
Remove Pattern Locks on Android Screen at Ease
- Remove 4 screen lock types - pattern, PIN, password & fingerprints.
- Bypass Android FRP lock without a PIN or Google account.
- Unlock mainstream Android brands like Samsung, Huawei, LG, Xiaomi, etc.
- No tech knowledge is needed. Everybody can handle it.
4,008,669 people have downloaded it
To learn how to unlock pattern lock using Dr.Fone, follow these steps
- Step 1. Install Dr.Fone and launch it to perform pattern unlock. From the home screen, select the “Screen Unlock” option.

- Step 2. Connect your device to the system. Once it is detected, click on the “Unlock Android Screen” button.

- Step 3. Select your device brand to unlock and access reboot instructions, then follow them to complete the process.

- Step 4. You will be notified when the process is completed. Simply disconnect your Infinix Smart 8 Plus and access it without any pattern lock.

Besides Dr.Fone, there are also a few more options to learn how to unlock pattern locks on an Android device. Though, these options are not as secure or fast as Dr. Fone’s. For instance, you can take the assistance of Android Device Manager (also known as Find My Device) to do the same. It can be used to remotely ring a device, change its lock, locate it, or erase its content. To learn how to unlock pattern lock on Android, follow these steps:
- Step 1. Go to Android Device Manager (Find My Device) website https://www.google.com/android/find and log in using your credentials.
- Step 2. A list of all the connected devices to your Google account will be provided.
- Step 3. As you would select your device, you will get various options: erase, lock, and ring.

- Step 4. Click on the “Lock” option to change the lock pattern on your device.
- Step 5. Provide the new password for your device and write an optional recovery message.

- Step 6. Apply these changes and exit the window to change the lock on your device.
Part 3: How to Unlock Android Pattern Lock Using the ‘Forgot Pattern’ Feature?
If your device is running on Android 4.4 or older versions, then you can also take the assistance of the “Forgot Pattern” option to perform the pattern unlock. You won’t need a third-party tool or any other device to perform the desired operation. To learn how to unlock pattern lock on your device, follow these steps:
- Step 1. Simply provide any incorrect pattern on your device to get the following screen.
- Step 2. From the bottom of the screen, you can tap on the “Forgot Pattern” feature.

- Step 3. Select the option to unlock your device with your Google credentials.

- Step 4. Provide the correct Google credentials of the account that is linked to your device.
- Step 5. Later, you can set a new pattern for your device and confirm it. This will let you access your Android device with the new pattern lock.
Part 4: How to Unlock Samsung Phone Pattern Lock Using Samsung Find My Mobile?
Just like Android, Samsung has also developed a dedicated feature for finding a device remotely and performing various other operations on it. The Samsung Find My Mobile service can be used to locate your device, change its lock, wipe its data, and perform a few other tasks as well. Needless to say, the service only works for Samsung Android devices. You can learn how to unlock patterns with this tool by following these instructions:
- Step 1. Go to Samsung’s Find my Mobile official website https://findmymobile.samsung.com/ and log in using your Samsung account credentials.

- Step 2. You can select your device from the left panel. By default, it will provide its location on the map.

- Step 3. Additionally, you can access various other services from here as well. Click on the “Unlock My Device” option to proceed.

- Step 4. Now, all you need to do is click on the “Unlock” button to perform pattern unlock on your device.
- Step 5. After unlocking your Samsung device, you will be informed of an on-screen message.
Part 5: How to Unlock Android Pattern Lock in Safe Mode?
This is a simple and effective solution to knowing how to unlock patterns on an Android device. Nevertheless, this solution will only work for third-party lock screen apps. If you are using your phone’s native lock feature, then it might not work. After restarting your phone in Safe Mode, you can easily move past its pattern lock without any trouble. All you need to do is follow these steps:
- Step 1. Simply press the Power button on your device to get the Power menu on its screen.
- Step 2. Now, tap and hold the “Power off” option.
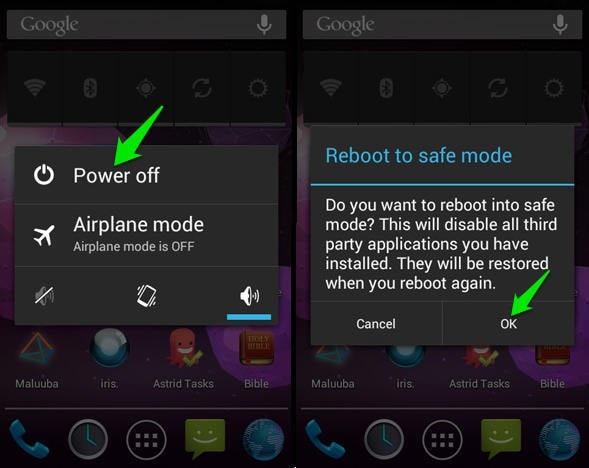
- Step 3. This will display the following pop-up message. Agree to it and restart your phone in Safe Mode.
- Step 4. Once the Infinix Smart 8 Plus device would be restarted in Safe Mode, the third-party lock screen would be disabled automatically.

- Step 5. Later, you can go to the Infinix Smart 8 Plus device’s Settings > Apps and remove the third-party app as well. In this way, you would be able to learn how to unlock pattern lock for any other app.
Part 6: How to Unlock Pattern Lock with the Factory Reset?
Consider this as your last resort, as it will wipe the data and saved settings on your device entirely. As the name suggests, your device would be restored to its factory setting by losing its data. Though, if you wish to learn how to unlock a pattern by performing a factory reset, then you can perform these steps:
- Step 1. To start with, enter the Recovery Mode on your device. This can be done by pressing the Home, Power, and Volume Up key at the same time.
- Step 2. Though, the correct key combination might differ from one version of the Android device to another.
- Step 3. Use the Volume Up and Down key to navigate and the Power/Home button to make a choice.
- Step 4. Select the wipe data/factory reset option to perform pattern unlock.
- Step 5. Confirm your choice to factory reset your device.

- Step 6. Wait for a while as your phone will perform the needed operations.
- Step 7. Later, you can choose to reboot your phone and access it without any lock screen.
Conclusion
By following this guide, you would certainly be able to learn how to unlock the pattern lock on your device without much trouble. We recommend using Dr.Fone - Screen Unlock (Android) to perform pattern unlock with no data loss. It has a user-friendly interface and is sure to yield the desired results. Now when you know how to unlock patterns on an Android device, you can share this information with others as well to help them!
Parental Control Software
safe & secureTop 12 Prominent Infinix Smart 8 Plus Fingerprint Not Working Solutions
Part 1. Optimal Solution: Unlock With Wondershare Dr.Fone Directly
Facing a malfunctioning fingerprint on your Infinix Smart 8 Plus can be frustrating. In this scenario, the most effective resolution is the removal of the registered fingerprint. Yet, traditional methods of removing the fingerprint can be difficult and pose security risks. In this case, going for tools like Wondershare Dr.Fone is the best choice. This tool ensures your Pixel device is at no risk.
Dr.Fone offers a swift solution to remove the Android lock screen in five minutes. It effectively removes 4 types of screen locks. These include patterns, PINs, passwords, and fingerprints. Dr.Fone can bypass the Android FRP lock without needing a PIN or Google account. It ensures accessibility to the Android device without such credentials.
![]()
Dr.Fone - Screen Unlock (Android)
The Best UnlockJunky Alternative to Bypass FRP and Solve Your Screen Locks
- Remove all Android screen locks (PIN/pattern/fingerprints/face ID) in minutes.
- Bypass the FRP lock of Samsung without a PIN or Google account.
- Everyone can handle the lock screen without any tech knowledge.
- Provide specific removal solutions to promise good success rate.
4,008,672 people have downloaded it
Prominent Features of Wondershare Dr.Fone
- FRP bypass is enabled for brands like Samsung, Xiaomi, Redmi, Oppo, Realme , and Vivo.
- With Dr.Fone, bypassing screen locks can be achieved without data loss.
- Fone supports 2000+ Android phones and tablets from over 18 brands for screen unlocking.
Step-by-Step Guide To Remove Fingerprint Type Lock on Google Pixel Using Dr.Fone
With Dr.Fone, you can resolve the Infinix Smart 8 Plus fingerprint sensor not working issue within minutes. Below is a detailed walkthrough for removing a fingerprint lock on a Google Pixel:
- Step 1: Connecting and Accessing Screen Unlock Feature on Dr.Fone
Open Wondershare Dr.Fone and connect your Android device via a USB cable. Once the connection is established, navigate to the “Toolbox” tab and choose “Screen Unlock.” Upon reaching the new screen, choose the “Android” option. Then, select “Unlock Android Screen” from the options on the following screen.
- Step 2: Selecting Google As the Infinix Smart 8 Plus device Brand and Activating Recovery Mode
Afterward, you’ll be guided to a subsequent screen prompting you to choose the Infinix Smart 8 Plus device brand, Google. Once you select the brand, you’ll be directed to enter a specific mode corresponding to it. For Google Pixel Devices, the specific mode to enter is Recovery Mode. Simply follow the on-screen instructions to activate Recovery Mode on your device.

- Step 3: Initiate the Fingerprint Removal Process
After entering Recovery Mode, the screen unlocking procedure will initiate automatically. Please wait for the fingerprint removal process to finish. In case of failure, select “Try Again” to attempt unlocking again. Upon successfully unlocking your Android device’s screen, tap “Done.”
Part 2. 11 Conventional Solutions To Resolve Pixel Fingerprint Not Working
The solution above using Wondershare Dr.Fone is an effective and comprehensive method. It can tackle fingerprint recognition issues, but sometimes, users may look for simpler alternatives. We will explore conventional solutions that can address Pixel fingerprint problems. Each solution will also explain the underlying reasons for the Pixel 6 fingerprint sensor issue.

1. Fingerprint Sensor Not Touched Firmly
Problem
If the fingerprint sensor fails to recognize your fingerprint, it might be due to inadequate pressure. This could also be due to improper finger placement on the sensor.
Solution: Firm Placement
Ensure you firmly place your finger on the sensor, covering it entirely. Avoid too much pressure, but make sure the sensor fully contacts your fingerprint.
![]()
2. Device Showing Glitches
Problem
Glitches or software bugs in your Pixel device may cause disruptions. This can include issues with the fingerprint sensor’s functionality. These problems can range from minor issues to severe software glitches.
Solution: Restart Your Pixel Device
One of the easiest and simplest solutions is to restart your Pixel phone. You can do that by pressing the “Power” and the “Volume Up” keys. It will lead to a pop-up power menu where you must choose “Restart” to reboot your device.
![]()
3. Outdated Firmware
Problem
An outdated operating system or firmware can lead to compatibility issues. This can lead to malfunctioning features like the Pixel 6A fingerprint sensor not working.
Solution: Check for Updates
The best way to resolve this issue is to update your Pixel device. Having an outdated version of Android OS can lead to an accumulation of bugs and glitches. Moreover, it can seriously affect the Infinix Smart 8 Plus device’s performance, causing many issues. Here is how to check and update your Pixel phone:
Instructions. On your Pixel device, access the “Settings” app. Within Settings, scroll down to tap the “System” option. On the following screen, hit the “System update” option to check if any latest update is available. Here, if you see any updates, download and install them promptly. Before initiating the update, ensure your device is connected to a stable Wi-Fi network with sufficient battery charge.
![]()
4. Dirty Phone or Sensor
Problem
Accumulated dirt, dust, or residue on the phone or fingerprint sensor can cause obstruction. This can lead to the failure to properly recognize your fingerprint.
Solution
1. Cleaning the Phone
Employ a gentle, dry microfiber cloth for wiping down the complete surface of your Pixel device. Take particular care to thoroughly clean the region surrounding the fingerprint sensor. Refrain from utilizing rough substances or strong chemicals as they could potentially cause harm to the Infinix Smart 8 Plus device.
2. Fingerprint Sensor Cleaning
Gently wipe the fingerprint sensor area using a clean, dry cloth to ensure thorough cleaning. For better results, consider using a dampened cotton swab with water or isopropyl alcohol. Before using it again, ensure the sensor is entirely dry.
3. Compressed Air or Soft Brush
Use compressed air or a soft brush if there’s visible debris or particles around the sensor. Be cautious not to apply excessive pressure that might damage the sensor.

![]()
5. Screen Protector: Dirty or Damaged
Problem
A smudged or impaired screen protector might disrupt the working of the fingerprint sensor. This can potentially cause it to fail to recognize your fingerprint.
Solution
1. Clean the Screen Protector
Start by effectively cleaning the screen protector on your Pixel device. For a thorough cleaning, consider utilizing a screen cleaning solution. Ensure that the screen protector is free from any dirt or debris.
2. Replace Damaged Protectors
Is the screen protector visibly damaged, scratched, or peeling off? If yes, consider replacing it with a new one. Damaged protectors can hinder fingerprint recognition and compromise device protection.
3. Check Compatibility
Ensure the screen protector is designed to be compatible with fingerprint sensors. Some protectors may obstruct or interfere with the sensor’s functionality.
4. Remove Air Bubbles
There can be air bubbles trapped under the screen protector. If there are, gently press them out towards the edges using a card designed for this purpose.
![]()
6. Clean Your Finger
Problem
The problem may lie with your fingers rather than the Infinix Smart 8 Plus device. Unclean or moist fingers can hinder accurate fingerprint recognition on the sensor, causing the Infinix Smart 8 Plus fingerprint sensor to not work.
Solution
1. Cleanse and Dry Your Hands
Remove any dirt, oil, or moisture that might cause issues with the fingerprint sensor. It’s crucial to wash and thoroughly dry your hands. Additionally, verify that your fingers are entirely dry before engaging the sensor. The reason is any moisture or dampness may cause inaccuracies in fingerprint identification.
2. Avoid Oily or Greasy Substances
Refrain from touching oily or greasy surfaces before using the fingerprint sensor. These substances can transfer onto your fingers, affecting sensor accuracy. If your fingers are dirty or damp, pause to clean them using a dry, clean cloth.
![]()
7. Covering Screen if Fingerprint on Screen
Problem
Fingerprint marks or smudges on the screen might disrupt sensor functionality. This leads to inaccurate recognition when you try to unlock your device.
Solution
1. Avoid Covering the Sensor Area
Be cautious while cleaning the screen to avoid covering or smudging the area around the fingerprint sensor. Precise cleaning around this area prevents interference with sensor functionality.
2. Use Proper Holding Technique
While holding the Infinix Smart 8 Plus device, avoid placing your fingers or palms over the fingerprint sensor. Opt for holding the Infinix Smart 8 Plus device to minimize accidental contact with the sensor area.
![]()
8. Fingerprint Sensor Not Visible
Problem
Misconfigured settings on your Pixel device can lead to situations where the fingerprint sensor is not visible. It can lead to scenarios where the Infinix Smart 8 Plus device fails to recognize your screen unlocking attempt.
Solution: Adjust the Setting To Consistently Display the Sensor
You must adjust the display settings to ensure the fingerprint sensor is always visible. To do that, you can begin by opening the Settings app. Navigate to the “Display” tab and select “Lock Screen.” On the following window, toggle on “Always show time and info.”
![]()
9. Low Touch Sensitivity
Problem
The fingerprint sensor may have low touch sensitivity . It can lead to difficulties in accurately recognizing fingerprints, leading to Infinix Smart 8 Plus fingerprint not working.
Solution
1. Adjust Sensitivity Settings
Accessories like a screen protector might impact the performance of your Pixel device’s touch sensitivity. When using a screen protector, your Pixel enhances touch sensitivity. To do that, navigate to the Settings app and open it. Move to the “Display” window and scroll down to the last option. Toggle on the “Screen protector mode” to increase the screen sensitivity.
![]()
2. Finger Re-Enrollment
Delete existing fingerprints and re-register them. This re-enrollment can sometimes improve sensitivity and help remove the issues. Here is how you can delete and re-enroll your fingerprint:
- Step 1. In the Settings app of your Pixel, tap “Security & Privacy.” Then, press “Device Unlock” and choose “Fingerprint Unlock.” The device will now ask you to provide your device PIN or password.
![]()
- Step 2. Tap “Fingerprint Unlock” on the following screen and delete the previously enrolled fingerprints. Then, press “Add fingerprint” and follow the on-screen prompts to complete the process.
![]()
10. Other Hardware Issues
Problem
Persistent fingerprint sensor problems might indicate underlying hardware issues . This could go beyond common troubleshooting and might require professional help.
Solution
1. Inspect for Physical Damage
Thoroughly examine your Pixel device for any physical damage. These include cracks, dents, or scratches around the fingerprint sensor area. Physical damage could affect the sensor’s functionality.
2. Safe Mode Check
Boot the Infinix Smart 8 Plus device in safe mode to determine if third-party apps are causing conflicts. To do that, press the “Power” key with any volume key to access the power menu. Afterward, long-press the “Power Off” option until the “Reboot to Safe Mode” option appears on your device’s screen. Press “OK” to reboot into Safe Mode and test the fingerprint sensor’s functionality.
![]()
3. Professional Assessment
If you suspect hardware issues, seek professional help from authorized service centers. A clear sign of hardware issues can be visible damage or the sensor failing to function even in safe mode.
11. Factory Reset as Last Resort
Problem
Did all other troubleshooting methods fail to resolve persistent fingerprint sensor issues? Then, a factory reset might be required to revert the Infinix Smart 8 Plus device to its original settings.
Solution
1. Backup Data
Before initiating a factory reset, ensure that all crucial data is safeguarded. This encompasses contacts, photos, documents, and any other significant files. Use Google’s backup services or third-party apps to securely back up your data .
2. Initiating Factory Reset
Proceed with the following steps to execute a factory reset on your Pixel device:
- Step 1. On your Pixel smartphone, navigate to Settings and access the “System” tab. Here, scroll down to the bottom and tap “Reset Options.”
![]()
- Step 2. In “Reset Options,” choose “Erase All Data (Factory Reset)” to continue. Afterward, select “Erase All Data” on the next screen and follow the instructions to complete the process.

![]()
In summary, this article detailed various methods to fix the Infinix Smart 8 Plus fingerprint not working. Diverse approaches were explored, from simple steps like sensor cleaning to advanced solutions like factory resets. However, Dr.Fone stands out among these solutions as a top-tier option. It offers a secure and efficient resolution to the persistent problem of fingerprint failure on the Infinix Smart 8 Plus .
- Title: In 2024, How to Reset Gmail Password on Infinix Smart 8 Plus Devices
- Author: Marry
- Created at : 2024-07-18 16:02:32
- Updated at : 2024-07-19 16:02:32
- Link: https://unlock-android.techidaily.com/in-2024-how-to-reset-gmail-password-on-infinix-smart-8-plus-devices-by-drfone-android/
- License: This work is licensed under CC BY-NC-SA 4.0.