
In 2024, How to Reset Gmail Password on Xiaomi Redmi Note 12 Pro+ 5G Devices
How to Reset Gmail Password on Xiaomi Redmi Note 12 Pro+ 5G Devices
Nowadays, along with Windows or Apple devices, Android devices are starting to take its place as one of the most popular, reliable, and efficient technical equipment brands. As a result, the use of Android as an operating system for both PC and portable tools is becoming an extremely hot trend.
Android devices pride themselves on providing their customers with the best features possible. Not only do they support offline features, but Android devices are also capable of offering users with several services online. One of them is the ability to make use of Gmail - a very famous email site nowadays.
Gmail being used directly by an Android tool is a great advantage, but it still contains some small drawbacks that users may have to go through. According to a recent survey, the majority of Android users were likely to wonder if they were able to reset Gmail password on Android devices.
Luckily for you, this performance is possible. In this article, a very informative and detailed description will be delivered to you to help you solve the problem of resetting your Gmail password.
Part 1: Reset Gmail Password When you Forget it
There will be times when you come into the situation of not knowing what your Gmail password is, or you just simply forget it. You want to change your password but you don’t have access to a computer or laptop to perform this task. Now with the help of Android, you can do it through your own Android devices.
Step 1: Visit the Gmail login page from your Android device. Click on the Need helpline, which is highlighted in blue.


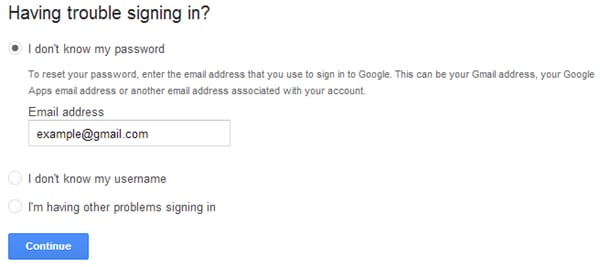
Step 2: After that, you will be moved to the Google Account Recovery page. There will be 3 main options which indicate 3 frequent problems. Select the first one, which is entitled “I don’t know my password”. Once you have chosen it, you will be required to fill in your Gmail address in the bar provided. Click on the Continue button as long as you have made sure to finish all these tasks.
Step 3: In this step, you may be asked to fill in a CAPCHA form. Just simply do it and move to the next page. There you had better type in the last password that you are still able to recall if possible, then click on the Continue button to move. Or else, you can skip this step by clicking on I don’t know button.

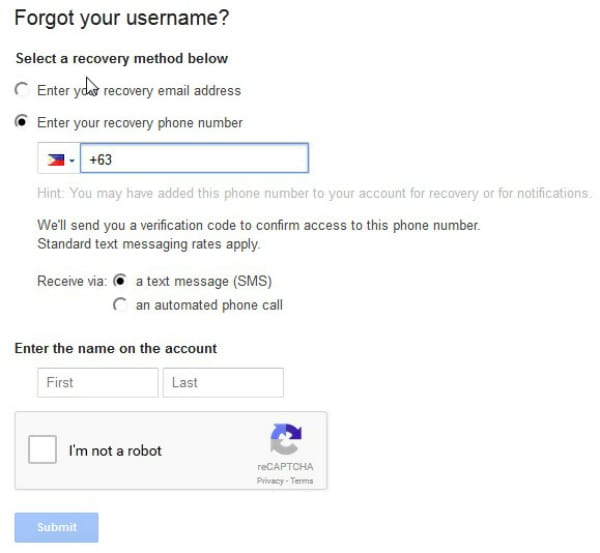
Step 4: Finally, you will be shown a list of options on how to reset your Gmail password on Android devices. You can either use your alternative email address or your phone number to receive a verification code. Bear in mind to fill in any required information and put a check in the CAPCHA box to submit the process.
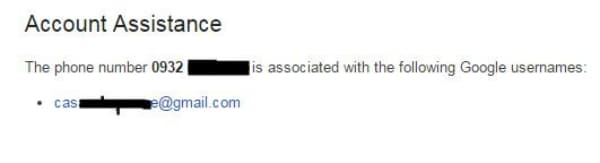
Step 5: In this step, a blank bar will appear and it will demand you to type in your verification code. Just do it carefully to make sure there is no error. Once you have done it, a new screen will appear to tell you.

Step 6: After you have done all the previous steps, you will know how to reset your Gmail password directly from your Android device.
Part 2: Change Gmail Password When You Still Know it
Besides not knowing your password, there are still circumstances when you wish to change your current password for various reasons. Just simply follow these steps.
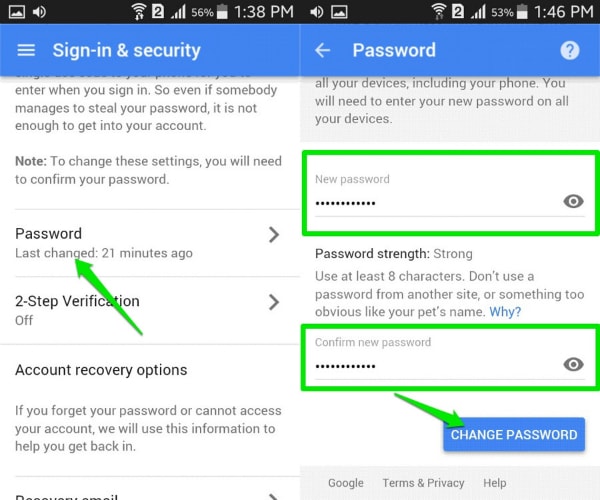
Step 1: Make sure your Android device is connected with the Internet. Then get access to the link myaccount.google.com. After logging into your account (or maybe you have already done this), scroll down, find the Sign-in and security option and choose it.
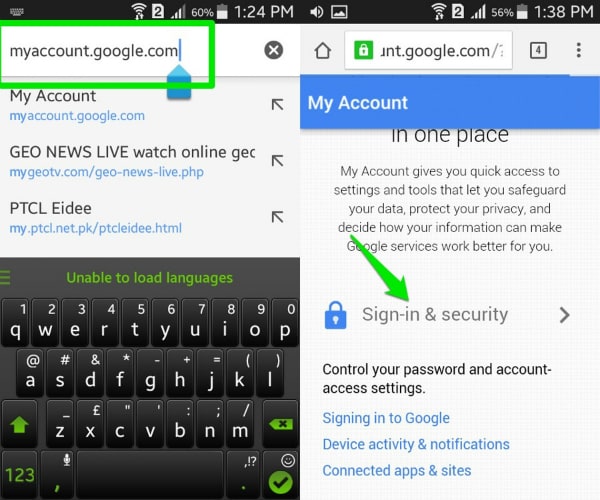
Step 2: Find the Password option in the list. Tap on it to be moved to another screen. In the menu, type in your new password that you wish to exchange, confirm it and then click on the Change password button.

Part 3: Bonus Tips
Gmail is undoubtedly a marvelous tool to use on Android devices, but have you really understood all the tips and tricks to take the best advantage of it? Below are the 5 most helpful tips that we want to offer you.
- Far from your imagination, Gmail on Android devices is capable of allowing you to make use of several accounts at the same time, even if it’s not a Gmail account. This performance not only helps you to organize your work better, but it also increase the efficiency of your job. Just simply log in your Gmail account on Gmail app, click on the down arrow which is placed next to your avatar and name, then choose Add account. You will be moved to another page, choose Personal (IMAP/POP) choice and follow the detailed guide on the screen.
- If your Android device is used by only one user, and you are guaranteed about the security of it, try to keep the Gmail logged in. It would help you to avoid wasting unnecessary time to sign in your account every time you need, not to mention that it prevent you from being confused of not knowing your account/password.
- You are capable of sorting your mails with a certain level of accuracy once you are fully aware of the features of Gmail app on Android devices. Just click on the email, then choose Settings menu and mark it as “Mark as not important”, “Mark important” or “Report to spam” owing to the priority of your email.
- Gmail app provided you with the ability to have conversations online, and whenever a message comes, there will be a sound. In case you are in a vital conference, or you don’t want to be disturbed by the noise, you can mute it. All you have to do is to tap into the conversation, choose the three dots icon then click on the Mute option in the menu.
- Enhance the speed and the accuracy of your search with the use of certain phrases. Let’s take an instance to see what Gmail can do for you in this case. If you want to search for the mails which have been sent by a certain person, typefrom:(name of the person on Gmail) in the searching bar. And in case you would love to look for a private message from that person, please type is:chat:(name of the person on Gmail) .
Part 4: Video on How to Reset Gmail Password on Android Devices
Full Guide to Unlock Your Xiaomi Redmi Note 12 Pro+ 5G
Yesterday my kid was using YouTube on my Xiaomi Redmi Note 12 Pro+ 5G to help solve an assignment. However, it wouldn’t take the Xiaomi Redmi Note 12 Pro+ 5G pattern unlock when I tried opening the phone. Maybe the kid has accidentally changed the lock, but I don’t know what to do. Please help me.
This article is for you if you have been locked out of your Xiaomi phone. Many individuals fail to remember their password or change it accidentally. However, it is not a big deal now. We’ll talk about the best Xiaomi Redmi Note 12 Pro+ 5G password unlock tool today.
There are multiple ways to unlock your locked Xiaomi device. All the solutions mentioned here are effective and work 99% of the time. However, we suggest you use Dr.Fone. Dr.Fone is expert software to answer all your Android needs. It is safe, secure, and free of data loss.
Part 1: 3 Easy Ways to Remove Your Xiaomi Redmi Note 12 Pro+ 5G Lock
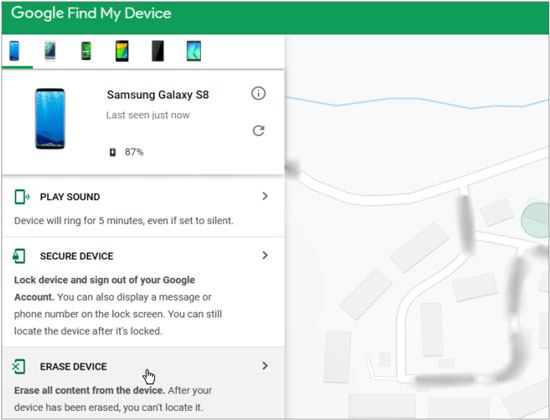
1. Google Find My Device
Google Find My Device is an inbuilt feature in Xiaomi phones to unlock your phone through Google accounts. You can utilize it to unlock the Xiaomi screen lock. However, you need to know that you will lose all your files on the Xiaomi phone after the Xiaomi Redmi Note 12 Pro+ 5G password unlocks. Therefore, make sure to back up your data before proceeding with the following steps:
- Ensure your locked Xiaomi phone is connected to your Google account and WiFi/Data. Then open the Find My Device site on a PC, and sign in with your phone’s Google account.
- Kindly select your device, and tap the “Erase Device” option.
- Type your Google account credentials once more. Then, click the “Erase” symbol to begin the unlocking system. That will remove the pattern lock from your OPPO, and you can open it without effort.
2. Answer Security Questions
This method is for you if you have set security questions while making your Google ID. By addressing those questions, you can unlock the Xiaomi Redmi Note 12 Pro+ 5G screen lock. In any case, this way is invalid on some old Android phones.
To unlock this way, you need to press the Forgot Password option. If you can’t see the “Forgot Pattern/Password button on your phone, follow these steps:
- Try unlocking your Xiaomi smartphone with some wrong patterns a few times. Then you will see the “Forgot Pattern” symbol on the screen and tap it.
- Select the “Answer question” option to get to your security questions. Then, at that point, answer each of them correctly.

- It will automatically unlock your device if you answer all questions accurately. Then, it will expect you to set another screen lock for your OPPO. Therefore, keep the new PIN to yourself.
3. Hard Reset
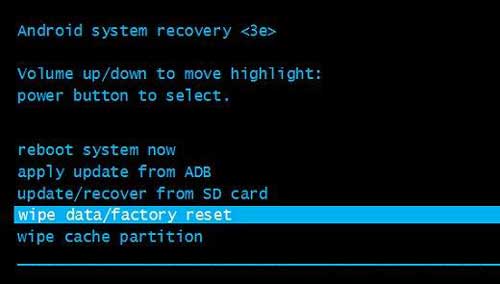
If you wouldn’t worry about losing your user data, you can attempt this unlock method for your Xiaomi Redmi Note 12 Pro+ 5G. You won’t require any account or applications. It requires you to have sufficient battery life. It is simple. So let’s see how it is done.
- Check whether the battery percentage is over half. Then power off your Xiaomi phone by holding the “Side/Power” key for around 10 seconds.
- Press and hold the “Volume Down” and “Side/Power” buttons till the Xiaomi logo appears on display. Then, at that point, your phone is in recovery mode.
- Utilize the volume keys to pick the “Wipe Data/Factory Reset” choice, and press the “Side/Power” button to select it. Then, at that point, pick “Yes” to go on. You can reboot your Xiaomi after the reset is finished, and the lock will be no more.
Part 2: The Efficient Tool for Your Xiaomi Redmi Note 12 Pro+ 5G Unlock
Dr.Fone - Screen Unlock (Android) offers a wonderful tool that works to unlock Xiaomi devices rapidly. This lock screen remover tool can unlock your phone from every five locks: PIN, passcode, face lock, pattern, or fingerprint in only a couple of basic steps. It works with all the Xiaomi models hassle-free. So, download it right away for a safe unlocking experience. Here’s how you can use it:
Step 1. Start your hard reset from Dr.Fone
Make your Xiaomi Redmi Note 12 Pro+ 5G phone connected to the PC through a USB cable. Then, at that point, click “Screen Unlock” > “Android” on the program.
Step 2. Select Unlock Android Screen
When you arrive at this page, please choose the button “Unlock Android Screen”.


Step 3. Select device brand
We’ll offer you a phone brands list, almost all Android devices are here, for example, Samsung, Huawei, OPPO, Vivo, Lenovo, LG, etc. Then Select Xiaomi to continue.

Step 4. Unlock your Xiaomi Redmi Note 12 Pro+ 5G now
The following steps are the key to unlocking your Xiaomi device. Attention! The unlock process will also wipe your data!
Great! Now the unlocking progress is done, and you can use your phone without entering password.


Bonus Tips: The Importance of Backing Up Your Android Data Regularly
The data loss on your Android phone or tablet can be extremely unpleasant. Subsequently, it’s suggested that you back up your Android phone or tablet consistently. It will keep you from losing your data. As an expert application, Dr.Fone Backup and Restore (Android) can help back up a wide range of data and settings on Android. In the meantime, it lets you review and restore the backup documents to another phone. Here’s how:
- Open the Dr.Fone software on your computer, and connect your phone to the PC through a USB connector and click OK. Then select the “Back up device” option.

- Tap the Backup option to begin the process.

- The process will require some time.
- After it is done, you can see where the backup is stored by clicking on the “View BackupS” option.

Conclusion
All the best Xiaomi Redmi Note 12 Pro+ 5G password unlock tools are displayed above. They are helpful, dependable and safe to use. However, if you need the easiest tools, you must pick the Android Screen Unlock program. In this case, the Dr.Fone - Screen Unlock (Android) can unlock your Xiaomi phone without any issue. Therefore, we strongly suggest you use Dr.Fone for backup and unlock your device.
How to Use Google Assistant on Your Lock Screen Of Xiaomi Redmi Note 12 Pro+ 5G Phone
Android has undergone numerous changes to enhance user experience and security. One notable feature that was once present was the ability to unlock phones with voice Google Assistant. However, Google Assistant has removed this feature across all versions since 2021.
While this voice-unlocking feature is no longer available, there are still many things you can do with Google Assistant, even when the Xiaomi Redmi Note 12 Pro+ 5G device is locked. This tool brings an added layer of convenience to your smartphone experience.
Let’s dig deeper into how you can use Google Assistant on the lock screen and make the most out of this tool in the following article.
Part 1. What You Can Do With Voice Google Assistant
Google Assistant is a virtual assistant powered by artificial intelligence (AI) developed by tech giant Google. This application is readily available on most recent mobile phone models, especially those operating on Android 6.0 and newer versions.
Although you can no longer use the Google Assistant unlock feature, you can still perform a myriad of tasks using Google Assistant. These include:
- Getting the weather
- Setting alarms
- Playing music
- Sending texts
- Making a call
- Asking Google for information, etc.

Enable Google Assistant on Lock Screen: A Step-by-Step Guide
Now that you’re eager to try the potential of Google Assistant on your lock screen, let’s walk through the simple steps on how to enable this tool.
- Step 1: Open Google Assistant:
Look for “Google Assistant” and open the app.
- Step 2: Ask Google Assistant to open the settings.
You can ask, “Hey Google, open the Google Assistant settings,” and it will show you the Google Assistant settings.
- Step 3: Allow Google Assistant on the lock screen.
Locate the “Lock Screen” settings and make sure to switch on “Assistant responses on lock screen.”

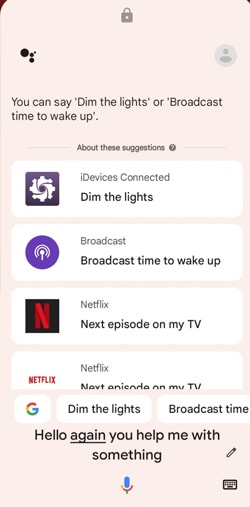
Part 2. How To Use Google Assistant on Lock Screen
After you’ve successfully enabled Google Assistant on your lock screen, let’s see how to use Google Assistant to do certain tasks more efficiently and hands-free.
- Step 1: Wake Up Google Assistant
Start by waking up Google Assistant. You can do this by saying the wake word “Hey Google” or “OK Google.” If it doesn’t work, you can long-press the home button or use any dedicated gesture to activate Google Assistant.
- Step 2: Issue a Voice Command
Once Google Assistant is active, issue a voice command related to the task you want to perform. For example:
“Hey Google, what’s the weather today?”
“OK Google, set an alarm for 5 PM.”
“Hey Google, play my Spotify playlist.”
When you can still unlock with Google Assistant, you can ask it to “unlock my phone” or use any similar command.
- Step 3: Interact with Responses
Google Assistant will then provide spoken responses and display relevant information on the lock screen. For instance, if you ask for the weather, it might verbally provide the current conditions and display a brief summary on your lock screen.

Part 3. Common Problems When Using Google Assistant
Unable to use Google Assistant to unlock phone is not the only drawback that users may have encountered in recent changes. Although Google Assistant on the lock screen presents a revolutionary way to interact with your phone, like any technology, it also comes with its share of challenges. Some of the common problems when using Google Assistant are:
- Misunderstandings and misinterpretations
One prevalent issue users encounter is Google Assistant misunderstanding or misinterpreting voice commands. This can be influenced by factors such as background noise, accent variations, or pronunciation differences.
- Limited context understanding
While Google Assistant is adept at understanding individual commands, it may struggle with complex, multi-step requests that rely heavily on context. Break down your tasks into simpler commands to enhance comprehension and execute it more accurately.
- Inability to execute certain tasks
Google Assistant’s capabilities are extensive, but there are instances where it may struggle to execute specific tasks. For example, it can’t execute tasks that involve interacting with certain third-party applications or services. You can’t also unlock phone with voice Google Assistant.
Tips to Make Voice Google Assistant Recognize Your Commands
One of the most infuriating problems with voice Google Assistant is that users often encounter difficulties in having their commands accurately recognized. To enhance the accuracy of voice recognition with Google Assistant, you can consider implementing the following tips:
- Speak Clearly and Naturally
Make sure that you speak in a clear and natural manner. Avoid mumbling or speaking too quickly. Enunciate your words, giving Google Assistant a better chance to interpret your commands accurately.
- Use Simple and Direct Phrases
Keep your commands simple and direct. Avoid unnecessary elaboration or complex sentence structures. Google Assistant is more likely to understand straightforward commands.
- Check Your Microphone
Ensure that your device’s microphone is in good working condition. Dirt or debris on your phone’s microphone can affect its performance. Clean the microphone area and try again.
- Quiet Environment
Background noise can interfere with voice recognition. Try to issue commands in a quiet environment to minimize any potential confusion caused by external sounds.
Part 4. How to Unlock Android Phone Screen Without Passcode
Now, you know that you can’t unlock phone via Google Assistant anymore. But what if you accidentally forget your phone’s passcode? Is there a reliable method to regain access to your Android device without the passcode?
Fortunately, Wondershare Dr.Fone offers a straightforward solution for precisely such scenarios. It provides a simple and effective way to unlock your Android phone screen through Dr.Fone - Screen Unlock when the screen lock is forgotten or becomes inaccessible.
![]()
Dr.Fone - Screen Unlock (Android)
The Best UnlockJunky Alternative to Solve Your Screen Locks
- Completely unlinked from the previous Google account, it won’t be traced or blocked by it anymore.
- Remove all Android screen locks (PIN/pattern/fingerprints/face ID) in minutes.
- Compatiable with various Android models.
- Provide specific removal solutions to promise good success rate.
4,008,670 people have downloaded it
If you are wondering how to unlock your Android phone screen without a passcode with Dr.Fone – Screen Unlock, follow the steps below.
- Step 1: Launch the Screen Unlock Tool
Open the latest version of Wondershare Dr.Fone on your computer and connect your phone device using a USB cable. Once connected, navigate to the Toolbox > Screen Unlock to access Dr.Fone – Screen Unlock tool.

- Step 2: Select Android for your device type.
As the Dr.Fone Screen Unlock tool supports both Android and iOS, you will need to indicate the specific device you are using. Opt for the Android option if you are unlocking an Android device. Then, continue to choose “Unlock Android Screen” on the next screen.
- Step 3: Remove Screen Lock Without Data Loss
- In this step, you will be directed to select your device brand. Choose the Android device brand you are using and opt for “Remove without Data Loss” if you don’t want to lose your data.

- Step 4: Define Device Details
Next, make sure to check and confirm the Brand, Device Name, and Device Model to unlock your Android screen. Tick the checkmark that says you agree with the warning and are ready to proceed. Click “Next” to unlock your screen.

- Step 5: Confirm to Unlock Screen
Type “000000” continue by clicking Confirm.

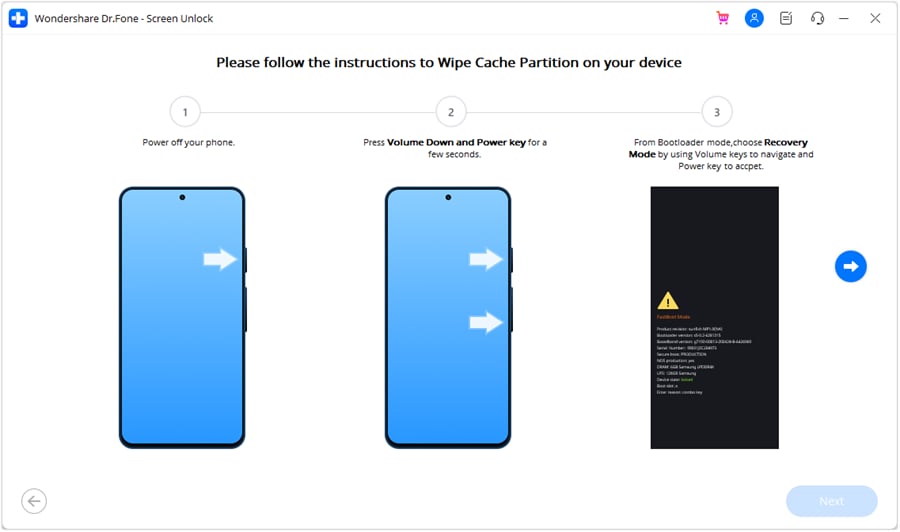
- Step 6: Put Android in Download Mode
Dr.Fone will then guide you to put your Android device into Download Mode according to the model you have identified. After you have followed the instructions, Dr.Fone will automatically lead to the next screen to proceed the unlocking process.

After that, you can monitor the progress and wait for a few minutes until it shows “Unlocked successfully.”
You May Also Interested:
Unlocking Your Realme Phone Made Easy: Step-by-Step Guide
8 Safe and Effective Methods to Unlock Your iPhone Without a Passcode
Complete Guide to Unlock Mi Account Without Password In 2024
Conclusion
Google Assistant is a versatile virtual assistant that is designed to help you with a wide range of tasks and make your daily life more convenient. Accessible on most modern Android devices, it enables users to perform several tasks through voice commands.
However, if you are looking for ways to unlock phone with Google Assistant, this function is no longer available. Google Assistant unlock feature has been discontinued since 2021. But in case you’ve forgotten the screen lock passcode, you can use Wondershare Dr.Fone Screen Unlock tool to regain access to your Android phone. This tool facilitates the unlocking process without data loss, featuring a user-friendly learning curve.
- Title: In 2024, How to Reset Gmail Password on Xiaomi Redmi Note 12 Pro+ 5G Devices
- Author: Marry
- Created at : 2024-07-18 13:17:46
- Updated at : 2024-07-19 13:17:46
- Link: https://unlock-android.techidaily.com/in-2024-how-to-reset-gmail-password-on-xiaomi-redmi-note-12-proplus-5g-devices-by-drfone-android/
- License: This work is licensed under CC BY-NC-SA 4.0.