
In 2024, How to Unlock a Network Locked Honor X50i+ Phone?
How to Unlock a Network Locked Honor X50i+ Phone?
Revolutions in the telecommunication industry have introduced advancements in smartphone features and utilities. The other side of the coin is, however, not as appealing. Thanks to the different carrier services, network locking is the commonest issue of recent mobile launches. Users have reported of Honor X50i+ phones refusing to work with different carriers.
The issue limits the smartphone’s functioning to the specific carrier from whom the Honor X50i+ device is purchased. Consequently, there are annoying connectivity problems that restrict seamless mobile usage. The problem aggravates in geo-restricted regions where the carrier options are quite limited. This scenario puts forward the need for Honor X50i+ network unlock solutions.
Part 1: What Does It Mean When Your Honor X50i+ Phone is Network Locked?
In the simplest words, a network-locked Honor X50i+ phone means that your device has become carrier-specific. It will now work only with the network provider from where the phone was purchased. Another problem is that there is no automatic unlocking even after the expiry of your contract with the carrier service. Having a network-locked Honor X50i+ phone poses undesired connectivity issues.
1. Why is my phone locked to the network carrier?
Smartphones are network locked by carrier services to prevent customers from switching to a different carrier. Reasons for switching can be the availability of better plans, discounts, etc. Another cause of locking the phones to specific carriers is preventing them from theft and unauthorized usage.
2. Is it legal to unlock it?
Unlocking your network-locked phone is legal in every sense. It is however advisable to contact your service provider for addressing the concern. The only downside of unlocking such phones is the loss of device warranty assured at the time of purchase.
Part 2. How to Unlock a Network Locked Honor X50i+ Phone?
When looking for affordable solutions to address the Honor X50i+ SIM unlock task, you can follow the methods discussed below:
Method 1: Use Network Unlock Code
The safest way to unlock a network-locked Honor X50i+ phone is through the network unlock code provided by the carrier service. Here’s what you should do:
- Contact Your Network Provider
Contact your network provider to receive the network unlock code if you are the actual buyer of the Honor X50i+ device. Your carrier’s customer service will guide you with the Honor X50i+ unlocking process using the code. Drop your worries about the expired contract as that’s not a problem in unlocking your phone.
Listed below are some popular carrier service providers in the USA with the applicable phone models. You can have a look to find out yours:
| Carrier Providers | Mobile Phones |
|---|---|
| Verizon | Honor X50i+ 8, Honor X50i+ 8 Pro |
| T-Mobile US | Honor X50i+ Nord N10, Honor X50i+ 9 |
| AT & T Mobility | Honor X50i+ 7T, Honor X50i+ Nord N200 |
| Dish Wireless | Honor X50i+ 8, Honor X50i+ Nord N10 |
| US Cellular | Honor X50i+ 8, Honor X50i+ 8 Pro |
- How to Use Your Network Unlock Code
Take the following steps to unlock your Honor X50i+ phone with the network unlock code:
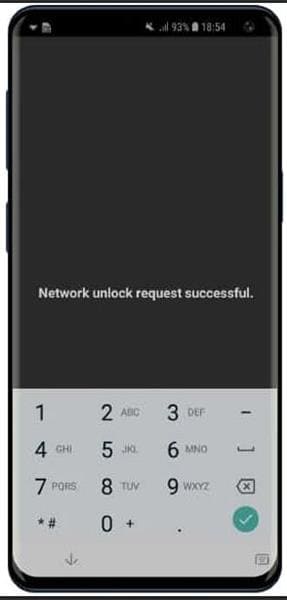
- 1. Shut down your Honor X50i+ smartphone.
- 2. Insert a different carrier’s SIM card into the Honor X50i+ device.
- 3. Power on your Honor X50i+ phone.
- 4. One of the SIM lock/unlock code/ SIM network unlock PIN/NCK prompts will pop up.

- 5. Enter the network unlock code received from your carrier service provider. The device is unlocked and can work with all GSM network services.

Method 2: With a Third-Party Service
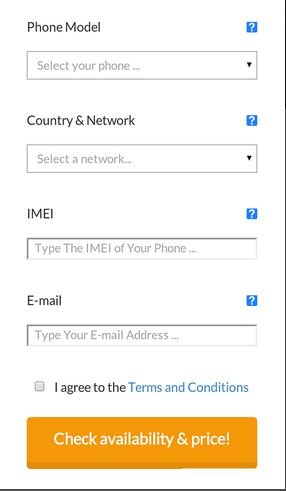
If you don’t wish to use the carrier unlock code, several third-party services can be availed to unlock a network-locked Honor X50i+ device. The UnlockScope application is one such utility to proceed with the process. The tool helps to unlock your network-locked Honor X50i+ phone by sending an unlock code on request. Here’s how you can work with the tool:
Step 1: Download and launch the application on your Honor X50i+ phone.

Step 2: Select the details of brand, phone model, IMEI number, country, and network. Then, enter your email address and agree to the app’s terms and conditions to continue.

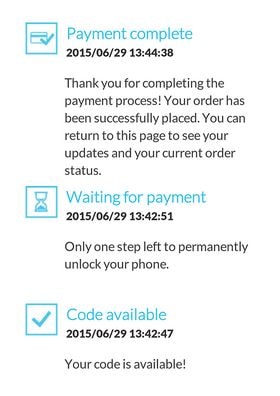
Step 3: Click on the ‘Check Availability and Price’ tab; followed by choosing the price and payment method. Finally, tap ‘Go to Payment’.

Step 4: Make the payment and wait for its acknowledgment. You will receive the code once the payment is successful.
Dr.Fone - Screen Unlock (Android)
Unlock Your Honor X50i+ Phone in a Flash
- Pattern, PIN, password, fingerprints & face screen lock can all be unlocked.
- Bypass Android FRP lock without a PIN or Google account.

- Unlock mainstream Android brands like Samsung, Huawei, OnePlus, Xiaomi, etc.
- No tech knowledge required, Simple, click-through, process.

3,981,454 people have downloaded it
Part 3. What to ask Before Signing a New Honor X50i+ Phone Contract?
Signing in a new Honor X50i+ contract has many factors to consider for affordable purchases and consumer safety. When entering into such deals, you should pay head-to-data allowances, upfront costs, price hikes, carrier coverage, roaming charges, contract length, flexibility, etc. A low price is not the only thing that should be taken care of.
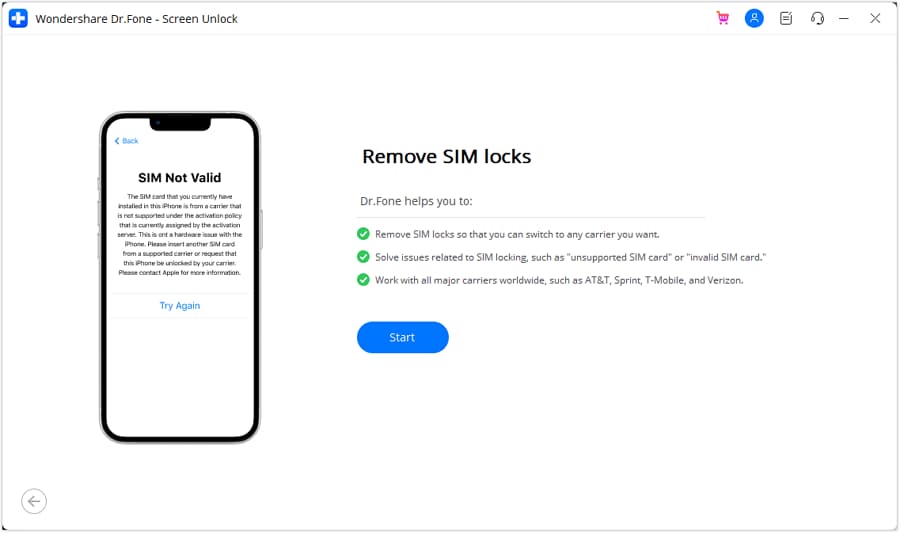
Part 4:Bonus Tips: iPhone SIM Unlock to Work on Any Carrier Worldwide
Working with the Dr.Fone - Screen Unlock (iOS) application is advisable to quickly unlock your network-locked iPhone. The tool uses a simple and intuitive method to sort out the issue in just a few simple steps. In addition, the app’s responsive interface guides you at every step of the process and ensures complete information security.
Dr.Fone - Screen Unlock (iOS)
iPhone SIM Unlock to Work on Any Carrier Worldwide
- Support newly released models from iPhone 5S to iPhone X.
- Move to any network operator within minutes aimlessly without data loss.
- You can unlock an iPhone without an R-SIM.
- Compatible with most carriers, T-Mobile, Sprint, Verizon, etc.
3,981,454 people have downloaded it
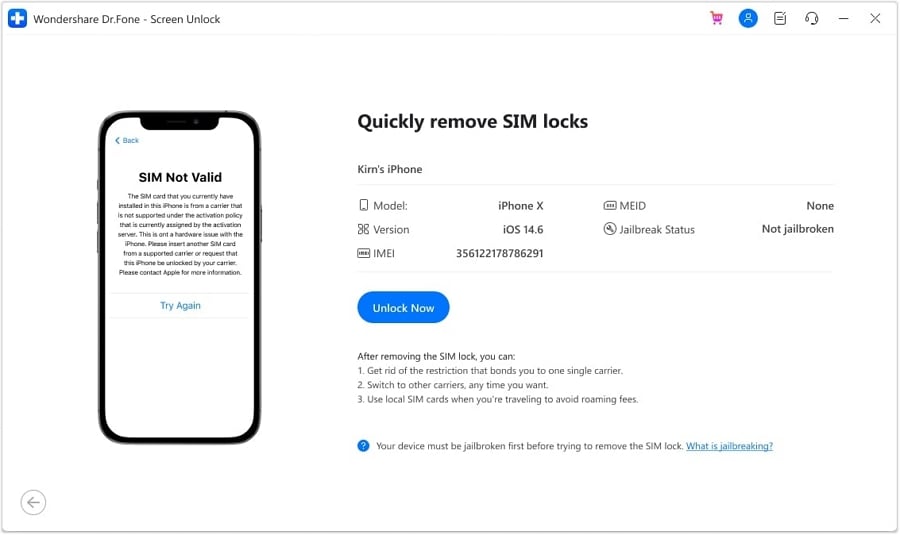
How to Unlock Network Locked iPhone with Dr.Fone - Screen Unlock (iOS)
To unlock your network-locked iPhone with the aforesaid app, you can take the following steps:
Visit the official Dr.Fone website and download the app to your PC. Install the program by adhering to the on-screen instructions.
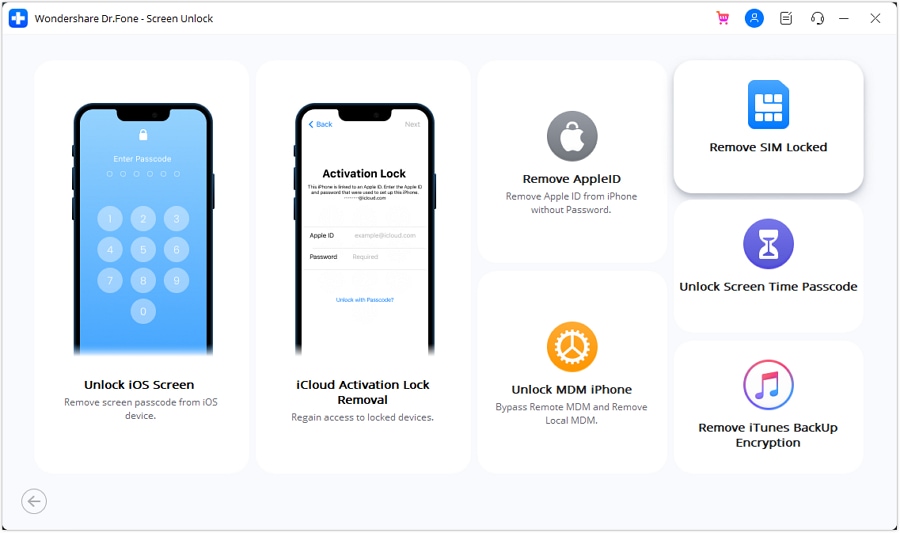
Step 1: Launch the app and tap on the ‘Remove SIM Locked’ function in the main interface.
Step 2: Tap ‘Start’ to initiate the authorization and verification process. Next, connect your iPhone to the PC and hit the ‘Confirmed’ button to proceed further.
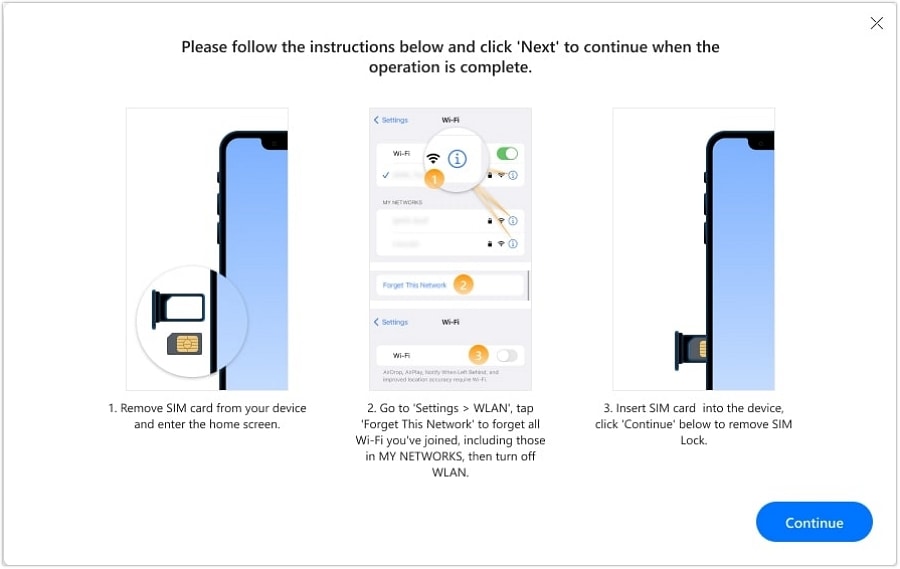
Step 3: Follow the instructions in the configuration profile sent by Dr.Fone to unlock the iPhone screen. It is necessary to jailbreak your iPhone to remove the SIM lock.
Step 4: Take the following steps for remove all Wi-Fi networks.
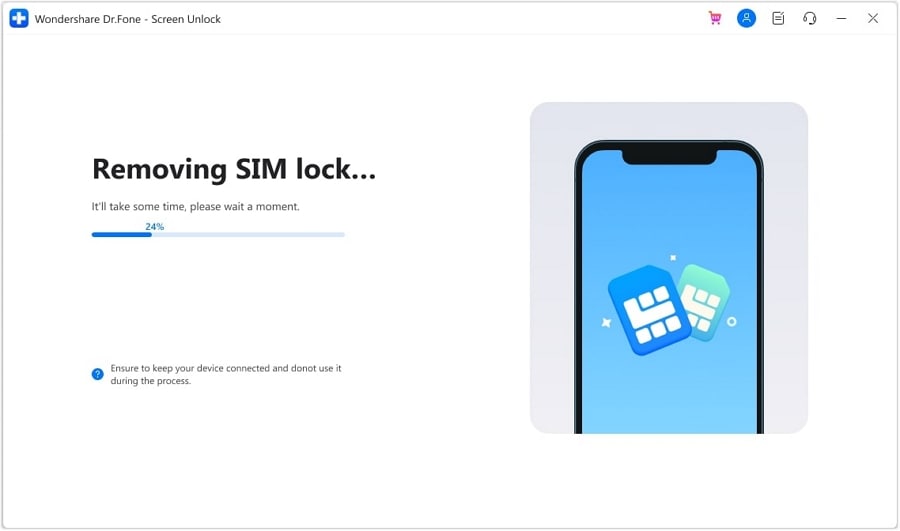
Step 5: The following screen displays the prompt window featuring the SIM unlocking process’s progress. After that, you are free to use your choice’s SIM plan and carrier network.
 safe & secure
Conclusion
Technology has a pivotal influence on today’s high-tech lifestyles, which is rewarding in several ways, but there are glitches too. The latest ones are the network-locked Honor X50i+ devices that have become carrier-specific. When looking for effective solutions to resolve the issue, getting in touch with your service provider is the safest option. You will receive an unlock code to make your device work with different carriers. Another way is to use third-party apps to address the concern. If you want to unlock your iPhone. Searching for a reliable one, you can trust the Dr.Fone - Screen Unlock (iOS) application for a quick and convenient solution.
How to Use Google Assistant on Your Lock Screen Of Honor X50i+ Phone
Android has undergone numerous changes to enhance user experience and security. One notable feature that was once present was the ability to unlock phones with voice Google Assistant. However, Google Assistant has removed this feature across all versions since 2021.
While this voice-unlocking feature is no longer available, there are still many things you can do with Google Assistant, even when the Honor X50i+ device is locked. This tool brings an added layer of convenience to your smartphone experience.
Let’s dig deeper into how you can use Google Assistant on the lock screen and make the most out of this tool in the following article.
Part 1. What You Can Do With Voice Google Assistant
Google Assistant is a virtual assistant powered by artificial intelligence (AI) developed by tech giant Google. This application is readily available on most recent mobile phone models, especially those operating on Android 6.0 and newer versions.
Although you can no longer use the Google Assistant unlock feature, you can still perform a myriad of tasks using Google Assistant. These include:
- Getting the weather
- Setting alarms
- Playing music
- Sending texts
- Making a call
- Asking Google for information, etc.
Enable Google Assistant on Lock Screen: A Step-by-Step Guide
Now that you’re eager to try the potential of Google Assistant on your lock screen, let’s walk through the simple steps on how to enable this tool.
- Step 1: Open Google Assistant:
Look for “Google Assistant” and open the app.
- Step 2: Ask Google Assistant to open the settings.
You can ask, “Hey Google, open the Google Assistant settings,” and it will show you the Google Assistant settings.
- Step 3: Allow Google Assistant on the lock screen.
Locate the “Lock Screen” settings and make sure to switch on “Assistant responses on lock screen.”

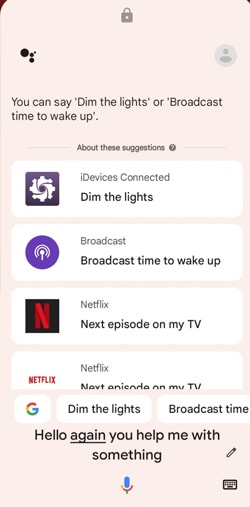
Part 2. How To Use Google Assistant on Lock Screen
After you’ve successfully enabled Google Assistant on your lock screen, let’s see how to use Google Assistant to do certain tasks more efficiently and hands-free.
- Step 1: Wake Up Google Assistant
Start by waking up Google Assistant. You can do this by saying the wake word “Hey Google” or “OK Google.” If it doesn’t work, you can long-press the home button or use any dedicated gesture to activate Google Assistant.
- Step 2: Issue a Voice Command
Once Google Assistant is active, issue a voice command related to the task you want to perform. For example:
“Hey Google, what’s the weather today?”
“OK Google, set an alarm for 5 PM.”
“Hey Google, play my Spotify playlist.”
When you can still unlock with Google Assistant, you can ask it to “unlock my phone” or use any similar command.
- Step 3: Interact with Responses
Google Assistant will then provide spoken responses and display relevant information on the lock screen. For instance, if you ask for the weather, it might verbally provide the current conditions and display a brief summary on your lock screen.

Part 3. Common Problems When Using Google Assistant
Unable to use Google Assistant to unlock phone is not the only drawback that users may have encountered in recent changes. Although Google Assistant on the lock screen presents a revolutionary way to interact with your phone, like any technology, it also comes with its share of challenges. Some of the common problems when using Google Assistant are:
- Misunderstandings and misinterpretations
One prevalent issue users encounter is Google Assistant misunderstanding or misinterpreting voice commands. This can be influenced by factors such as background noise, accent variations, or pronunciation differences.
- Limited context understanding
While Google Assistant is adept at understanding individual commands, it may struggle with complex, multi-step requests that rely heavily on context. Break down your tasks into simpler commands to enhance comprehension and execute it more accurately.
- Inability to execute certain tasks
Google Assistant’s capabilities are extensive, but there are instances where it may struggle to execute specific tasks. For example, it can’t execute tasks that involve interacting with certain third-party applications or services. You can’t also unlock phone with voice Google Assistant.
Tips to Make Voice Google Assistant Recognize Your Commands
One of the most infuriating problems with voice Google Assistant is that users often encounter difficulties in having their commands accurately recognized. To enhance the accuracy of voice recognition with Google Assistant, you can consider implementing the following tips:
- Speak Clearly and Naturally
Make sure that you speak in a clear and natural manner. Avoid mumbling or speaking too quickly. Enunciate your words, giving Google Assistant a better chance to interpret your commands accurately.
- Use Simple and Direct Phrases
Keep your commands simple and direct. Avoid unnecessary elaboration or complex sentence structures. Google Assistant is more likely to understand straightforward commands.
- Check Your Microphone
Ensure that your device’s microphone is in good working condition. Dirt or debris on your phone’s microphone can affect its performance. Clean the microphone area and try again.
- Quiet Environment
Background noise can interfere with voice recognition. Try to issue commands in a quiet environment to minimize any potential confusion caused by external sounds.
Part 4. How to Unlock Android Phone Screen Without Passcode
Now, you know that you can’t unlock phone via Google Assistant anymore. But what if you accidentally forget your phone’s passcode? Is there a reliable method to regain access to your Android device without the passcode?
Fortunately, Wondershare Dr.Fone offers a straightforward solution for precisely such scenarios. It provides a simple and effective way to unlock your Android phone screen through Dr.Fone - Screen Unlock when the screen lock is forgotten or becomes inaccessible.
![]()
Dr.Fone - Screen Unlock (Android)
The Best UnlockJunky Alternative to Solve Your Screen Locks
- Completely unlinked from the previous Google account, it won’t be traced or blocked by it anymore.
- Remove all Android screen locks (PIN/pattern/fingerprints/face ID) in minutes.
- Compatiable with various Android models.
- Provide specific removal solutions to promise good success rate.
4,008,670 people have downloaded it
If you are wondering how to unlock your Android phone screen without a passcode with Dr.Fone – Screen Unlock, follow the steps below.
- Step 1: Launch the Screen Unlock Tool
Open the latest version of Wondershare Dr.Fone on your computer and connect your phone device using a USB cable. Once connected, navigate to the Toolbox > Screen Unlock to access Dr.Fone – Screen Unlock tool.

- Step 2: Select Android for your device type.
As the Dr.Fone Screen Unlock tool supports both Android and iOS, you will need to indicate the specific device you are using. Opt for the Android option if you are unlocking an Android device. Then, continue to choose “Unlock Android Screen” on the next screen.

- Step 3: Remove Screen Lock Without Data Loss
- In this step, you will be directed to select your device brand. Choose the Android device brand you are using and opt for “Remove without Data Loss” if you don’t want to lose your data.

- Step 4: Define Device Details
Next, make sure to check and confirm the Brand, Device Name, and Device Model to unlock your Android screen. Tick the checkmark that says you agree with the warning and are ready to proceed. Click “Next” to unlock your screen.

- Step 5: Confirm to Unlock Screen
Type “000000” continue by clicking Confirm.

- Step 6: Put Android in Download Mode
Dr.Fone will then guide you to put your Android device into Download Mode according to the model you have identified. After you have followed the instructions, Dr.Fone will automatically lead to the next screen to proceed the unlocking process.

After that, you can monitor the progress and wait for a few minutes until it shows “Unlocked successfully.”
You May Also Interested:
Unlocking Your Realme Phone Made Easy: Step-by-Step Guide
8 Safe and Effective Methods to Unlock Your iPhone Without a Passcode
Complete Guide to Unlock Mi Account Without Password In 2024
Conclusion
Google Assistant is a versatile virtual assistant that is designed to help you with a wide range of tasks and make your daily life more convenient. Accessible on most modern Android devices, it enables users to perform several tasks through voice commands.
However, if you are looking for ways to unlock phone with Google Assistant, this function is no longer available. Google Assistant unlock feature has been discontinued since 2021. But in case you’ve forgotten the screen lock passcode, you can use Wondershare Dr.Fone Screen Unlock tool to regain access to your Android phone. This tool facilitates the unlocking process without data loss, featuring a user-friendly learning curve.
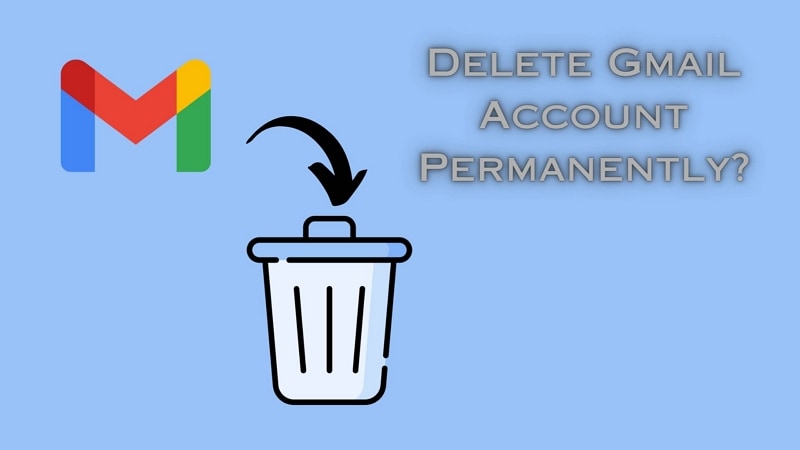
Delete Gmail Account With/Without Password On Honor X50i+
Email accounts have proven their worth in digital devices beyond sending emails. Lately, Android devices have only operated with a Gmail account. This is because most of the data, such as contact information, messages, and other details, are saved across the storage space offered with the email. Against all recognizable uses of Gmail accounts, users look for ways how to delete Gmail accounts.
To this day, it is known that Gmail accounts can be removed with or without a password. However, one should know that if they consider deleting their Gmail account, they won’t be able to send or receive emails. With that, let’s proceed to reveal all essential methods that can be used to delete a Gmail account permanently. This article will also focus on a perfect tool that assists in making the process easier.
Part 1. Synopsis: Things To Know Before Deleting Gmail Account
Although the process of deleting a Gmail account sounds basic, there are many pointers connected to it. For that, this part is putting up a discussion on the important things that a user should know before they delete their Gmail account permanently:
- No Going Back: If you delete a Gmail account, the process is irreversible. All details and information will be lost, and the email won’t be trackable ever again.
- Cannot Reset Passwords if Connected: If the Gmail account is connected to any other service, make sure that you remember their passwords. Since the account will be deleted, you cannot reset their passwords.
- Access to Other Services: Although you are deleting your Gmail account, you can still access Google Photos, Google Drive, and other services.
- Lookout For Emails: Ensure that the emails in your account are saved. You can easily download them anywhere before deleting the Gmail account.
Part 2. Delete Your Gmail Account Using Your Password: Desktop Solution
For the first method, we will discuss how to delete a Google account with your password. You will use your computer for this process and access the Google Account services. The service helps you save all your essential Gmail data before you remove it. To understand how it makes it possible, look through the steps provided below:
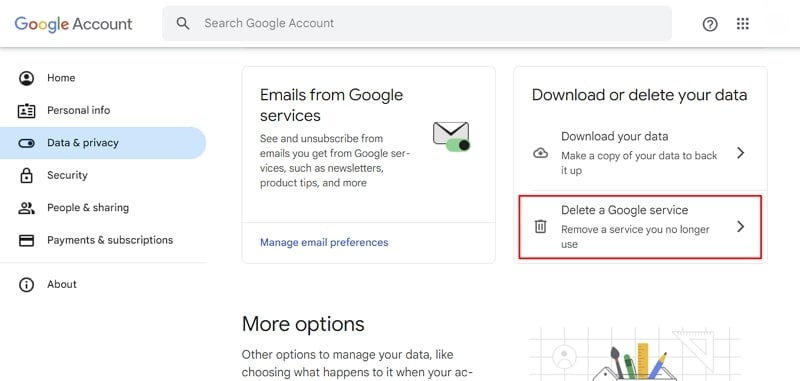
- Step 1. Access the website https://myaccount.google.com/ on your desktop browser and log in with your credentials. Proceed to the “Data & privacy” section from the left panel.
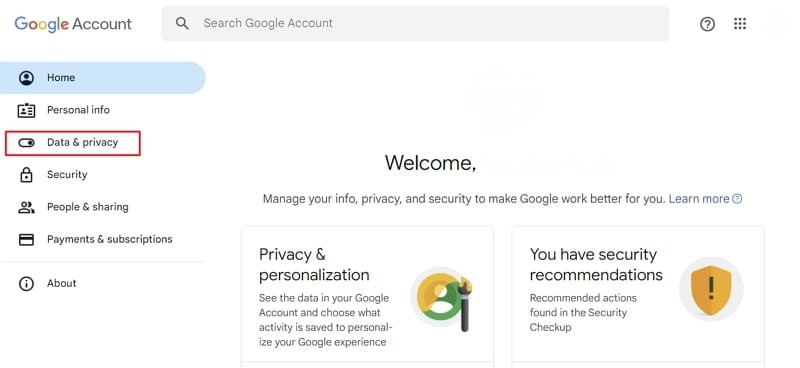
- Step 2. On the following window, scroll down and look for the “Delete a Google service” option. Accessing this would allow you to delete your Gmail account permanently.
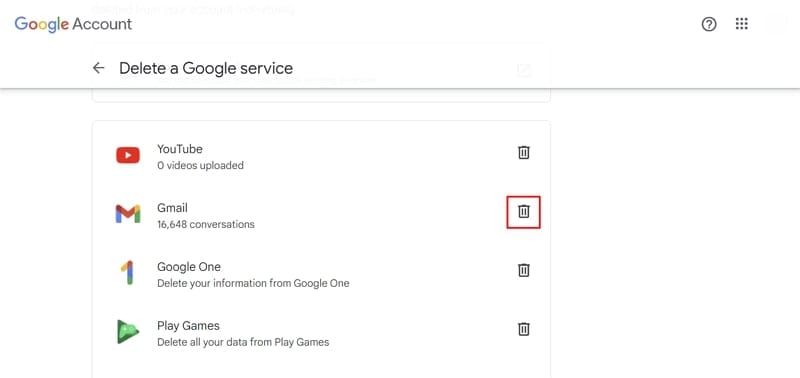
- Step 3. You will be led to a new screen where you need to provide your password credentials again. On successfully providing your password, look for the “Gmail” option on the next screen. Click the “Trash” icon to continue deleting the Gmail account.
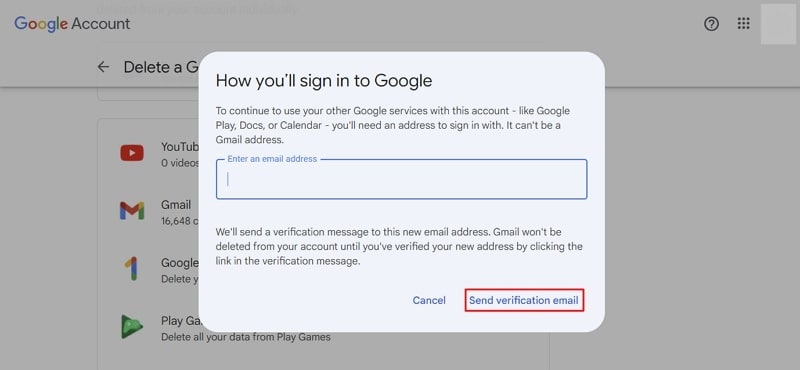
- Step 4. A new pop-up window opens, demanding another email address that can help connect to other Google services. Provide the email address and continue to click “Send verification email .” The Gmail account won’t be deleted until the user verifies the email sent to the new address.
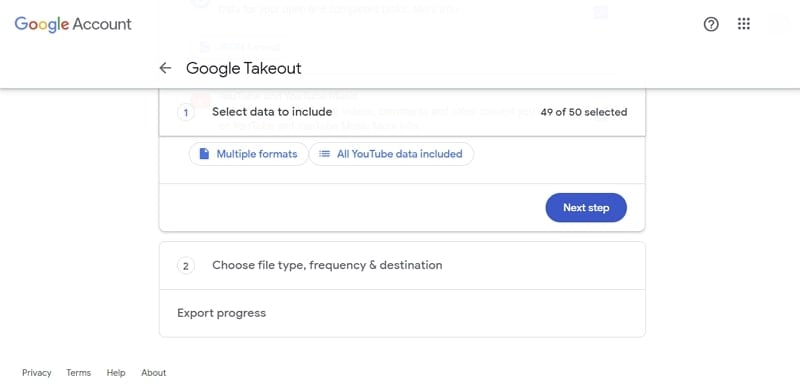
- Step 5. For those who want to save their email data, look for the “Download your data” option in the same window. This leads you to the Google Takeout window, where you need to select the data to include. After selecting the data, define the file type, frequency, and destination for exporting all important data.
Part 3. Delete Your Gmail Account From Your Smartphone: Android & iOS
If you use a smartphone device and want to delete your Gmail account from that particular device, you are at the right place. The following methods will help you understand how to delete Gmail from your Android and iOS devices:
Android Devices
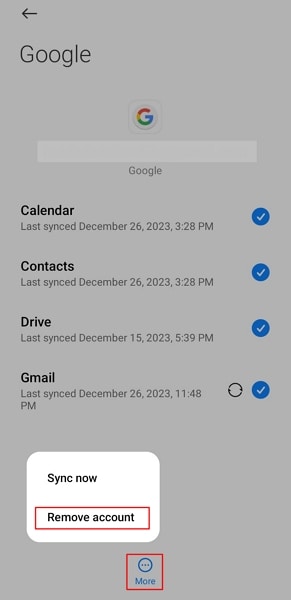
- Step 1. Look for “Settings” on your Android and continue to the “Accounts & sync” option in the list. As you proceed into the next window, look for the Google account and select it.
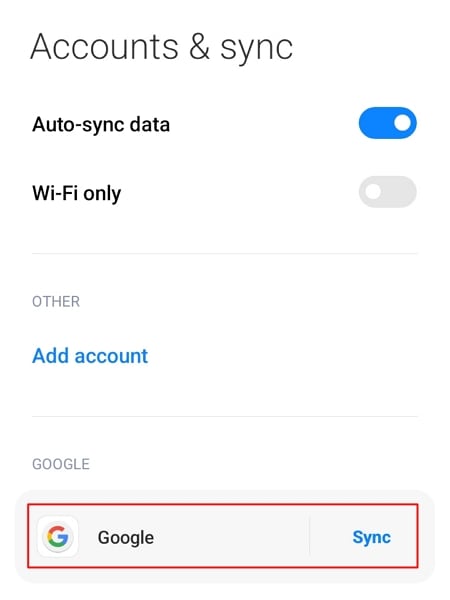
- Step 2. Select the “More” option at the bottom on the following screen. Choose the “Remove account” option in the pop-up menu and provide your credentials to execute the deletion of your Gmail account.
iOS Devices
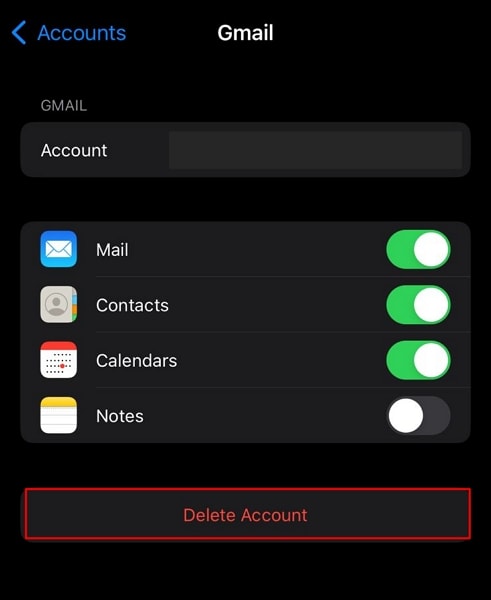
- Step 1. Open your iPhone’s “Settings” app and scroll down to the “Mail” option. You will find the “Accounts” option on the following screen, which you need to tap to proceed.
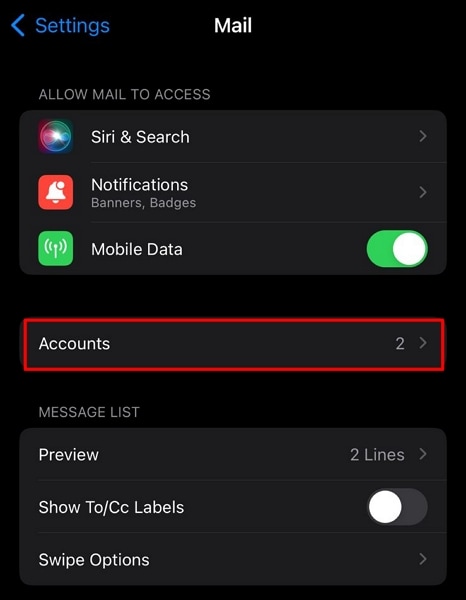
- Step 2. Discover the option of “Gmail” in the list of signed-in accounts and continue to the next screen. Select “Delete Account” to remove the account from your iOS device.
Part 4. Don’t Know Password of Device? Reset To Delete Gmail Account
What if you’ve forgotten the password to your smartphone device, and you have to delete your Gmail account permanently? In such cases, you are left with the option of accessing the Honor X50i+ device’s Recovery Mode and factory resetting the Honor X50i+ device, where possible. To know how it is done flawlessly, look through the steps provided next:
Android Devices
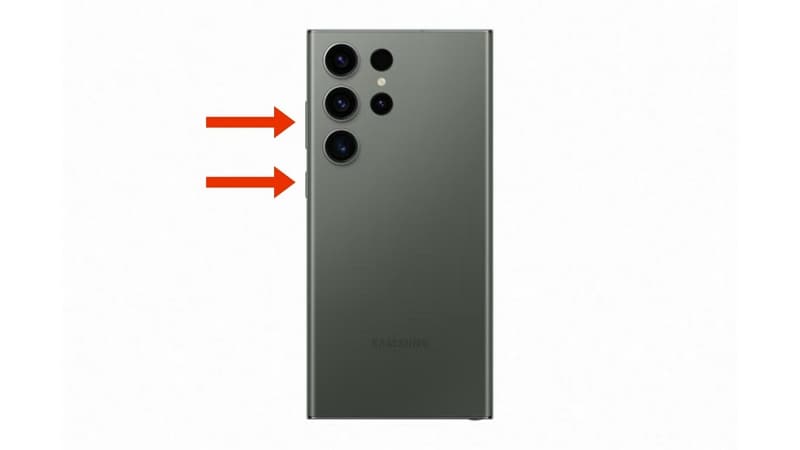
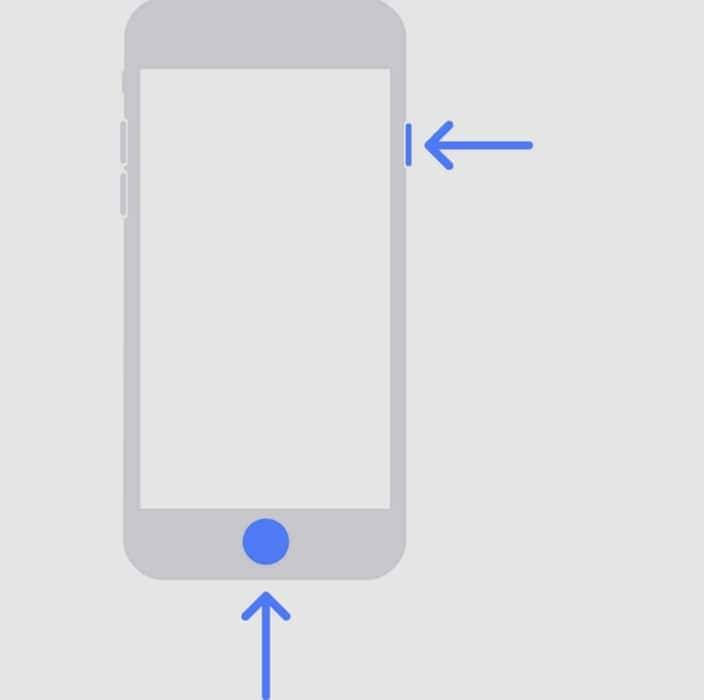
- Step 1. Those owning an Android device need to put it in Recovery Mode first. For that, use the combination of the “Power” and “Volume” keys to put the Honor X50i+ device in Recovery Mode.
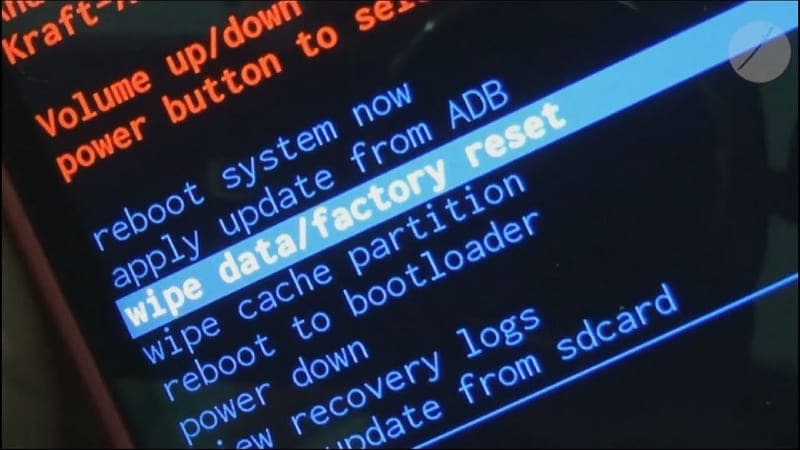
- Step 2. Once you boot into the Recovery Mode, use the Power and Volume buttons to scroll through the menu. Scroll down with the Volume buttons and select the “Wipe data/factory reset” option with the Power button.
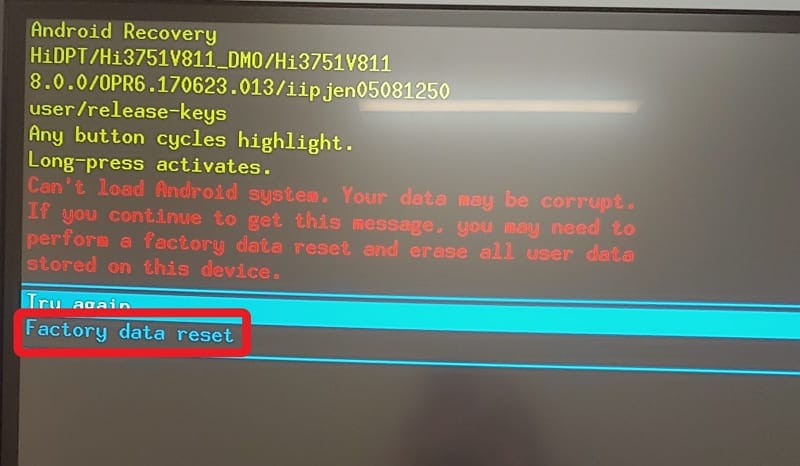
- Step 3. Select “Factory data reset” on the next screen and confirm that factory reset your Android device successfully. The device automatically gets out of Recovery Mode and starts normally after resetting.
iOS Devices
Step 1. You need to turn on Finder if you own a macOS Catalina or later device. Conversely, use iTunes if you have a macOS Mojave or earlier version or if you are using Windows. Connect your iPhone to the computer using the lightning cable and put it in Recovery Mode.
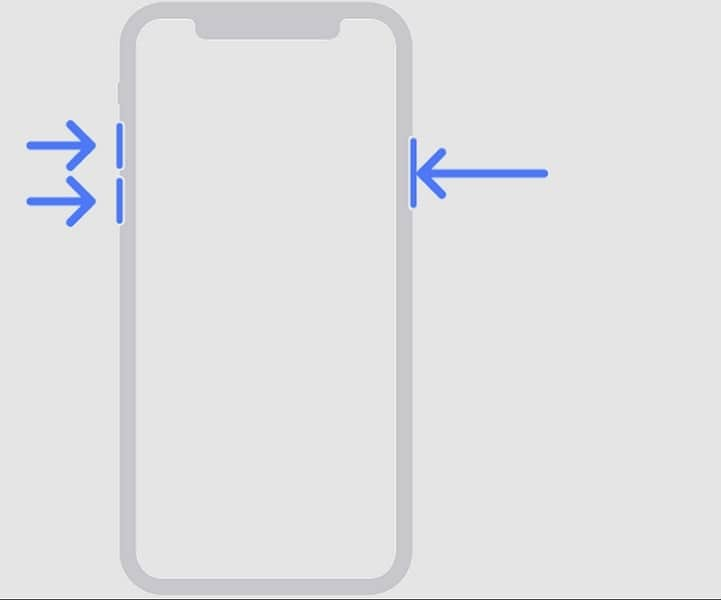
For iPhone X or Later Models: Press and release the “Volume Up” button, followed by the “Volume Down” button. Hold the “Side” button until the Recovery Mode screen appears.
- For iPhone 7 Models: Hold the “Side” and “Volume Down” button until the Recovery Mode screen appears.
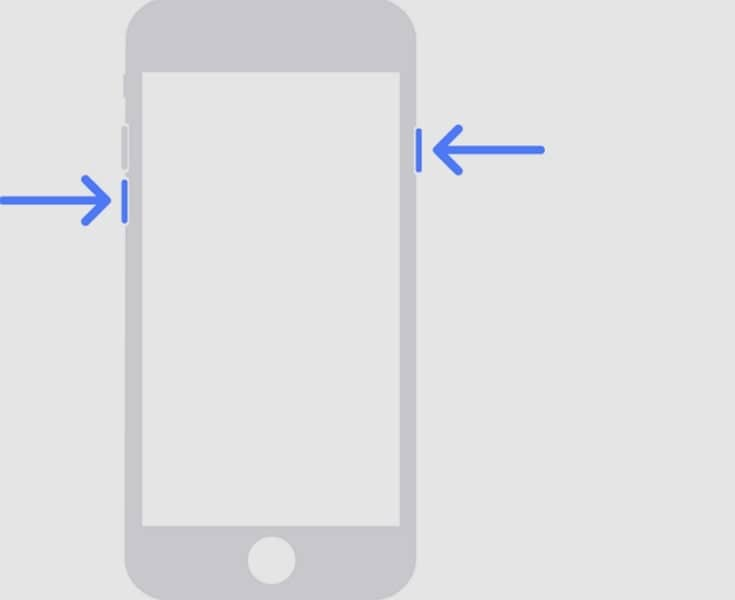
- For iPhone 6 and Earlier Models: Hold the “Side” and “Home” buttons simultaneously until the Recovery Mode screen appears.
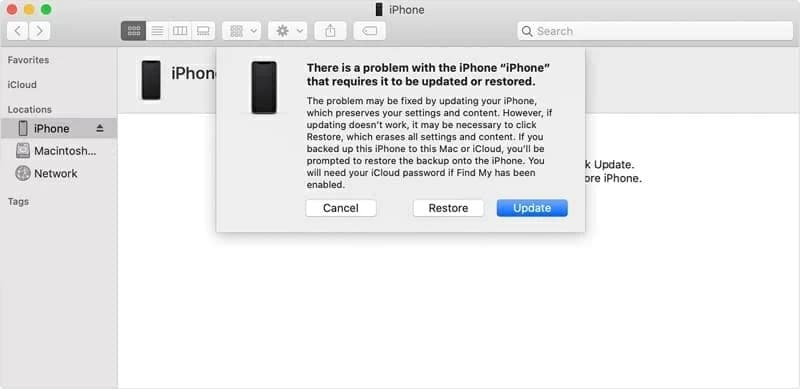
- Step 2. The device automatically gets detected on Finder/iTunes, and a pop-up appears on the screen. Click “Restore” to reset your iOS device to factory settings.
Part 5. Remove Gmail Account From Device Without Password: Using Wondershare Dr.Fone
While you seek some appropriate way to close a Gmail account from a device whose password you’ve forgotten, you might get into Wondershare Dr.Fone. This all-in-one service offers a unique Screen Unlock feature that helps you restore your device. If you have forgotten the lock screen password of your Android device, Dr.Fone – Screen Unlock (Android) makes it exceptionally easy to recover.
Key Features of Wondershare Dr.Fone
![]()
Dr.Fone - Screen Unlock (Android)
The Best UnlockJunky Alternative to Bypass FRP and Solve Your Screen Locks
- Remove all Android screen locks (PIN/pattern/fingerprints/face ID) in minutes.
- Bypass the FRP lock of Samsung without a PIN or Google account.
- Everyone can handle the lock screen without any tech knowledge.
- Provide specific removal solutions to promise good success rate.
4,008,671 people have downloaded it
Whether it is your latest Samsung or other Android smartphone, the process is easy to work with. You might look for more details about this unique tool, for which some important features are highlighted as follows:
- It removes all major types of screen locks from your Android devices.
- Provides support to the latest Android devices, along with all mainstream brands.
- You can recover your device with and without data loss, according to your discretion.
Steps To Remove Google Account While Removing Screen Lock
The following steps highlight the way to remove screen lock from your Android device, which would also cover removing the Google Account automatically:
- Step 1.Launch Screen Unlock Feature
To start with the process, launch Dr.Fone on your computer and navigate to the “Toolbox” section. Proceed to the “Screen Unlock” feature, which opens a new window. After selecting “Android” as your device type, select “Unlock Android Screen” from the available options.
- Step 2.Select Device Brand and Unlock Mechanism
As you direct into the next window, select the brand of your Android device. Continue to select “100% Remove Screen Lock” from the following window.
- Step 3. Follow the Instructions and Successfully Remove the Screen Lock
According to your selected device brand, Dr.Fone provides guidelines for entering the specific mode. Follow the on-screen instructions to start unlocking the screen of your device. If the process is successful, click “Done” to conclude using Dr.Fone – Screen Unlock.

Conclusion
This article has specifically provided you with some important details on how to delete a Gmail account with ease. The article explains everything from the methods of deleting it from the computer to removing it from the Honor X50i+ device. Furthermore, it also serves as a guidance for those who have forgotten their device passwords. For that, they’ve provided an insight into Wondershare Dr.Fone – Screen Unlock and its unique functions.
Also read:
- [Updated] 2024 Approved Revitalizing Past Moments with Instagram Filters
- [Updated] Efficient Techniques to Record Your iDevice for 2024
- [Updated] In 2024, Step-by-Step Guide Premiere Pro for YouTube Cutting
- [Updated] Operational OBS Cam After Fix for 2024
- 2024 Approved Camera Selection For Young Shooters - Top Picks '24
- Essential Tips for GIF Creation
- How Effective Is Western Digital's DataLifeGuard? An In-Depth Diagnostic Tool Review
- How to Share/Fake Location on WhatsApp for Honor Magic 6 Pro | Dr.fone
- In 2024, Best Tecno Camon 30 Pro 5G Pattern Lock Removal Tools Remove Android Pattern Lock Without Losing Data
- In 2024, Can I Bypass a Forgotten Phone Password Of Tecno Spark 10 Pro?
- In 2024, How to Bypass Android Lock Screen Using Emergency Call On Honor Magic 5 Pro?
- In 2024, How To Unlock Any Honor 90 Lite Phone Password Using Emergency Call
- In 2024, How to Unlock Tecno Pova 5 Pro Phone without Google Account?
- In 2024, How to Use Google Assistant on Your Lock Screen Of Tecno Pova 5 Phone
- In 2024, Top 12 Prominent Honor Magic 5 Pro Fingerprint Not Working Solutions
- Resolving Corsair H115i Graphics Card Drivers on Windows 8, 10 & 11
- The Ultimate Guide How to Bypass Swipe Screen to Unlock on Google Pixel 8 Device
- Top-Ranked Mac Software Picks - Expert Reviews by ZDNet
- Unlock Your Google Pixel Folds Potential The Top 20 Lock Screen Apps You Need to Try
- Title: In 2024, How to Unlock a Network Locked Honor X50i+ Phone?
- Author: Marry
- Created at : 2025-01-02 23:40:31
- Updated at : 2025-01-04 22:30:13
- Link: https://unlock-android.techidaily.com/in-2024-how-to-unlock-a-network-locked-honor-x50iplus-phone-by-drfone-android/
- License: This work is licensed under CC BY-NC-SA 4.0.