
In 2024, How to Use Google Assistant on Your Lock Screen Of Xiaomi Redmi Note 12 Pro 5G Phone
How to Use Google Assistant on Your Lock Screen Of Xiaomi Redmi Note 12 Pro 5G Phone
Android has undergone numerous changes to enhance user experience and security. One notable feature that was once present was the ability to unlock phones with voice Google Assistant. However, Google Assistant has removed this feature across all versions since 2021.
While this voice-unlocking feature is no longer available, there are still many things you can do with Google Assistant, even when the Xiaomi Redmi Note 12 Pro 5G device is locked. This tool brings an added layer of convenience to your smartphone experience.
Let’s dig deeper into how you can use Google Assistant on the lock screen and make the most out of this tool in the following article.

Part 1. What You Can Do With Voice Google Assistant
Google Assistant is a virtual assistant powered by artificial intelligence (AI) developed by tech giant Google. This application is readily available on most recent mobile phone models, especially those operating on Android 6.0 and newer versions.
Although you can no longer use the Google Assistant unlock feature, you can still perform a myriad of tasks using Google Assistant. These include:
- Getting the weather
- Setting alarms
- Playing music
- Sending texts
- Making a call
- Asking Google for information, etc.
Enable Google Assistant on Lock Screen: A Step-by-Step Guide
Now that you’re eager to try the potential of Google Assistant on your lock screen, let’s walk through the simple steps on how to enable this tool.
- Step 1: Open Google Assistant:
Look for “Google Assistant” and open the app.
- Step 2: Ask Google Assistant to open the settings.
You can ask, “Hey Google, open the Google Assistant settings,” and it will show you the Google Assistant settings.
- Step 3: Allow Google Assistant on the lock screen.
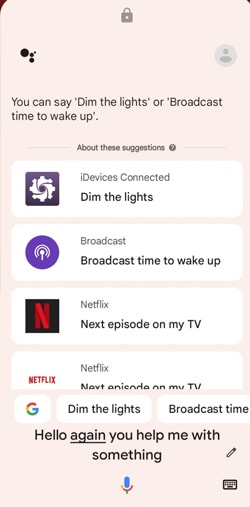
Locate the “Lock Screen” settings and make sure to switch on “Assistant responses on lock screen.”

Part 2. How To Use Google Assistant on Lock Screen
After you’ve successfully enabled Google Assistant on your lock screen, let’s see how to use Google Assistant to do certain tasks more efficiently and hands-free.
- Step 1: Wake Up Google Assistant
Start by waking up Google Assistant. You can do this by saying the wake word “Hey Google” or “OK Google.” If it doesn’t work, you can long-press the home button or use any dedicated gesture to activate Google Assistant.
- Step 2: Issue a Voice Command
Once Google Assistant is active, issue a voice command related to the task you want to perform. For example:
“Hey Google, what’s the weather today?”
“OK Google, set an alarm for 5 PM.”
“Hey Google, play my Spotify playlist.”
When you can still unlock with Google Assistant, you can ask it to “unlock my phone” or use any similar command.
- Step 3: Interact with Responses
Google Assistant will then provide spoken responses and display relevant information on the lock screen. For instance, if you ask for the weather, it might verbally provide the current conditions and display a brief summary on your lock screen.

Part 3. Common Problems When Using Google Assistant
Unable to use Google Assistant to unlock phone is not the only drawback that users may have encountered in recent changes. Although Google Assistant on the lock screen presents a revolutionary way to interact with your phone, like any technology, it also comes with its share of challenges. Some of the common problems when using Google Assistant are:
- Misunderstandings and misinterpretations
One prevalent issue users encounter is Google Assistant misunderstanding or misinterpreting voice commands. This can be influenced by factors such as background noise, accent variations, or pronunciation differences.
- Limited context understanding
While Google Assistant is adept at understanding individual commands, it may struggle with complex, multi-step requests that rely heavily on context. Break down your tasks into simpler commands to enhance comprehension and execute it more accurately.
- Inability to execute certain tasks
Google Assistant’s capabilities are extensive, but there are instances where it may struggle to execute specific tasks. For example, it can’t execute tasks that involve interacting with certain third-party applications or services. You can’t also unlock phone with voice Google Assistant.
Tips to Make Voice Google Assistant Recognize Your Commands
One of the most infuriating problems with voice Google Assistant is that users often encounter difficulties in having their commands accurately recognized. To enhance the accuracy of voice recognition with Google Assistant, you can consider implementing the following tips:
- Speak Clearly and Naturally
Make sure that you speak in a clear and natural manner. Avoid mumbling or speaking too quickly. Enunciate your words, giving Google Assistant a better chance to interpret your commands accurately.
- Use Simple and Direct Phrases
Keep your commands simple and direct. Avoid unnecessary elaboration or complex sentence structures. Google Assistant is more likely to understand straightforward commands.
- Check Your Microphone
Ensure that your device’s microphone is in good working condition. Dirt or debris on your phone’s microphone can affect its performance. Clean the microphone area and try again.
- Quiet Environment
Background noise can interfere with voice recognition. Try to issue commands in a quiet environment to minimize any potential confusion caused by external sounds.
Part 4. How to Unlock Android Phone Screen Without Passcode
Now, you know that you can’t unlock phone via Google Assistant anymore. But what if you accidentally forget your phone’s passcode? Is there a reliable method to regain access to your Android device without the passcode?
Fortunately, Wondershare Dr.Fone offers a straightforward solution for precisely such scenarios. It provides a simple and effective way to unlock your Android phone screen through Dr.Fone - Screen Unlock when the screen lock is forgotten or becomes inaccessible.
![]()
Dr.Fone - Screen Unlock (Android)
The Best UnlockJunky Alternative to Solve Your Screen Locks
- Completely unlinked from the previous Google account, it won’t be traced or blocked by it anymore.
- Remove all Android screen locks (PIN/pattern/fingerprints/face ID) in minutes.
- Compatiable with various Android models.
- Provide specific removal solutions to promise good success rate.
4,008,670 people have downloaded it
If you are wondering how to unlock your Android phone screen without a passcode with Dr.Fone – Screen Unlock, follow the steps below.
- Step 1: Launch the Screen Unlock Tool
Open the latest version of Wondershare Dr.Fone on your computer and connect your phone device using a USB cable. Once connected, navigate to the Toolbox > Screen Unlock to access Dr.Fone – Screen Unlock tool.

- Step 2: Select Android for your device type.
As the Dr.Fone Screen Unlock tool supports both Android and iOS, you will need to indicate the specific device you are using. Opt for the Android option if you are unlocking an Android device. Then, continue to choose “Unlock Android Screen” on the next screen.

- Step 3: Remove Screen Lock Without Data Loss
- In this step, you will be directed to select your device brand. Choose the Android device brand you are using and opt for “Remove without Data Loss” if you don’t want to lose your data.

- Step 4: Define Device Details
Next, make sure to check and confirm the Brand, Device Name, and Device Model to unlock your Android screen. Tick the checkmark that says you agree with the warning and are ready to proceed. Click “Next” to unlock your screen.

- Step 5: Confirm to Unlock Screen
Type “000000” continue by clicking Confirm.


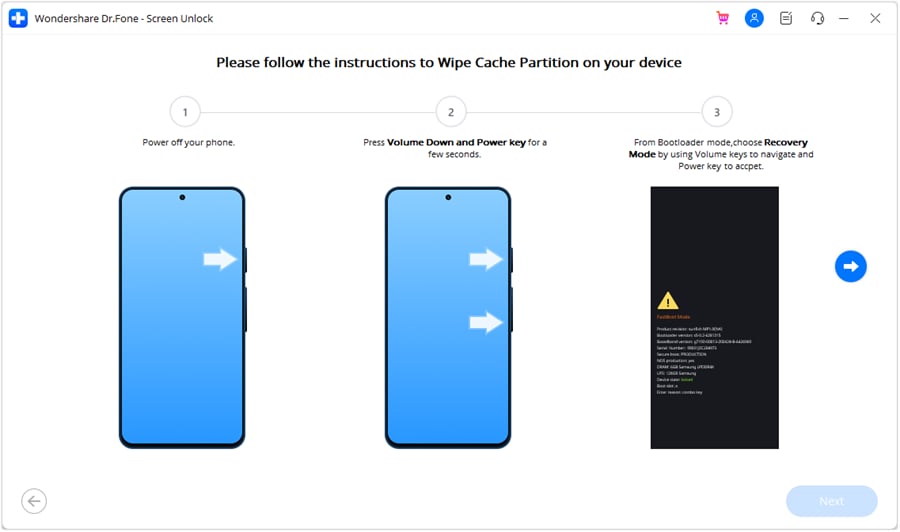
- Step 6: Put Android in Download Mode
Dr.Fone will then guide you to put your Android device into Download Mode according to the model you have identified. After you have followed the instructions, Dr.Fone will automatically lead to the next screen to proceed the unlocking process.

After that, you can monitor the progress and wait for a few minutes until it shows “Unlocked successfully.”
You May Also Interested:
Unlocking Your Realme Phone Made Easy: Step-by-Step Guide
8 Safe and Effective Methods to Unlock Your iPhone Without a Passcode
Complete Guide to Unlock Mi Account Without Password In 2024
Conclusion
Google Assistant is a versatile virtual assistant that is designed to help you with a wide range of tasks and make your daily life more convenient. Accessible on most modern Android devices, it enables users to perform several tasks through voice commands.
However, if you are looking for ways to unlock phone with Google Assistant, this function is no longer available. Google Assistant unlock feature has been discontinued since 2021. But in case you’ve forgotten the screen lock passcode, you can use Wondershare Dr.Fone Screen Unlock tool to regain access to your Android phone. This tool facilitates the unlocking process without data loss, featuring a user-friendly learning curve.
How to Show Wi-Fi Password on Xiaomi Redmi Note 12 Pro 5G
Since the invention of Android OS in 2008 by Andy Rubin, our world has faced a dramatic change. Android seems to be controlling a considerably high portion of our life. We have bought many gadgets that use this amazing OS and most of which are phones. But how much can you do with your Android phone? Developers are always making it more interesting to use this interface.
Most of the time, we use Android phones, we get faced with the need to access the internet. The Wi-Fi capability of these Android gadgets makes it super easy for us to surf the web. Throughout using Wi-Fi, we connect to a number of them. This could be at school, a sub-way café, the gym, buses, hospitals, hotels, towns, and the list is endless. A password secures most of this. Needless to say, our brain is weak to store all these passwords for future use, especially if you would want to connect with a different gadget you have recently bought or even your laptop. In this article, we will introduce you to how to find wifi password on rooted and also unrooted Android devices.
Part 1: Show Wifi Password on Rooted Android Device
What is Rooting?
First of all, what does rooting mean? You have probably used a Windows computer or even Linux. For the case of Windows, when installing a new program or software, it always prompts a dialog box saying, “Administrator permission required to run this program.” If you don’t have the administrator permission, you won’t install the program. In Android, this is called rooting. In simple terms, it means having the root permission to your phone. Some Android apps will require you the root permission, e.g., flashing your ROM. In this part, we will explain how you can show the Wi-Fi password on your Android with root.
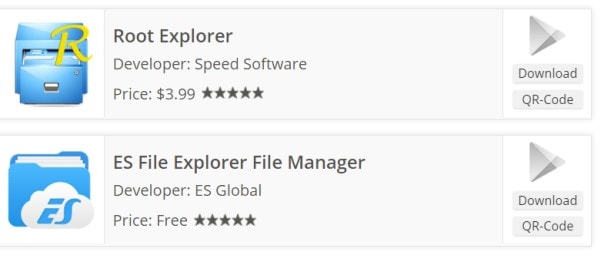
To find the Wi-Fi passwords on your Android phone, you need to have an app to explore files which also supports a root user. In this case, ES FileExplorer or Root Explorer will come in handy. However, it turns out that the latter is offered at $3. Let’s use the free ES File Explorer.
Steps of getting Wi-Fi password on Android with root
In only four steps, we, at this moment, learn how we can find the password of a Wi-Fi on an Android phone.
Step 1: Install the ES File Explorer
Download the ES File Explorer from your play store, install it, and open it.

Step 2: Enable Root Explorer
The root explorer needs to be enabled so that you can reach the root folders of the Wi-Fi passwords you need. By default, the root feature in this ES explorer is not enabled. To enable it, just tap on the list menu on the top left corner.:
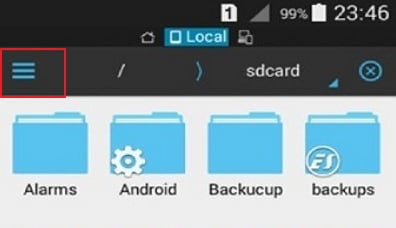
This will drop down a list of controls. Scroll down and find the Root Explorer option and enable it.

Step 3: Get the passwords’ file.
Go back to ES file explorer, and this time, find the folder named data.
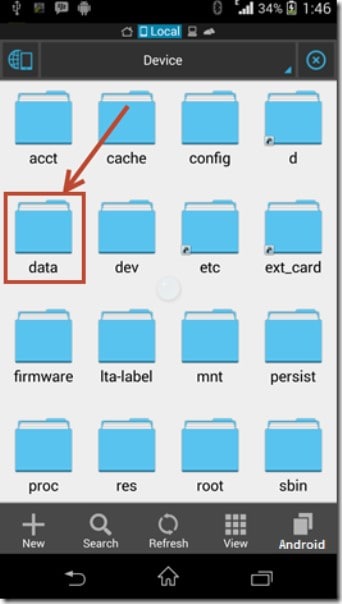When this folder opens, find another one named misc. Open it and find another one named wifi. Here, find a file named wpa_supplicant.conf.

Step 4: Retrieve the wifi password on Android
Make sure that you don’t edit anything in the file. You might mess up with important data and fail to access the Wi-Fi(s) in the future.
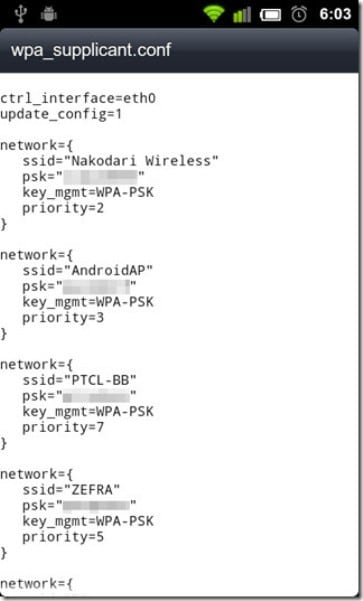As you can see above, we have found the Wi-Fi passwords on the android device. On each network profile, we have the name of the network represented by name (ssid=”{the name}”), the network’s password represented by psk, the network’s access point represented by key_mgmt=WPA-PSK and its priority represented by priority.
Part 2: Show Wifi Password on Android without Root
What if I don’t have root access to my Android, can I still see Android Wi-Fi password? The short answer is yes. However, this is a bit involving but simple. You don’t need to be a computer guru to do it, but you need to have a computer and some internet access of course. The key thing is to find a way through which we can fetch the password file from the phone without using a root access protocol in the Android. This is made possible by some little programming insight using the Windows Command prompt.
Steps to show Wi-Fi password on Android without root
Step 1: Access the Developer authority
To access the files that Android uses to run passwords, you must first become a developer. This is very simple.
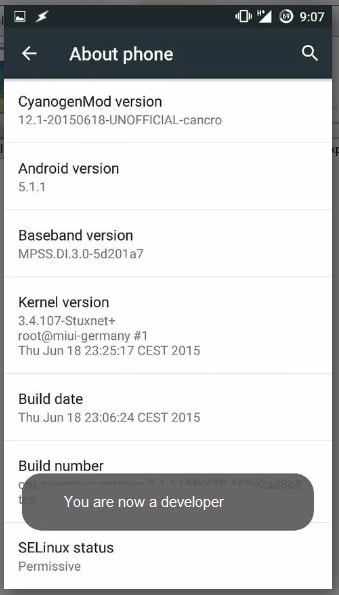
Get your Android phone and go to settings. Scroll down and find “About phone.” Tap on it and scroll down again to find Build number.

Tap on this “build number” 5 to 6 times until a message pops up, saying, “You are now a developer”.
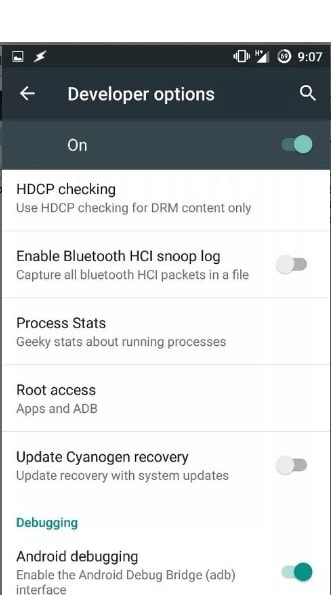
Step 2: Enable the debugging.
Go back to Settings. Scroll down for developer options. Turn on the button for “Android/USB debugging”.

Step 3: Install ADB drivers.
Now, open your Windows desktop. Download and install ADB drivers. (Use this download link adbdriver.com ). You need to download and install platform tools (minimal ADB and fastboot) from http://forum.xda-developers.com/... Now open the folder where you’ve installed the above tools. By default, it is in the Local disc C\windows\system32\platform_tools location. However, you might want to locate them by searching on the windows search engine. You have to hold the Shift key and right-click inside the folder to click on”Open Command Window Here.”
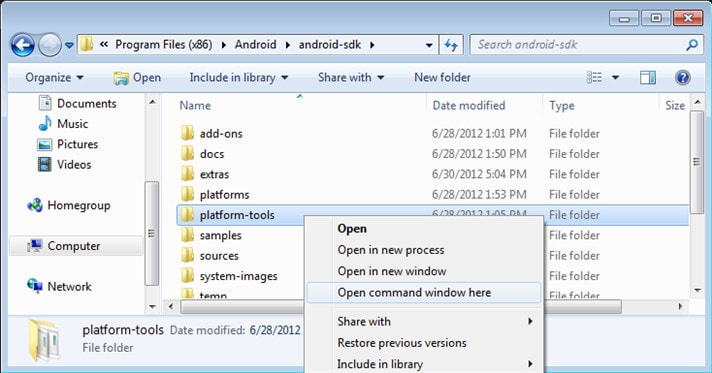Step 4: Test the ADB
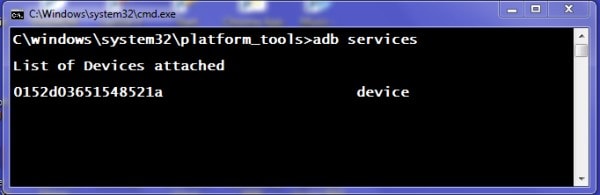
Here, we would like to test whether the ABD is working properly. To do this, connect your phone to the PC using a USB. In the command prompt, type adb services and then press enter. If it’s working properly, you should see a device on this list.
Step 5: Find the Android wifi password.
Now, it is time to type the given command in the command prompt and type: adb pull /data/misc/wifi/wpa_supplicant.conf c:/wpa_supplicant.conf. This will fetch the file from your phone to the local disc C drive of the PC.
Step 6: Get the wifi passwords.
Lastly, open the file with a notepad, and there you go.
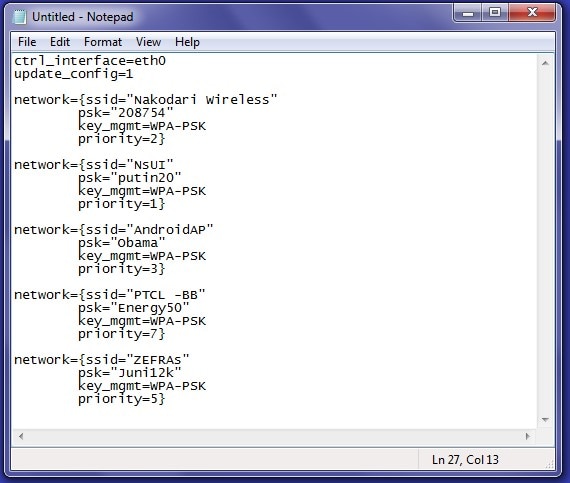
Now you learned how to show the wifi password on your Android device.
Still Using Pattern Locks with Xiaomi Redmi Note 12 Pro 5G? Tips, Tricks and Helpful Advice
They have been along for a long, long time now – pattern locks – the easiest of all smartphone locks. You just swipe your finger across to create an easy pattern lock of your choosing and that’s it, it becomes your new screen lock. No more remembering tedious digits! So, why have these easy pattern locks become outdated, and why do people still continue to use them? Let’s take a dive and find out all about pattern locks.
Part I: Things To Know About Pattern Locks
The first cellphone locks were 4-digit number locks. Then came 6-digit codes, and even alphanumeric ones. Pattern locks were all the rage a while ago. Though pattern locks continue to be used, they are not considered safe to use any longer. What is all that about? Here’s what you need to know about pattern locks, whether you are a seasoned pattern lock user or not.
I.I: What Are Pattern Locks?
Believe it or not, technology has advanced at such a rapid pace in the last two decades that you’d be forgiven if you don’t know what a pattern lock is, especially if you have only ever used iPhones, or Android phones in just the last few years.
Pattern locks are patterns you create on your smartphone and designate as a smartphone lock/ screen lock. There is a 9-point keypad of sorts, and you start swiping your finger from any point to any point for any which way you feel like. Android 13 allows a minimum of 4 points registered. They are easy to create, and easy to use, hence called easy pattern locks.
Pattern locks have only ever been offered on Android devices and were commonplace a few years ago until they were deemed not secure enough for use by modern standards because they were easy to figure out by malicious actors.
I.II: Popularity and Usage
Pattern lock is a feature unique to Android and has been so since the start. Naturally, it is one of the preferred ways users have come to unlock their Android devices over the years. Even though modern Android smartphones come with fingerprint recognition and face recognition technologies, there exists a large subset of users still addicted to and acclimatized with the pattern lock feature, opting over fingerprint and face recognition.
There has been, however, research conducted into the safety and security offered by pattern lock in Android.
I.III: Advantages and Drawbacks
Modern smartphones very nearly contain the entirety of our lives; photo memories, video memories, important documents both financial and personal in nature, banking apps, ID and ATM/ credit cards in the “wallet” apps, and whatnot. A smartphone falling into the wrong hands could very nearly be used to devastate the rightful owner, both financially and otherwise. And this is not a claim out of thin air; spyware/ malware/ phishing attacks are on the rise around the world. Locking the smartphone, once considered optional and an unnecessary hassle, is now an absolute must.
Advantages of Pattern Locks
There is no denying that using an easy pattern lock to lock their smartphone seems enough for most users. Swiping your finger across your smartphone to unlock it feels not only cool and futuristic but safer and more secure than remembering and punching in digits. And, for the most part, it is true, given that 4-digit PINs can only have 10,000 unique combinations!
Disadvantages of Pattern Locks
While very easy to use, security researchers and experts have come to agree that the feature is not in the least safe to use, and that is because of how people use the pattern lock feature (discussed in detail below in part II). Some go so far as to say that most pattern locks can be breached in just 5 attempts or less. Imagine that!
What is more, research has found that humans have an uncanny ability to correctly guess a pattern lock simply by viewing the unlocking! The test comprised showing the test subjects videos of users unlocking their phones from different angles and varying distances, and it was found that around 64% of test subjects were able to correctly guess a 6-point pattern lock in one viewing only, and 80% could correctly guess the pattern after just two viewings. By contrast, only 11% were able to correctly deduce a 6-digit PIN after one viewing, and only 27% after viewing twice. This goes to show just how insecure pattern locks are!
Part II: How People Use Pattern Locks
We might wonder how anyone would be able to guess the correct pattern of our device, but believe it or not, it is possible, eerily easily at that! We are all the same humans, after all! You know how people usually set PINs that could be significant dates in their lives? How they get car registration numbers that mean something to them? The same ‘logic’ applies to their setting pattern locks.
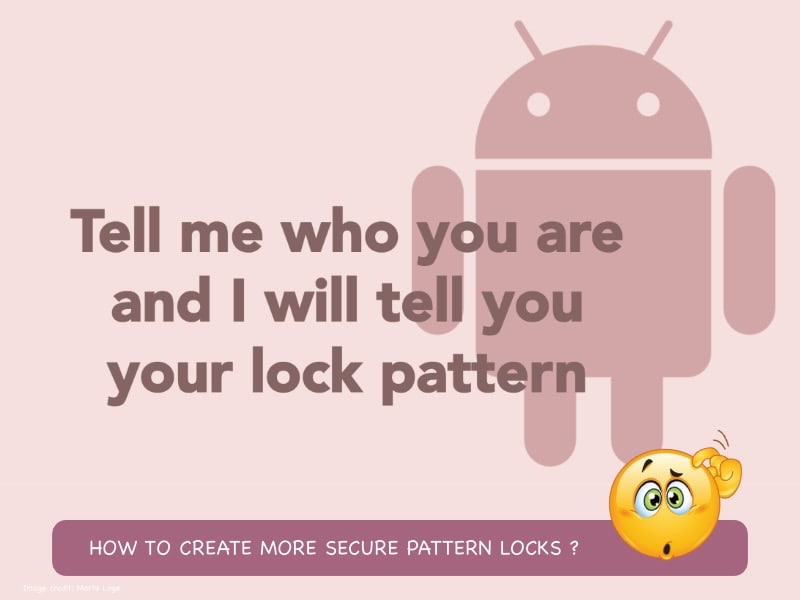
At DEFCON 23, Marte Loge, an M.Sc. Computer Science student, presented something that stunned people around the world. She said, “Tell me who you are, and I will tell you your lock pattern.” What followed was an expert presentation outlining and detailing user behaviors around pattern locks.
These are some commonly created pattern locks by people:
- - shapes of alphabets,
- - shapes of numerals,
- - any other easy-to-make, simple shape.
Marte Loge presented the image below, showing how people naturally gravitate towards creating simple shape patterns, in her research.

To further help you see how easy it might be for anyone to guess your pattern, Marte Loge also presented some statistics.
- - 77% of people started their patterns in one of the 4 corners.
- - 44% of Loge’s subjects started their pattern with the first dot, the top-left one. The next number was 15% for the top-right and 14% for the bottom-left.
- - These percentages did not vary much depending on left-handedness or right-handedness.
- - On average, irrespective of gender, people set 5-point patterns, with 4-point patterns being the most common. This means that the number of combinations on average was 7152 for 5-point patterns and a bogglingly low 1624 for 4-point patterns.
The above data makes it amply clear how using an easy pattern lock is actually worse than using a 4-digit PIN, simply because how people are usually using the pattern lock feature.
Part III: Tips For Using More Secure Pattern Locks
Now, we know how hard it is to break habits cemented over years of use, so in case you must at all costs use a pattern lock only, the least you can do is try and change your easy pattern lock to a better, more secure hard pattern lock.
III.I: How to Create More Secure Patterns
Here are some tips to help you create a better, more secure pattern lock for your smartphone.
- - Avoid using any of the corners to start the pattern.
- - Never use your first initial as a pattern.
- - Never use a digit shape as a pattern.
- - You can pass through the same pattern lines multiple times over. This makes it more difficult for someone to guess your pattern correctly.
- - Use all 9 points on the grid while setting the pattern lock! That simple act takes the possible pattern combinations to over 140,000, significantly more than 10,000 for 4-digit PINs, and vastly superior to paltry 1624 for a 4-point easy pattern lock!
III.II: Forgot Your Pattern? Unlock Your Xiaomi Redmi Note 12 Pro 5G Without Pattern Lock With Dr.Fone
Supercharged with the information above, you went ahead and changed your easy pattern lock to a hard-to-guess pattern lock. Only problem is, your brain is habituated to that old pattern, and you’ve suddenly forgotten what the new pattern was! Well, worry not; Wondershare Dr.Fone - Screen Unlock (Android) will help you unlock your phone without pattern lock !
![]()
Dr.Fone - Screen Unlock (Android)
The Best Tool to Unlock Your Xiaomi Redmi Note 12 Pro 5G without Pattern Locks!
- Remove all Android screen locks (PIN/pattern/fingerprints/face ID) in minutes.
- Bypass the FRP lock of Samsung without a PIN or Google account.
- Everyone can handle the lock screen without any tech knowledge.
- Provide specific removal solutions to promise good success rate.
4,008,669 people have downloaded it
Download the newest version of Dr.Fone from the Wondershare website and launch the app.
Step 1: Go to Toolbox > Screen Unlock and click Android.

Step 2: Click Unlock Android Screen.
Step 3: You will see a list of supported manufacturers on the next screen. Select yours.

Step 4: Now, follow the onscreen guide to prepare your device for screen unlocking.
After completing the process, when the Next button becomes available, click it.
Your device will be successfully unlocked.

Note that this method wipes all data on the Xiaomi Redmi Note 12 Pro 5G device. There is no way around it. You may be able to unlock select older Samsung devices without data loss. Check this list for those devices.
Closing Words
Pattern locks are outdated and not safe to use an easy pattern lock – there are no two ways about it. As such, our recommendation is to start using a 6-digit PIN along with biometric or face recognition. However, we do understand that sometimes, you simply cannot use biometrics or face recognition. For those instances, we recommend that you use this guide and create a more secure pattern lock for your device. In case you forgot your pattern, there is always Wondershare Dr.Fone – Screen Unlock (Android) to save the day.
- Title: In 2024, How to Use Google Assistant on Your Lock Screen Of Xiaomi Redmi Note 12 Pro 5G Phone
- Author: Marry
- Created at : 2024-07-18 13:13:24
- Updated at : 2024-07-19 13:13:24
- Link: https://unlock-android.techidaily.com/in-2024-how-to-use-google-assistant-on-your-lock-screen-of-xiaomi-redmi-note-12-pro-5g-phone-by-drfone-android/
- License: This work is licensed under CC BY-NC-SA 4.0.