
Mastering Android Device Manager The Ultimate Guide to Unlocking Your Itel A05s Device
Mastering Android Device Manager: The Ultimate Guide to Unlocking Your Itel A05s Device
So, what is Android Device Manager? Android has this amazing native tool to help you locate and remote wipe your lost or stolen phone. We lock our phones via passwords or patterns or fingerprints to maintain the security but what if someone dares to meddle with your phone or unfortunately, it gets stolen? Don’t worry, all you need to do is let Android Device Manager unlock your Android phone. For this, it just needs to be enabled on your phone (before you unluckily locked yourself out of it). Android Device Manager unlocks your phone in a small amount of time, saving you from all the troubles.
In addition to this, the Android Device Manager also unlocks your password/pin-encrypted phone if you have forgotten the passcode by chance. The procedure is quite simple; all you need is a Google account to set this up onyour phone and then you can make use of any other online device to track down your lost or stolen phone or to even wipe all data in it. Phew!

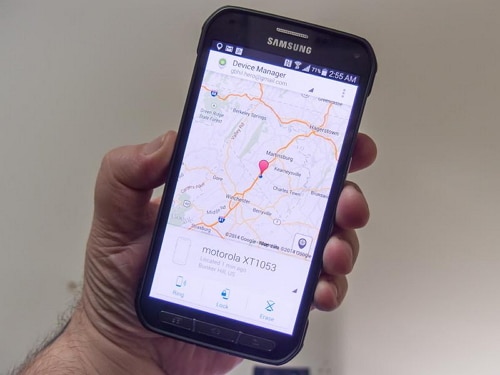
Using the Android Device Manager to track a lost phone
Part 1: What is Android Device Manager lock?
Android Device Manager is Google’s take on Apple’s Find My iPhone. Enabling the ADM is quite easy; just go to google.com/android/devicemanager on your computer and search through your list of devices that are already connected to your Google account. Once you are there, you can easily send a notification to the phone you want to enable remote password application and wiping upon.
ADM comes with a set of features that helps you to unlock your Android phone as well. It not only helps you to find your device, but also Ring it, lock it, and wipe and erase all the data as well, if your phone is lost or stolen. Once you’re logged into the ADM website from your computer, you can avail all these options once your phone is located. It is a wise option to get your device locked by Android Device Manager in case it is lost or stolen, so that your phone is secured.
Android Device Manager can unlock your phone under a specific set of circumstances only.
- • First of all, Android Device Manager needs to be enabled on your phone before it is lost, stolen, etc.
- • Secondly, your phone can only be tracked by ADM if the GPS option is switched on.
- • Thirdly, the Itel A05s device you are using for ADM, must be connected to Wi-Fi or internet, to login to your Google account.
- • Lastly, Android Device Manager is not compatible for all Android versions. For now, it is only compatible with devices running Android 4.4 and above, so your phone must be in this category for ADM to work.
Part 2: How to unlock Android phone with Android Device Manager?
Just act according to the following steps, and the Android Device Manager will unlock your phone.
1. On your computer or any other mobile phone, visit: google.com/android/devicemanager
2. Then, sign in with the help of your Google login details that you had used in your locked phone as well.
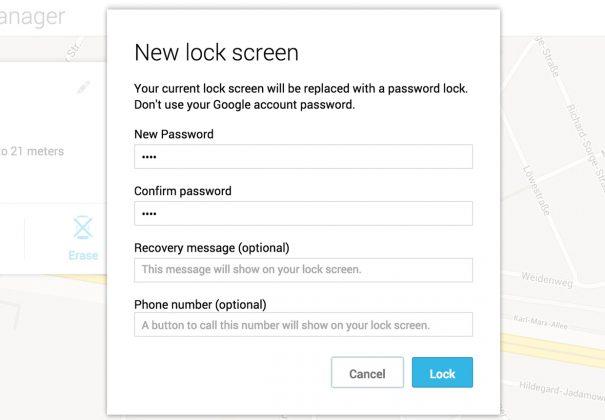
3. In the ADM interface, choose the Itel A05s device you want to unlock. Now, select “Lock”.
4. Enter a temporary password. Now go ahead and click on “Lock” again.
5. If the previous step was successful, you should be seeing a confirmation below the box with the buttons – Ring, Lock and Erase.
6. Now, you should see a password field on your phone screen. Enter a temporary password to unlock your phone.
7. Visit your phone’s lock screen settings and disable the temporary password.
The Android Device Manager has successfully unlocked your phone!
A downside to this process, is an error message faced by some users while using ADM. Many users have reported the issue, that when they have tried using ADM to unlock their locked device, an error message has occurred, saying, “since Google has verified that a screen lock is already set”. Basically, this error message conveys that you will not be able to unlock your phone using Android Device Manager, and this is a flaw on Google’s part, not your phone’s.
Part 3: What to do if phone is locked by Android Device Manager
There are 2 situations where you would want to know how to unlock the Android Device Manager lock – one, when you have unfortunately forgotten the screen lock passcode and the other is when your phone is locked by Android Device Manager.
ADM is built to completely lock your device so that unknown people cannot access it. So, if your phone is locked by Android Device Manager, you might be in a problem.While ADM is a wonderful tool to lock your phone or erase and wipe data if its stolen or lost, most of the users have reported the issue that they cannot unlock their phones that are locked by Android Device Manager. A possible solution to this is adding a temporary password via Google login and bypassing the ADM lock. Or, you can try resetting the password again by entering a new password via ADM. If that does not work, you can make use of several third-party applications which can be found in the internet, that will help to completely erase the Android Device Manager lock.
So, now you know how to unlock the Android Device Manager lock. Do keep in mind, your device must be connected to internet or Wi-Fi, to login to your Google account.
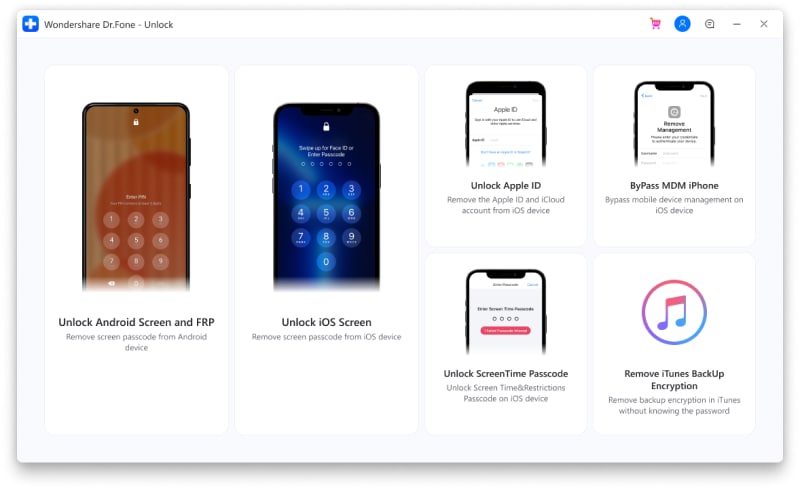
Part 4: Unlock Android devices with Dr.Fone - Screen Unlock (Android)
As mentioned before, many were unable to unlock their phones with ADM. This is why we use the Dr.Fone - Screen Unlock (Android) . It is hassle-free and easy-to-use; the Dr.Fone toolkit needs to be downloaded on your computer and with a few easy steps, it erases any kind of lock-screen passcode and avoids any kind of data loss as well!
Dr.Fone - Android Lock Screen Removal
Remove 4 Types of Android Screen Lock without Data Loss
- It can remove 4 screen lock types - pattern, PIN, password & fingerprints.
- Only remove the lock screen, no data loss at all.
- No tech knowledge asked, everybody can handle it.
- Work for Samsung Galaxy S/Note/Tab series, and LG G2, G3, G4, etc.
3,224,627 people have downloaded it
This tool works on removing all four types of lock-screen passcodes – PINs, Patterns, Fingerprints, and Passwords. Anyone can use this tool following these easy steps:
You can also use this tool to bypass the locked screen beyond Samsung and LG.Things you should pay attention is that it will remove all the data after finishing unloking on other brand android phone.
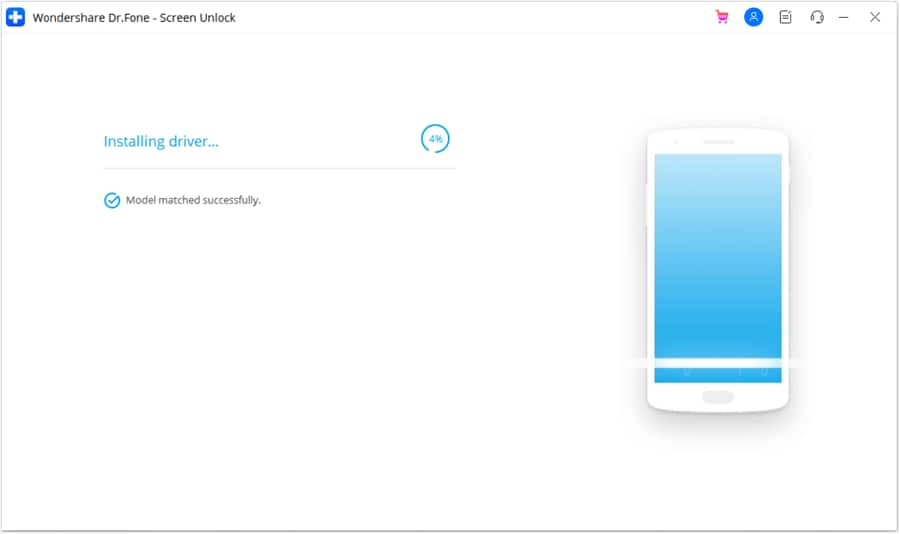
1. Fire up the Dr.Fone toolkit for Android on your computer and select the Screen Unlock among all the other tools.

2. Now, connect your Android device to the computer and select phone model in the list on the program.

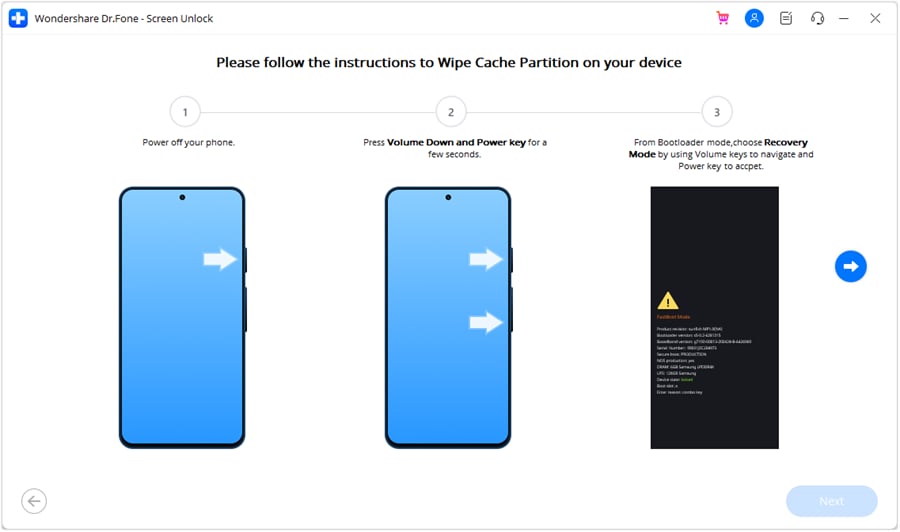
3. Boot your phone into Download mode:
- • Power off your Android phone.
- • Press and hold the volume down+the home button + the power button at the same time.
- • Press the volume up button to enter Download Mode.

4. After you get your phone into the Download mode, it will start downloading a recovery package. Wait for this to be completed.
5. When the recovery package download is completed, Dr.Fone toolkit will begin removing the screen lock. This process will not cause any data loss on your Android device, so do not worry. Once the whole procedure is over, you can easily access your Android phone without entering any kind of password. Hurrah!

The Dr.Fone software is currently compatible with Samsung Galaxy S/Note/Tab series, and LG G2/G3/G4 series. For windows, it is compatible with 10/8.1/8/7/XP/Vista.
The Android Device Manager is an excellent initiative taken by Google to give people the chance to not lose any data and regain access to their phones. This also teaches us to take precautions before such unfortunate incidents take place. Phones are probably one of the most important belongings of ours, in which we confide all our private and confidential documents that we wouldn’t want to be meddled with.
So, make use of this guide and get back command over your Android phone.
Full Guide to Unlock Your Itel A05s
Yesterday my kid was using YouTube on my Itel A05s to help solve an assignment. However, it wouldn’t take the Itel A05s pattern unlock when I tried opening the phone. Maybe the kid has accidentally changed the lock, but I don’t know what to do. Please help me.
This article is for you if you have been locked out of your Itel phone. Many individuals fail to remember their password or change it accidentally. However, it is not a big deal now. We’ll talk about the best Itel A05s password unlock tool today.
There are multiple ways to unlock your locked Itel device. All the solutions mentioned here are effective and work 99% of the time. However, we suggest you use Dr.Fone. Dr.Fone is expert software to answer all your Android needs. It is safe, secure, and free of data loss.
Part 1: 3 Easy Ways to Remove Your Itel A05s Lock
1. Google Find My Device
Google Find My Device is an inbuilt feature in Itel phones to unlock your phone through Google accounts. You can utilize it to unlock the Itel screen lock. However, you need to know that you will lose all your files on the Itel phone after the Itel A05s password unlocks. Therefore, make sure to back up your data before proceeding with the following steps:
- Ensure your locked Itel phone is connected to your Google account and WiFi/Data. Then open the Find My Device site on a PC, and sign in with your phone’s Google account.
- Kindly select your device, and tap the “Erase Device” option.
- Type your Google account credentials once more. Then, click the “Erase” symbol to begin the unlocking system. That will remove the pattern lock from your OPPO, and you can open it without effort.
2. Answer Security Questions
This method is for you if you have set security questions while making your Google ID. By addressing those questions, you can unlock the Itel A05s screen lock. In any case, this way is invalid on some old Android phones.
To unlock this way, you need to press the Forgot Password option. If you can’t see the “Forgot Pattern/Password button on your phone, follow these steps:
- Try unlocking your Itel smartphone with some wrong patterns a few times. Then you will see the “Forgot Pattern” symbol on the screen and tap it.
- Select the “Answer question” option to get to your security questions. Then, at that point, answer each of them correctly.

- It will automatically unlock your device if you answer all questions accurately. Then, it will expect you to set another screen lock for your OPPO. Therefore, keep the new PIN to yourself.
3. Hard Reset
If you wouldn’t worry about losing your user data, you can attempt this unlock method for your Itel A05s. You won’t require any account or applications. It requires you to have sufficient battery life. It is simple. So let’s see how it is done.
- Check whether the battery percentage is over half. Then power off your Itel phone by holding the “Side/Power” key for around 10 seconds.
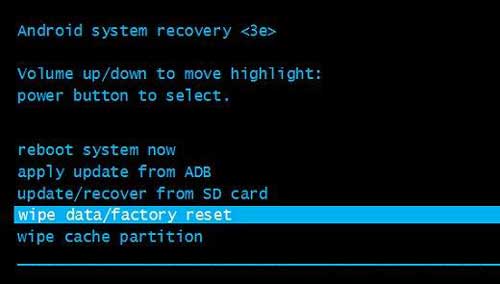
- Press and hold the “Volume Down” and “Side/Power” buttons till the Itel logo appears on display. Then, at that point, your phone is in recovery mode.
- Utilize the volume keys to pick the “Wipe Data/Factory Reset” choice, and press the “Side/Power” button to select it. Then, at that point, pick “Yes” to go on. You can reboot your Itel after the reset is finished, and the lock will be no more.
Part 2: The Efficient Tool for Your Itel A05s Unlock
Dr.Fone - Screen Unlock (Android) offers a wonderful tool that works to unlock Itel devices rapidly. This lock screen remover tool can unlock your phone from every five locks: PIN, passcode, face lock, pattern, or fingerprint in only a couple of basic steps. It works with all the Itel models hassle-free. So, download it right away for a safe unlocking experience. Here’s how you can use it:
Step 1. Start your hard reset from Dr.Fone
Make your Itel A05s phone connected to the PC through a USB cable. Then, at that point, click “Screen Unlock” > “Android” on the program.
Step 2. Select Unlock Android Screen
When you arrive at this page, please choose the button “Unlock Android Screen”.

Step 3. Select device brand
We’ll offer you a phone brands list, almost all Android devices are here, for example, Samsung, Huawei, OPPO, Vivo, Lenovo, LG, etc. Then Select Itel to continue.
Step 4. Unlock your Itel A05s now
The following steps are the key to unlocking your Itel device. Attention! The unlock process will also wipe your data!

Great! Now the unlocking progress is done, and you can use your phone without entering password.
Bonus Tips: The Importance of Backing Up Your Android Data Regularly
The data loss on your Android phone or tablet can be extremely unpleasant. Subsequently, it’s suggested that you back up your Android phone or tablet consistently. It will keep you from losing your data. As an expert application, Dr.Fone Backup and Restore (Android) can help back up a wide range of data and settings on Android. In the meantime, it lets you review and restore the backup documents to another phone. Here’s how:
- Open the Dr.Fone software on your computer, and connect your phone to the PC through a USB connector and click OK. Then select the “Back up device” option.

- Tap the Backup option to begin the process.

- The process will require some time.
- After it is done, you can see where the backup is stored by clicking on the “View BackupS” option.

Conclusion
All the best Itel A05s password unlock tools are displayed above. They are helpful, dependable and safe to use. However, if you need the easiest tools, you must pick the Android Screen Unlock program. In this case, the Dr.Fone - Screen Unlock (Android) can unlock your Itel phone without any issue. Therefore, we strongly suggest you use Dr.Fone for backup and unlock your device.

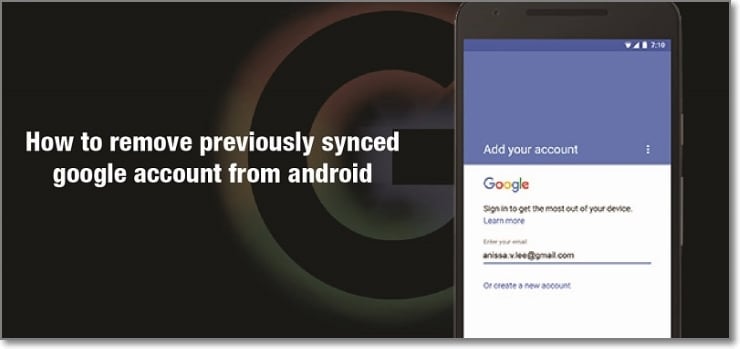
How to Remove a Previously Synced Google Account from Your Itel A05s
The setting up process of a new Android phone requires you to add a Google account that saves all activities and data of the phone like search history, details of online shipping, play store purchases, and more. Once the account is set, it cannot be changed till you delete everything from your phone. Moreover, with the introduction of FRP lock, even a factory reset will not remove the synced Google account.
So, now what if you want to sell your phone or have purchased a second-hand device that is still associated with the previous owner’s Google account? No, worries as there are workarounds available that will help you remove your previously synced google account from your Android device.
Keep reading to know more in detail about how to bypass previously synced google accounts.
Heres a full guide on how to remove google account from android, click to know more!
Part 1: Remove Previously Synced Google Account from Android Phone Without Phone Reset
In this part, we will discuss the methods that can be used for removing the previously synced account from your Android phone without a phone reset.
Method 1: Removing Google Account using the Android Settings Menu
If you just plan to reset your phone, maybe because of the lag caused by the phone cache, and you know the inconvenience of Google FRP as a protection mechanism, then you can remove Google FRP through the Settings menu.
The steps for this method are listed below.
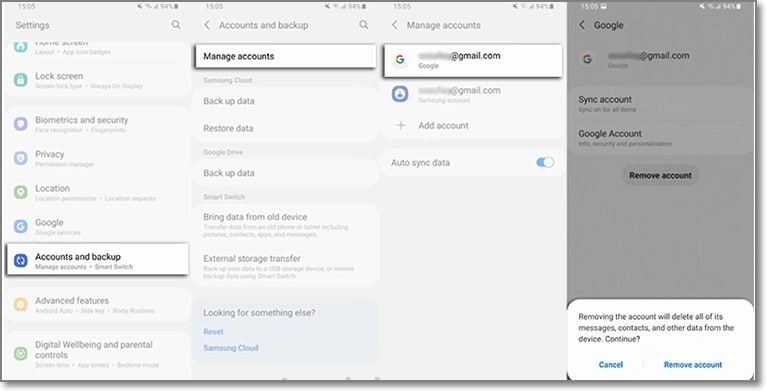
- Step 1: On your Android phone go to the Settings option and choose Accounts & Backup.
- Step 2: Select the Manage Accounts option now and the list of the associated Google Devices will appear.
- Step 3: Choose and click on the Google Account that you want to remove and a pop-up message will appear to inform you that all the account data will be deleted with this action.
To confirm the removal of the account, click on the Remove account button.
Method 2: Remove the Google account from the Android phone using the computer
There is another method using which you can remotely remove the Google account associated with your phone. The steps for the method are listed below.
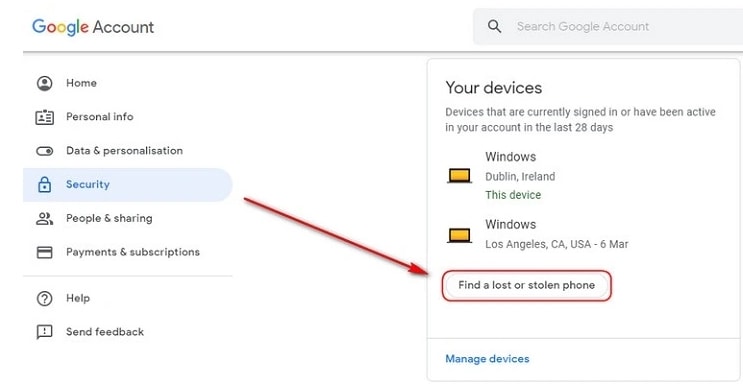
- Step 1: Using another device or a PC, sign in to your Google account that was previously synced on this device and choose the Security option.
- Step 2: Next scroll down and then tap on the Your devices option and choose to Manage devices.
- Step 3: You will now see the list of devices linked to your Google account. Next, tap on Find a lost or stolen phone and then select the Remove option present next to Account access.
- Step 4: You will be again asked if you want to delete the account. Select the Remove option.
- Step 5: The account will be removed successfully and the confirmation message will appear.
Note: This method will actually sign out you from the Google account and will not delete it permanently. To again get access to the account, a notification will appear on your phone to enter the password.
Part 2: How to Disable Factory Reset Protection to Bypass Google Account Verification After Factory Reset
The Factory Reset Protection (FRP) is a security feature for the Android device that allows factory reset only after the associated Google ID and password are entered correctly. With multiple accounts and passwords to remember there is quite a possibility that you may forget your Android phone Google account details and here the need to bypass Google account verification arises.
Though there are multiple tools available we recommend Dr. Fone - Screen Unlock (Android) as the best and the most reliable option. Using this excellent Windows and Mac-based software, FRP lock on all popular Android devices including Samsung, LG, HTC, and others. The tool is simple to use and requires no technology. There is also an option where you can unlock your device if you do not know the OS version.
![]()

Dr.Fone - Screen Unlock (Android)
Get into Locked Phones within Minutes
- 4 screen lock types are available: pattern, PIN, password & fingerprints.
- Easily remove the lock screen; No need to root your device.
- Everybody can handle it without any technical background.
- Provide specific removal solutions to promise good success rate
4,008,669 people have downloaded it
Steps to remove FRP lock using Dr. Fone-Screen Unlock (Android)
Step 1: Download, install and run the software on your system, and from the main interface choose the Screen Unlock option. Make sure that your phone is connected to WiFi.
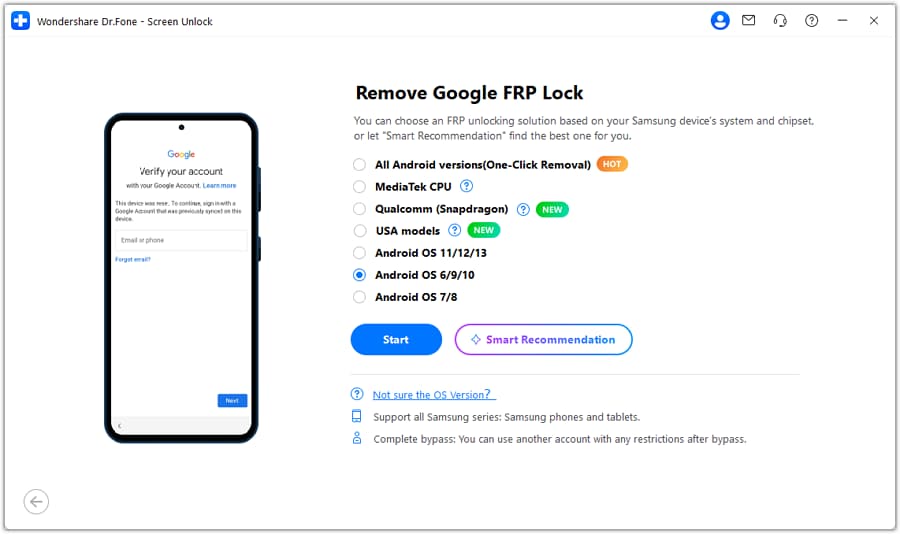
Step 2: Next, choose Unlock Android Screen/FRP and then select the Remove Google FRP Lock option.
Step 3: Next, choose the OS version of your device from the given options, and then using a USB cable, connect your phone to your system.
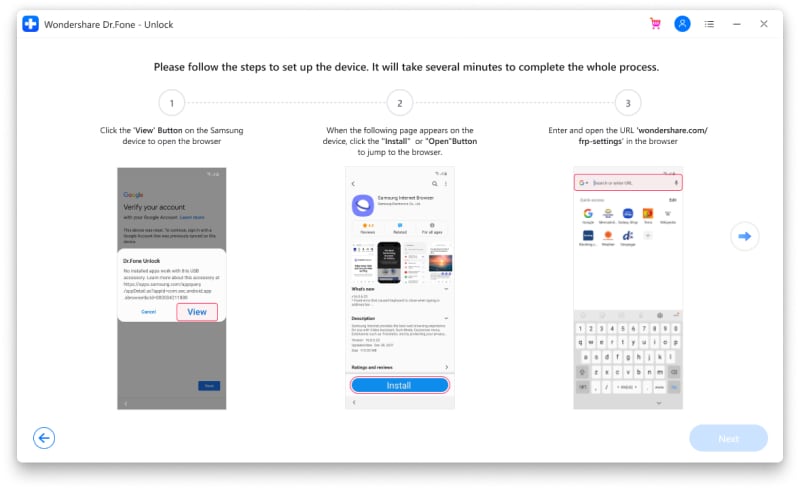
Step 4: After the Itel A05s device is connected, the Itel A05s device information will appear on the software for you to confirm and the notification for the same will be sent to your Android phone.
Step 5: Now follow the notifications for removing the FRP lock and in the browser enter drfonetoolkit.com.
Step 6: Next, click on the Android 6/9/10 button, choose Open Settings and select the PIN option to set a PIN to be used in the further steps.
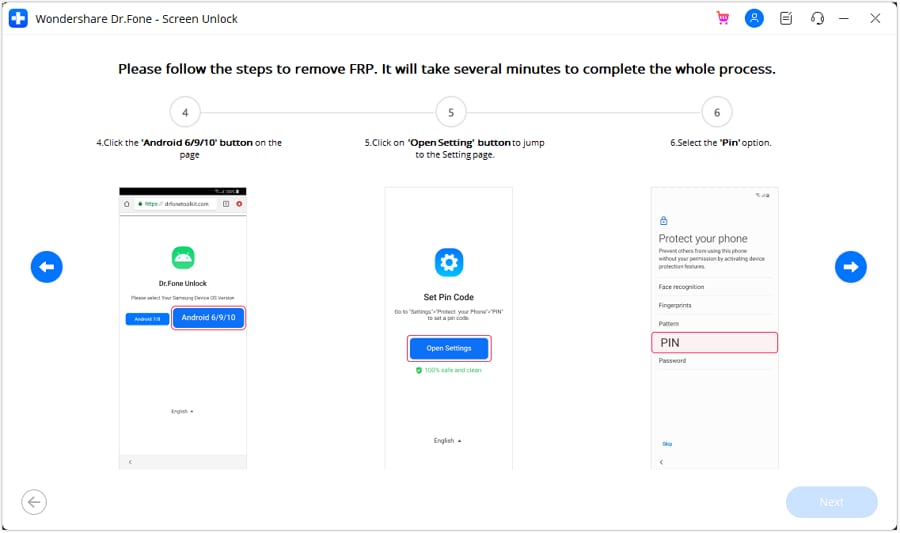
Step 7: Keep following the steps as they appear till you reach the Google Account Sign-In page. Here click on the Skip option that will successfully remove and bypass the Google Account.

The above given are the brief steps for the FRP bypass process. To learn about the entire process in detail, check Dr.Fone-Screen Unlock (Android) guide .
Part 3: Hire a Remote FRP Removal Service to Bypass ZTE/Motorola After Factory Reset
To bypass the FRP lock on your ZTE, Motorola, and Samsung device, there is also an online service called UnlockJunky.com that claims to remove the FRP lock and previously linked account on your Android device within 5-15 minutes. This is a paid service that also claims that if they are unable to remove the lock, they will refund the amount to their customers.
So, if you cannot sign in with a Google account that was previously synced, you can give this, method a try.
Step 1: Open the official service page Unlockjunky on your browser.
Step 2: Next, choose the Itel A05s device’s brand, model, and unlock type from their respective drop-down menus. Click on Unlock Now button after entering the details.
Step 3: Now you need to initiate the order by providing the details asked and completing the payment.
Step 4: Next, the software needs to be downloaded and installed on your system, and using a USB cable, connect your phone to your computer.
Step 5: Connect with one of the support provider members through the live chat and they will help you remove the FRP lock on your Android phone.
With the steps above, you can remove the account previously synced on this device.

Limitations of using the Unlockjunky method:
- This is a paid service.
- Works only with Motorola, ZTE, and Samsung devices.
- There is no surety that the service will work for removing the FRP lock on your devices.
- If you have to remove the FRP lock from multiple devices, a separate payment for each device has to be done.
Conclusion
Above we have listed several ways to remove a previously synced Google account on your Android device. The best of all the listed solutions is Dr. Fone - Screen Unlock (Android) as it supports bypassing FRP lock on multiple Android devices in a hassle-free manner. Once the license is purchased, you can unlock as many numbers of devices as you want without any worries.
- Title: Mastering Android Device Manager The Ultimate Guide to Unlocking Your Itel A05s Device
- Author: Marry
- Created at : 2024-07-18 16:28:13
- Updated at : 2024-07-19 16:28:13
- Link: https://unlock-android.techidaily.com/mastering-android-device-manager-the-ultimate-guide-to-unlocking-your-itel-a05s-device-by-drfone-android/
- License: This work is licensed under CC BY-NC-SA 4.0.