
Top 4 SIM Location Trackers To Easily Find Your Lost Vivo Y200e 5G Device
Top 4 SIM Location Trackers To Easily Find Your Lost Vivo Y200e 5G Device
Losing your smartphone can be a distressing experience. It’s not just a device; it’s a treasure trove of memories and personal information. Fortunately, technology has come to the rescue with SIM location trackers. These useful tools will help you ensure your lost device is never truly lost.
Whether you call it a SIM location tracker, a SIM card locator, a SIM card finder, or even a SIM card number finder, these smart solutions are your best friends in times of need. So dive in and discover the top 4 SIM location trackers to make device retrieval a breeze.
![]()
In today’s fast-paced world, losing a smartphone happens more often than one would like to admit. Picture this: You’re in a rush, juggling tasks, and suddenly, your phone slips out of your pocket or bag. Panic sets in as you realize it’s nowhere to be found.

![]()
Losing your smartphone can be depressing, not just because of the cost of replacing it. Think about all the photos, messages, and personal information stored on it. It’s like losing a piece of yourself. This is where SIM location trackers come to the rescue.
Common Scenarios of Device Loss
Check out some of the most common scenarios where a phone might get lost:
- Have you ever left your phone in a cab or at a restaurant? It’s surprisingly common.
- Sometimes, it slips out of your pocket during a hectic commute.
- In the worst cases, it might even get stolen.
The Growing Need for SIM Card Finders
With lives deeply intertwined with technology, the demand for easy and effective device tracking is rising. People want solutions that don’t require a tech genius to operate. They want something simple, straightforward, and, as much as possible, free SIM card locators.
Factors To Consider When Choosing a SIM Location Tracker
Now, here are the top factors you need to check when you are about to choose an online SIM location tracker.
- You need a tracker that can pinpoint your device’s location precisely.
- Ensure it works with your device and operating system.
- **User Reviews.**Check what others say about the tracker. Real user experiences matter.
- **Additional Features.**Some trackers offer extra perks like geofencing or remote device control. Consider what suits your needs.
The bottom line is that SIM location trackers offer a lifeline when your device vanishes into thin air. They’re your best shot at getting it back quickly and easily. Plus, in this age of digital privacy, knowing where your personal information is can be a big relief.
In the next part of this journey, this article will delve into the top 4 SIM location trackers that are here to make your life simpler and your devices safer. So, stay tuned and explore these handy tools that bring peace of mind to the palm of your hand.
Part 2: Top 4 SIM Location Trackers
Now that you understand why SIM location trackers are essential let’s dive into the world of these handy tools. This section explores four of the most popular SIM card finder that can help you track your SIM card location online for free.
Hoverwatch
Hoverwatch is your go-to solution for simple and effective SIM location tracking. Designed with user-friendliness in mind, it offers accurate GPS tracking call and SMS monitoring and operates in stealth mode.
![]()
Key Features
Check out Hoverwatch’s essential features below:
- It provides real-time GPS tracking to pinpoint your device’s location accurately.
- You can monitor calls and messages on the target device.
- Hoverwatch operates discreetly, so the user of the tracked device won’t know it’s being monitored.
Pros
Listed below are Hoverwatch’s advantages:
- Easy to set up and use, making it ideal for beginners.
- Supports a wide range of devices and operating systems.
- Affordable pricing plans.
Cons
Below is the drawback of using Hoverwatch:
- Some advanced features may require rooting or jailbreaking the target device.
mSpy
For a comprehensive monitoring solution that includes SIM location tracking, mSpy is a top choice. It not only provides real-time location tracking but also offers geo-fencing and social media monitoring. mSpy is particularly popular among parents who want to ensure their children’s safety online.
![]()
Key Features
Key characteristics of mSpy are as follows.
- Track the target device’s location in real time.
- Set up virtual boundaries and receive alerts when the Vivo Y200e 5G device enters or leaves these areas.
- Monitor social media activities and messages.
Pros
The benefits of using mSpy are as follows:
- Excellent for parents who want to ensure their child’s safety online.
- Comprehensive monitoring, including text messages, calls, and social media.
- Compatible with Android and iOS devices.
Cons
The disadvantages of mSpy are outlined below:
- Relatively higher pricing compared to some other trackers.
- Advanced features might require device rooting or jailbreaking.
Spyic
Spyic is a trusted name in the world of monitoring and tracking software. It offers precise location tracking, works without rooting or jailbreaking, and comes with features like geofencing. Spyic is highly reliable, user-friendly, and compatible with Android and iOS devices.
![]()
Key Features
See the highlights of Spyic below:
- It provides accurate location information, including location history.
- Spyic can be used without rooting or jailbreaking the target device.
- Set up virtual boundaries and get alerts if the Vivo Y200e 5G device enters or exits these areas.
Pros
Here are some of Spyic’s many benefits:
- Highly reliable and user-friendly.
- Works on both Android and iOS devices.
- Offers a web-based dashboard for easy monitoring.
Cons
The drawbacks of utilizing Spyic are as follows:
- The pricing may be a bit on the higher side for some users.
- Some advanced features may require a premium subscription.
Spyzie
Spyzie is a versatile monitoring tool covering SIM location tracking and more. It provides accurate location updates, social media monitoring, and call/text tracking. One of its standout features is that it doesn’t require complex technical procedures like rooting or jailbreaking, making it accessible to users of all levels.
![]()
Key Features
Take a look at some of Spyzie’s best qualities:
- Get real-time location updates of the target device.
- Track social media activities, messages, and media files.
- Monitor calls and text messages on the target device.
Pros
Spyzie’s benefits are as follows:
- Compatible with Android and iOS devices.
- There is no need for complex technical procedures like rooting or jailbreaking.
- User-friendly interface for easy navigation.
Cons
The Spyzie’s drawback is detailed here:
- Pricing plans might be a consideration for budget-conscious users.
Part 3: How To Unlock iPhone SIM?
Now, what if you don’t only want to track your SIM number location but also want to deal with other iPhone SIM-related issues like SIM not supported, invalid SIM, locked SIM, or no network servicing? Luckily, this article is also set to share a robust solution - Wondershare Dr.Fone – SIM Unlock. This versatile tool helps you locate your device and ensures your iPhone’s SIM card functions smoothly.
Dr.Fone - Screen Unlock (iOS)
Best SIM Unlock for iPhone.
- Simple, click-through, process.
- Fix SIM unlock with a few clicks.
- Supports almost all carriers, from Vodafone to Sprint.
- No tech knowledge required, everybody can handle it.
- Supports the latest iOS version fully!

4,395,217 people have downloaded it
Why Choose Dr.Fone - SIM Unlock
Below are the key features that make this tool unmatched:
- Dr.Fone - SIM Unlock is your trusted companion for various iPhone models. Whether rocking the latest iPhone or an older version, this tool has your back.
- **User Friendly Interface.**No need to be a tech wizard to use Dr.Fone - SIM Unlock. Its straightforward interface ensures that even if you’re not tech-savvy, you can easily unlock your iPhone SIM.
- **Broad Compatibility.**It supports many iPhone models and is regularly updated to stay compatible with new releases.
- **Quick and Easy.**The process is designed to be simple and efficient, ensuring you get your iPhone back up and running quickly.
Step-by-Step Guide to Using Dr.Fone - SIM Unlock
Here’s a simple step-by-step guide to unlocking your iPhone SIM using Dr.Fone - SIM Unlock:
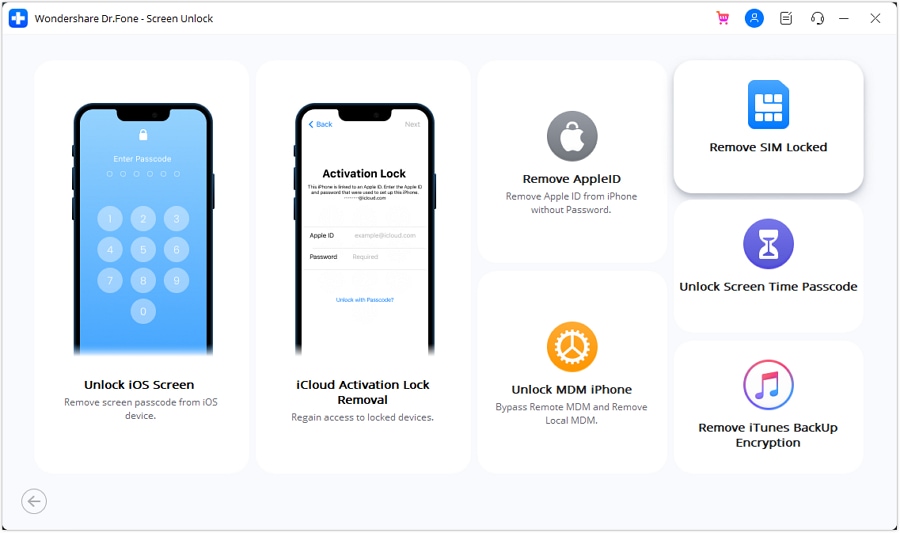
- Step 1: After downloading and installing the software, start Wondershare Dr.Fone on your computer. Continue to the Toolbox area, then select Screen Unlock and iOS to launch the tool in a new window.

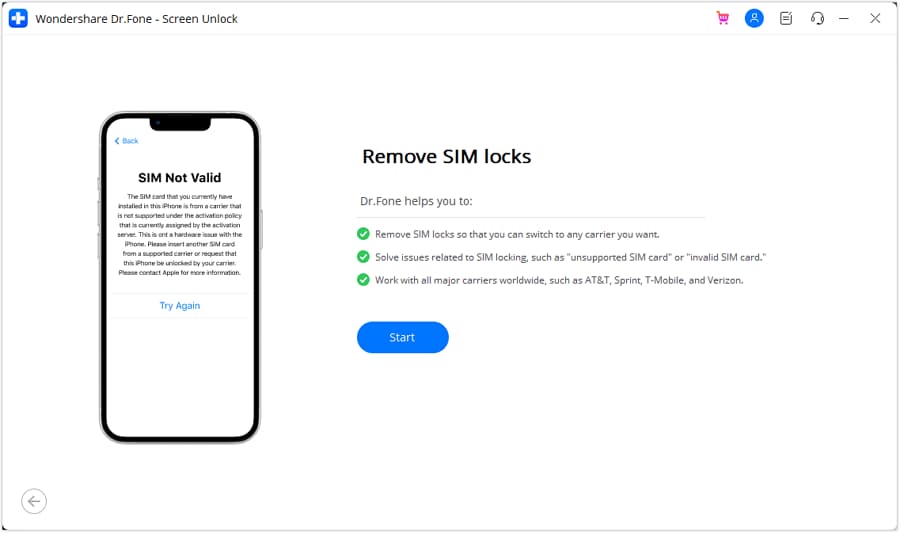
- Step 2: In the new window, hit the Remove SIM Locked button to start the process. You will then be sent to the Remove SIM Locks page, where you must click Start to initiate the process.
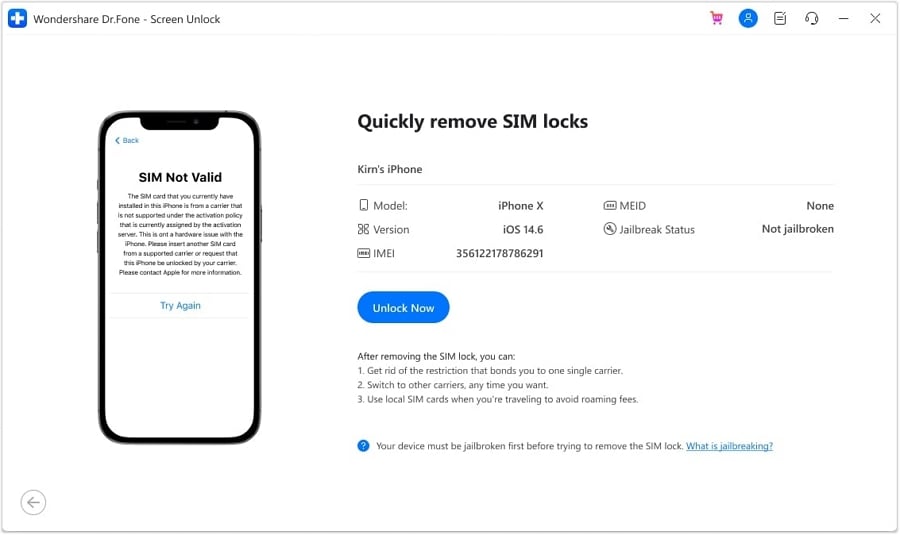
- Step 3: The platform will detect your device and present its details on the following screen. Click the Unlock Now button to continue the unlocking procedure.
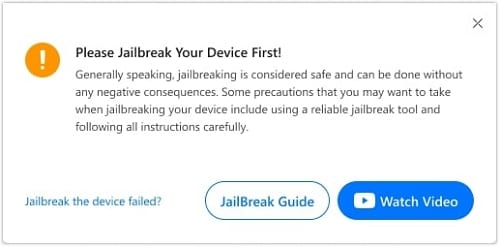
- Step 4: Because this method necessitates jailbreaking your iOS device, you will be prompted to do so first. If you want to follow a guide, click on Jailbreak Guide. If you want to watch a video guide, select Watch Video.
- Step 5: The screen will invite you to perform several actions, starting with removing the SIM card from the iDevice. To access the Vivo Y200e 5G device’s network settings, go to Settings, then WLAN. Find the Wi-Fi networks you’ve joined and select Forget This Network.
- Step 6: Unlink all connected networks from My Networks and turn off Wi-Fi. After that, re-insert your SIM card and press the Continue button. The following screen will offer a prompt box with the status of the unlocking process.
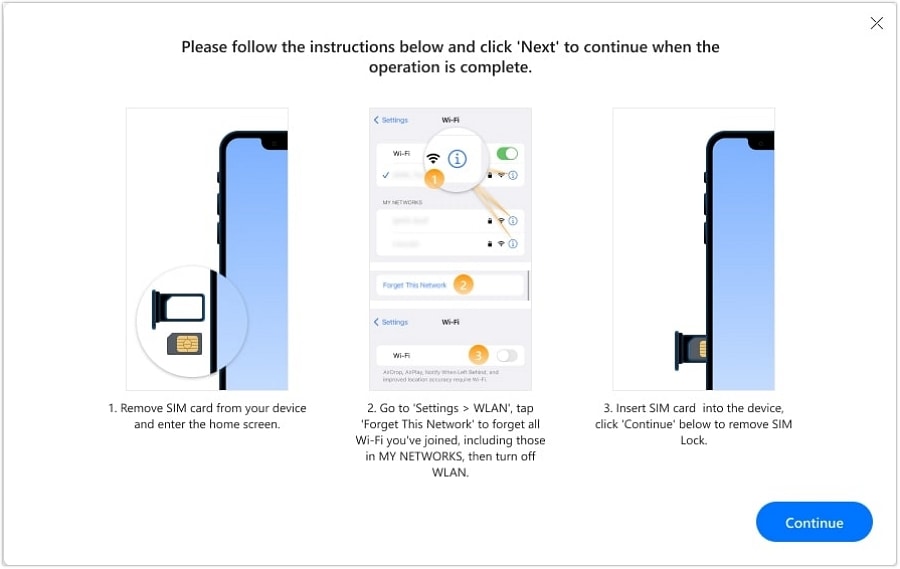
- Step 7: After a few moments, the window will display a completion notification, and you must click Done to complete the process.
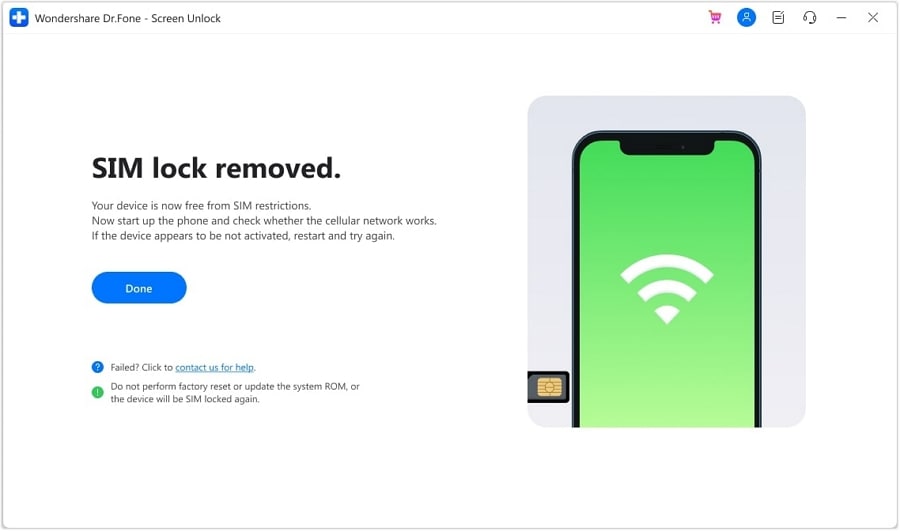
And that’s it! You’ve successfully unlocked your iPhone SIM using Dr.Fone - SIM Unlock. Now, your device should be free from SIM-related issues, and you can enjoy seamless network connectivity. So, if you’re facing SIM woes, don’t fret; Dr.Fone - SIM Unlock has you covered.
Conclusion
Losing your smartphone is more common than you might think. Thankfully, SIM location trackers are here to save the day. These simple tools offer accuracy and peace of mind, ensuring that your lost device can be swiftly recovered. Remember, quick device recovery means safeguarding your cherished memories and personal data. So, explore the recommended trackers this article has covered, and choose the one that best suits your needs.
And if you ever need to unlock your SIM card , Dr.Fone - SIM Unlock is your best companion. Enjoy the enhanced security, broad compatibility, and user-friendliness that come with it.
How to Reset your Vivo Y200e 5G Lock Screen Password
Android phones have the option of locking the screen using a PIN, pattern, or password. This is meant to keep the phone secure and prevent any unwanted intrusion. PINs and patterns are somewhat easy to remember, but it is common to forget the Android lock screen password. The phone gets locked if someone consecutively enters the wrong password multiple times. Then it is a common question to ask, “How to reset your Android password?”
The device becomes inaccessible and requires an Android password reset. But there is no easy way to do that. Either one needs their Gmail account or has to forget about getting back the Android data. Today we will deliver how to reset Android passwords and teach 6 useful ways. They can be used to reset the Android password and use the phone again. But if someone has to perform a factory restore, they need to depend on backups to get back the data. Now let’s begin with the first way and learn how to reset your Android phone password.
 safe & secure
Solution 1: Dr.Fone - Screen Unlock (Android): A Direct Way to Unlock the Phone
Using Dr.Fone - Screen Unlock (Android) is a direct way to Android reset the password and unlock the phone. There is no tension of data loss, and this phone unlocking software works for different lock systems. It can reset the Android password, pattern, PIN, and fingerprint lock in under 5 minutes. It is straightforward to operate and does not require any technical knowledge.
Wondershare offers you 100% security as it only authorizes you access. It is simple and user-friendly and keeps all the data on the Android device ( Samsung and LG only) intact.
![]()
Dr.Fone - Screen Unlock (Android)
Get into Locked Android Phones Within Minutes
- 4 screen lock types are available: pattern, PIN, password & fingerprints.
- Easily remove the lock screen; No need to root your device.
- Unlock 20,000+ models of Android phones & tablets.
- Provide specific removal solutions to promise good success rate
4,008,669 people have downloaded it
How to reset an Android phone password with Dr.Fone - Screen Unlock (Android)
Step 1: Select “Screen Unlock”
Open the program. After that, select and click on “Screen Unlock” on the right side of the window. With this option, you can Android reset your password and remove the lock screen of PIN, password, pattern, and fingerprints.
Now get the Android phone connected to the PC and select the Vivo Y200e 5G device model in the list to proceed.

Step 2: Activate download mode
You have to put your device into download mode. For that, follow the instructions given by Wondershare:
- 1. Switch off the Android device
- 2. Tap and keep holding the volume decrease button along with the power and home button simultaneously
- 3. Now tap the volume increase button to initiate download mode

Step 3: Download the recovery package
After the download mode has been entered, the program will begin to download the recovery package automatically. You have to hold your horses until it is complete.
Step 4: Remove the Android password without data loss
Soon the recovery package finishes downloading. Then the program begins to remove the lock screen. After the process is over, you can access all your data on your Android device and reset your Android password.

These simple steps will ensure that you can secure your Android lock screen easily, without any worries. You do not have to worry about data loss, and you will reset your Android phone. Even if you have forgotten your Android password and are thinking about starting your Android phone again, these simple tips will help.
Solution 2: How to reset Android Phone Password with Smart Lock?
Setting up Smart Lock on your Android device adds a convenient and straightforward method for unlocking your screen. Smart Lock provides different alternatives to bypass the lock screen based on specific situations.
These alternatives encompass trusted locations, connected devices, or facial recognition. For devices operating on Android 14, it’s now referred to as Extend Unlock. Here’s a guide on utilizing Smart Lock to unlock your Android device:
Step 1. Set a pattern, PIN, or password for your screen lock if you haven’t already. Open the Settings on your Android device and tap on “Security & Privacy.” Here, tap “More Security & Privacy” and select “Trust agents.”

Step 2. Within “Trust agents,” toggle on “Extend Unlock” and then return to the previous screen. Select “Extend Unlock” and input your pattern, PIN, or password to confirm. Next, pick your desired Smart Lock type and follow the on-screen prompts to activate.

Solution 3: How to Unlock Samsung Phone with SmartThings?
Unlocking an Android phone using SmartThings is an option available for Samsung devices. SmartThings offers remote control and management of Samsung devices. It also includes the ability to unlock your phone under specific conditions. Here’s a general guide on how to use SmartThings to unlock your Samsung phone:
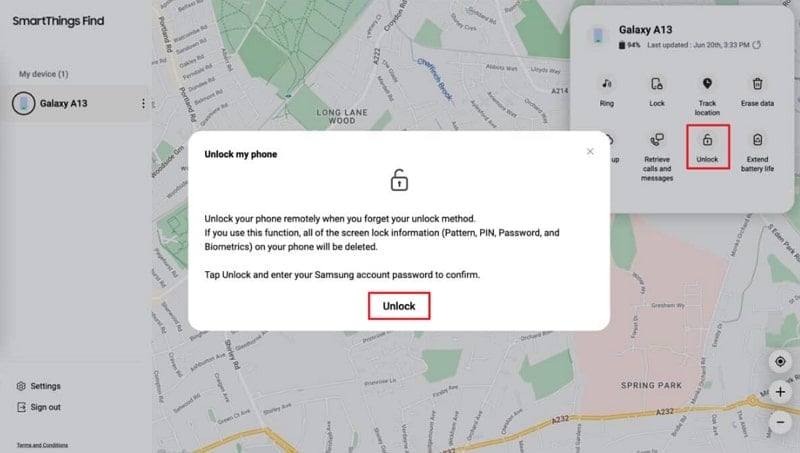
Step 1. Access the SmartThings website, where you should click on the “Sign In” button. Now log in using your Samsung Account, and you’ll be directed to a new screen displaying a map pinpointing your phone’s location.

Step 2. Select the “Unlock” button located in the top right corner of the menu. Then, proceed by clicking “Unlock,” and entering your Samsung password. Finally, confirm by clicking Unlock once more. This action will reset all your lock settings, comprising biometric security, PIN, password, and swipe pattern.
Solution 4: How to Reset Android Password using Google?
To reset the Android password using Google, it is necessary to remember the Google password and ID. Google account must also be activated on the phone. Also, this method only works on devices running Android 4.4 or below. Follow the steps below for the Android password reset.
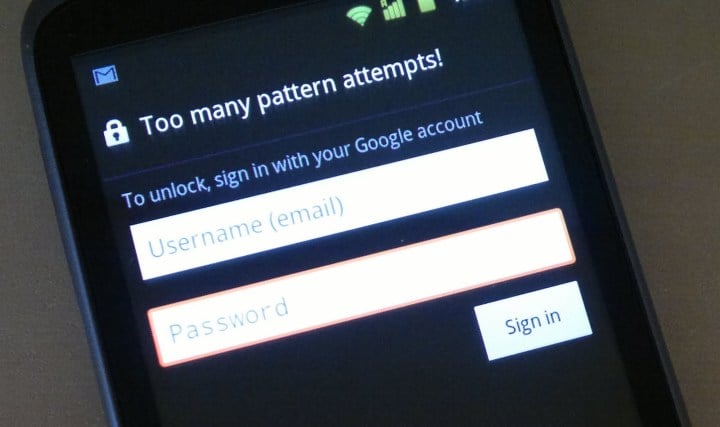
Step 1: Access Google login
Enter the wrong password 5 times till the Android device gives you a “Forgot password?” prompt. Click on the tab and choose “Enter Google Account details.”
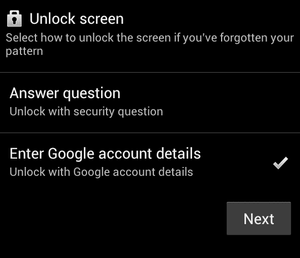
Step 2: Enter credentials and do an Android reset password
Now enter the Google ID and password and log in. You will be able to Android reset your password and get access to your phone.
Solution 5: How to Reset Android Password using Android Device Manager?
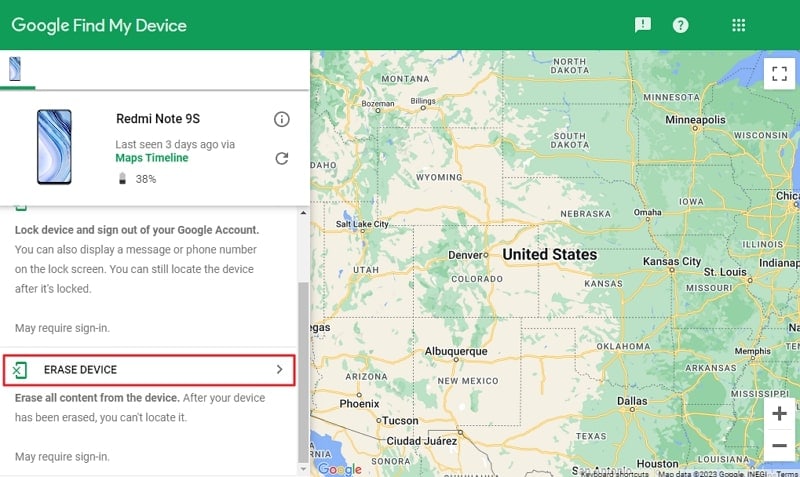
Familiar with Android Device Manager? Well, it has been renamed now as Find My Device. This service provided by Google helps you find, lock, or wipe your Android device. Plus, if you have enabled Find My Device, it might prove very helpful to assist you in unlocking your device. Check out these easy-to-follow steps for unlocking your Android device. For this, you need to use Find My Device, the upgraded Android Device Manager:
Instructions. On a computer or another device, go to the “Google Find My Device ” website. Here, sign in using your Google account linked to the locked Android device. Once you’ve logged in, the website will present a map revealing the most recent location of your device. Next, navigate to the left side and select “Erase Device.” Follow the prompts on the screen to finalize the process.
Solution 6: How to reset Android Phone Password using Factory Reset?
This method can be used when no other means of Android password reset works. This will erase all your data, so it is better to have backups created before. Now perform the steps to Android reset the password.
Step 1: Initiate factory restore.
Turn your Android device off. Press and hold the power button + home button + volume up button. This will bring up the recovery mode to initiate factory restoration.
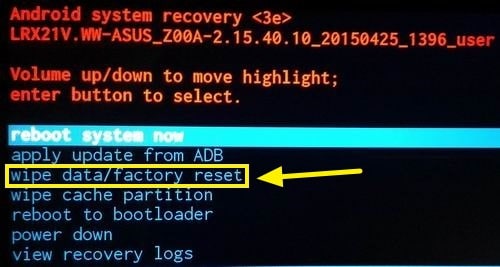
Step 2: Factory restore
Now use the volume +/- button to navigate to the “Wipe Data / Factory Reset” option and press the power button to select it. Wait till the process complete.
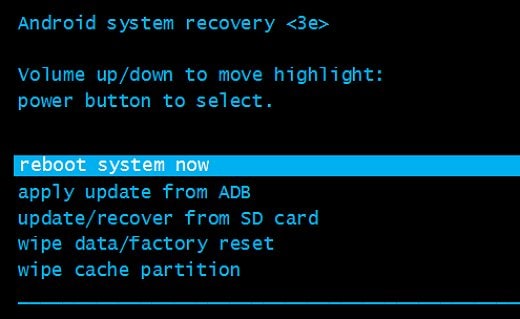
Step 3: Reboot and reset the password.
From the available options, choose “Reboot System Now.” After the Android device powers on, you will be able to do the Android password reset.
Bonus Part: Useful Tips to Prevent Future Lockouts on Android
Here are some helpful tips to prevent future lockouts on your Android device and ensure better password management.
- 1. Use Password Managers: Consider using reputable password manager apps that securely store and manage your passwords. These apps often have features to generate strong, unique passwords for different accounts and help you remember them.
- 2. Set up Biometric Authentication: In case your device supports it, use biometric authentication methods for a better experience. These can be fingerprints or facial recognition. These methods can be more convenient than remembering passwords and offer added security.
- 3. Create Memorable Passwords: If you opt against using a password manager, craft robust yet easily remembered passwords. To improve your security, try to use a sequence of lowercase and uppercase letters, numbers, and symbols. Plus, avoid easily guessable details like birthdays or common phrases to make your password strong.
- 4. Enable Two-Factor Authentication (2FA): Enable two-factor authentication whenever possible for your accounts. Likewise, this provides an added layer of security by requiring a secondary verification method. It could be a text message code or authentication app in addition to your password.
- 5. Regularly Back Up Your Data: Make it a habit to consistently back up your device data . To prevent potential data loss from forgotten passwords or unexpected issues, take precautions. Safeguard your crucial data by creating backups, whether in the cloud or on an external storage device.
Conclusion
This article guided all the possible ways available in 2024 to reset your Android lock screen password, such as using the Smart Lock, Google Find My, Samsung SmartThings, and Wondershare Dr.Fone - Screen Unlock (Android). The most recommended method out of these methods is Dr.Fone because it can handle all Android brands without restrictions.
On the other hand, other methods have their limitations. For example, SmartThings can only work for Samsung smartphones. Moreover, Wondershare Dr.Fone - Screen Unlock (Android) is compatible with Android 14 and can unlock the screen within 2 minutes.
How to Remove a Previously Synced Google Account from Your Vivo Y200e 5G
The setting up process of a new Android phone requires you to add a Google account that saves all activities and data of the phone like search history, details of online shipping, play store purchases, and more. Once the account is set, it cannot be changed till you delete everything from your phone. Moreover, with the introduction of FRP lock, even a factory reset will not remove the synced Google account.
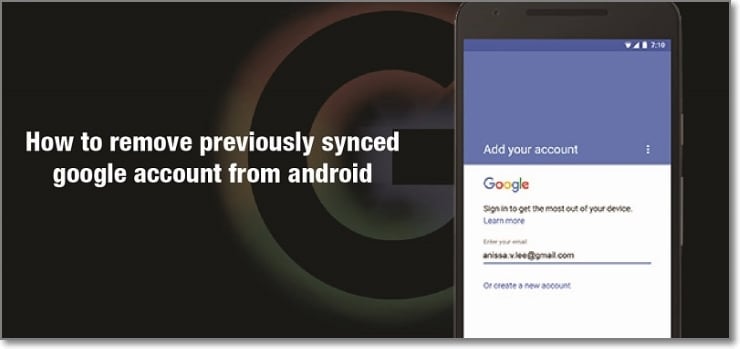
So, now what if you want to sell your phone or have purchased a second-hand device that is still associated with the previous owner’s Google account? No, worries as there are workarounds available that will help you remove your previously synced google account from your Android device.
Keep reading to know more in detail about how to bypass previously synced google accounts.
Heres a full guide on how to remove google account from android, click to know more!
Part 1: Remove Previously Synced Google Account from Android Phone Without Phone Reset
In this part, we will discuss the methods that can be used for removing the previously synced account from your Android phone without a phone reset.
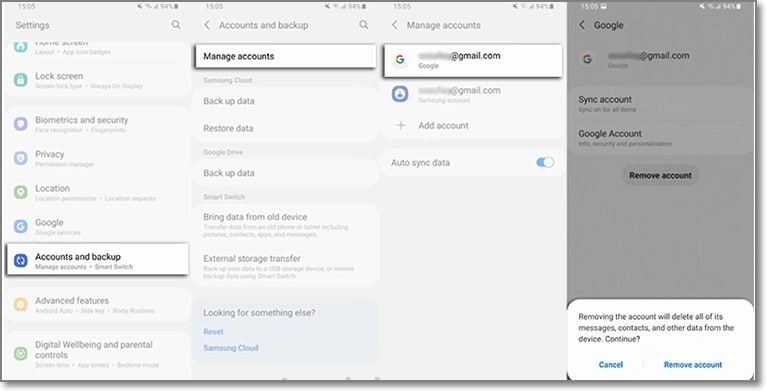
Method 1: Removing Google Account using the Android Settings Menu
If you just plan to reset your phone, maybe because of the lag caused by the phone cache, and you know the inconvenience of Google FRP as a protection mechanism, then you can remove Google FRP through the Settings menu.
The steps for this method are listed below.
- Step 1: On your Android phone go to the Settings option and choose Accounts & Backup.
- Step 2: Select the Manage Accounts option now and the list of the associated Google Devices will appear.
- Step 3: Choose and click on the Google Account that you want to remove and a pop-up message will appear to inform you that all the account data will be deleted with this action.
To confirm the removal of the account, click on the Remove account button.
Method 2: Remove the Google account from the Android phone using the computer
There is another method using which you can remotely remove the Google account associated with your phone. The steps for the method are listed below.
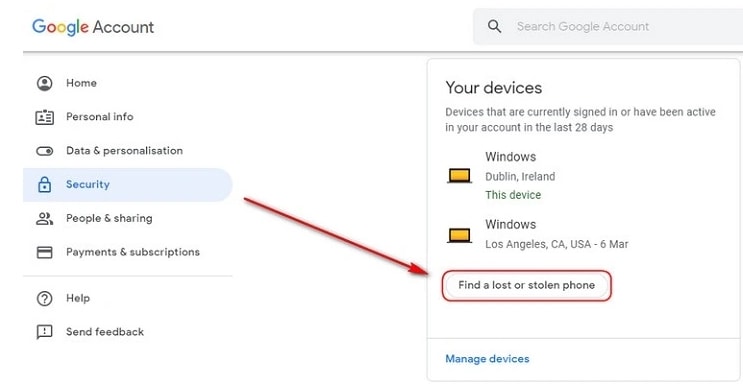
- Step 1: Using another device or a PC, sign in to your Google account that was previously synced on this device and choose the Security option.
- Step 2: Next scroll down and then tap on the Your devices option and choose to Manage devices.
- Step 3: You will now see the list of devices linked to your Google account. Next, tap on Find a lost or stolen phone and then select the Remove option present next to Account access.
- Step 4: You will be again asked if you want to delete the account. Select the Remove option.
- Step 5: The account will be removed successfully and the confirmation message will appear.
Note: This method will actually sign out you from the Google account and will not delete it permanently. To again get access to the account, a notification will appear on your phone to enter the password.
Part 2: How to Disable Factory Reset Protection to Bypass Google Account Verification After Factory Reset
The Factory Reset Protection (FRP) is a security feature for the Android device that allows factory reset only after the associated Google ID and password are entered correctly. With multiple accounts and passwords to remember there is quite a possibility that you may forget your Android phone Google account details and here the need to bypass Google account verification arises.
Though there are multiple tools available we recommend Dr. Fone - Screen Unlock (Android) as the best and the most reliable option. Using this excellent Windows and Mac-based software, FRP lock on all popular Android devices including Samsung, LG, HTC, and others. The tool is simple to use and requires no technology. There is also an option where you can unlock your device if you do not know the OS version.
![]()
Dr.Fone - Screen Unlock (Android)
Get into Locked Phones within Minutes
- 4 screen lock types are available: pattern, PIN, password & fingerprints.
- Easily remove the lock screen; No need to root your device.
- Everybody can handle it without any technical background.
- Provide specific removal solutions to promise good success rate
4,008,669 people have downloaded it
Steps to remove FRP lock using Dr. Fone-Screen Unlock (Android)
Step 1: Download, install and run the software on your system, and from the main interface choose the Screen Unlock option. Make sure that your phone is connected to WiFi.
Step 2: Next, choose Unlock Android Screen/FRP and then select the Remove Google FRP Lock option.
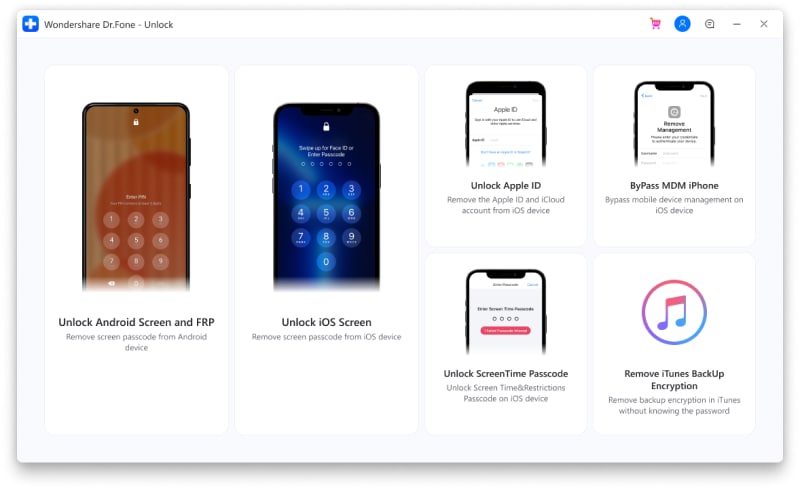
Step 3: Next, choose the OS version of your device from the given options, and then using a USB cable, connect your phone to your system.
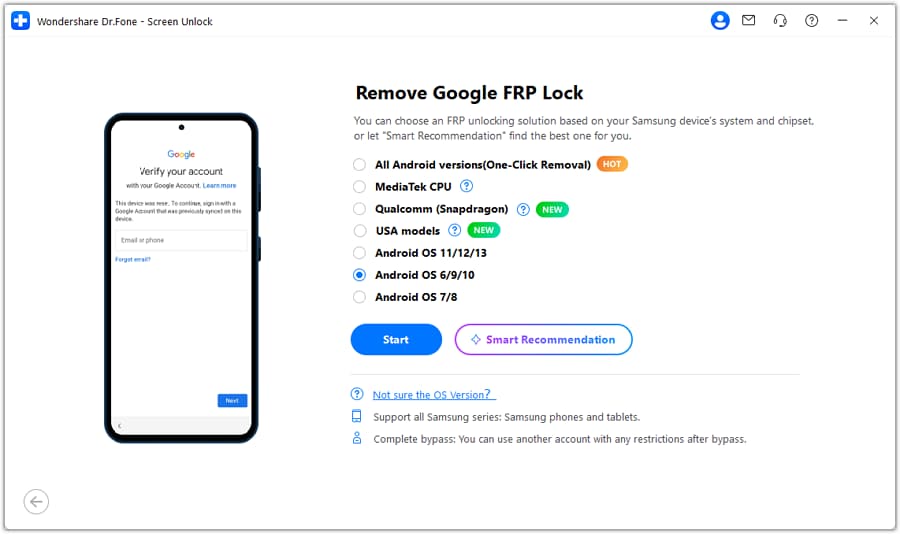
Step 4: After the Vivo Y200e 5G device is connected, the Vivo Y200e 5G device information will appear on the software for you to confirm and the notification for the same will be sent to your Android phone.
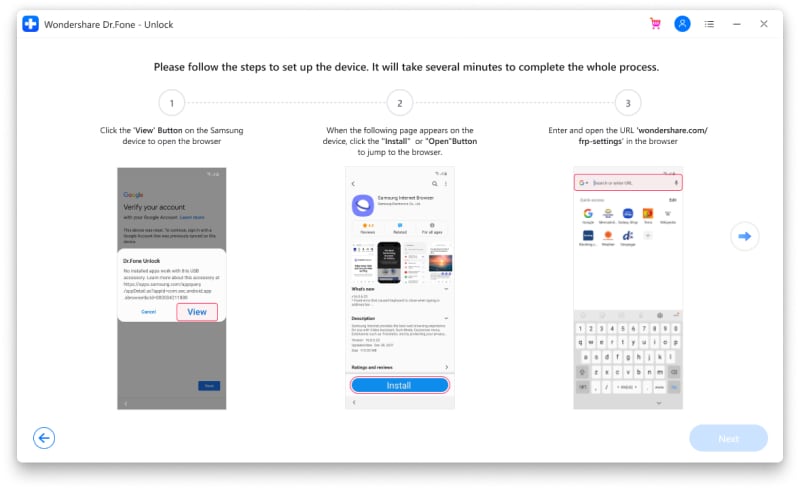
Step 5: Now follow the notifications for removing the FRP lock and in the browser enter drfonetoolkit.com.
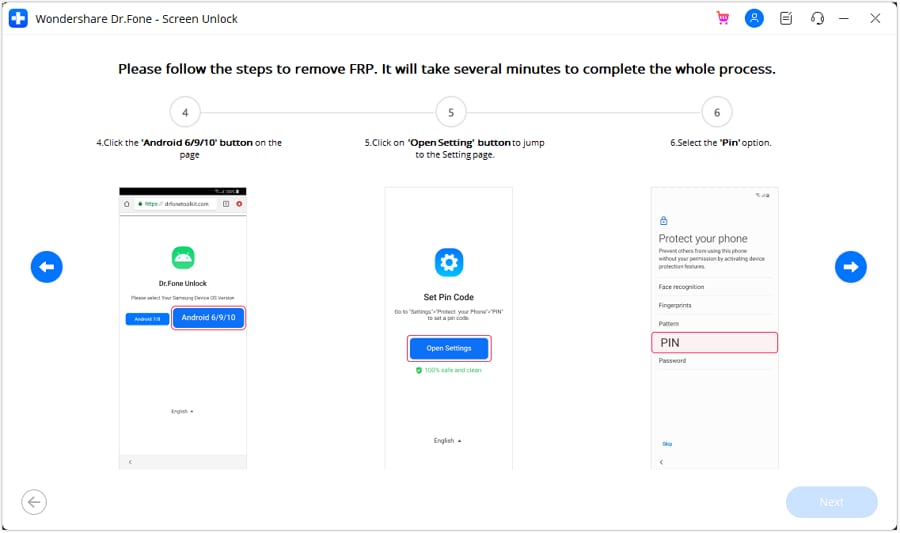
Step 6: Next, click on the Android 6/9/10 button, choose Open Settings and select the PIN option to set a PIN to be used in the further steps.
Step 7: Keep following the steps as they appear till you reach the Google Account Sign-In page. Here click on the Skip option that will successfully remove and bypass the Google Account.

The above given are the brief steps for the FRP bypass process. To learn about the entire process in detail, check Dr.Fone-Screen Unlock (Android) guide .
Part 3: Hire a Remote FRP Removal Service to Bypass ZTE/Motorola After Factory Reset
To bypass the FRP lock on your ZTE, Motorola, and Samsung device, there is also an online service called UnlockJunky.com that claims to remove the FRP lock and previously linked account on your Android device within 5-15 minutes. This is a paid service that also claims that if they are unable to remove the lock, they will refund the amount to their customers.
So, if you cannot sign in with a Google account that was previously synced, you can give this, method a try.
Step 1: Open the official service page Unlockjunky on your browser.
Step 2: Next, choose the Vivo Y200e 5G device’s brand, model, and unlock type from their respective drop-down menus. Click on Unlock Now button after entering the details.
Step 3: Now you need to initiate the order by providing the details asked and completing the payment.
Step 4: Next, the software needs to be downloaded and installed on your system, and using a USB cable, connect your phone to your computer.
Step 5: Connect with one of the support provider members through the live chat and they will help you remove the FRP lock on your Android phone.
With the steps above, you can remove the account previously synced on this device.

Limitations of using the Unlockjunky method:
- This is a paid service.
- Works only with Motorola, ZTE, and Samsung devices.
- There is no surety that the service will work for removing the FRP lock on your devices.
- If you have to remove the FRP lock from multiple devices, a separate payment for each device has to be done.
Conclusion
Above we have listed several ways to remove a previously synced Google account on your Android device. The best of all the listed solutions is Dr. Fone - Screen Unlock (Android) as it supports bypassing FRP lock on multiple Android devices in a hassle-free manner. Once the license is purchased, you can unlock as many numbers of devices as you want without any worries.
- Title: Top 4 SIM Location Trackers To Easily Find Your Lost Vivo Y200e 5G Device
- Author: Marry
- Created at : 2024-07-18 12:52:52
- Updated at : 2024-07-19 12:52:52
- Link: https://unlock-android.techidaily.com/top-4-sim-location-trackers-to-easily-find-your-lost-vivo-y200e-5g-device-by-drfone-android/
- License: This work is licensed under CC BY-NC-SA 4.0.