
Unlock Your Itel P40+ Phone with Ease The 3 Best Lock Screen Removal Tools
Unlock Your Itel P40+ Phone with Ease: The 3 Best Lock Screen Removal Tools
Let’s just say that you recently changed your Itel P40+ phone’s password, and now you are having trouble remembering it. After a few wrong attempts, you will get an alert message saying that more wrong attempts will block your device. In these situations, you can hard reset your device, but it will delete all your data and settings.
Instead of using other methods, you can use an Itel P40+ password unlock tool to unlock your device without a password. You can find many unlock tools but if you want an easy-to-use and efficient Itel P40+ unlock tool, try Dr.Fone - Screen Unlock. With Dr.Fone, you can unlock your Itel P40+ device within five minutes. You don’t have to worry about harm to your phone’s software. Here, we will discuss the three best Itel P40+ unlock tools and a complete guide on how to remove the Itel P40+ screen lock with Dr.Fone.

Tool 1: Dr.Fone - Screen Unlock (Android)
For Itel P40+ smartphone users who have forgotten their password and are locked out of their device, finding a reliable and efficient password unlock tool is crucial. One such tool that stands out is Dr.Fone - Screen Unlock (Android). Dr.Fone - Screen Unlock (Android) offers a fast and efficient solution to unlock your Itel P40+ device. With its advanced algorithms and technology, it can bypass various lock screen types, including PIN, password, pattern, and fingerprint. You can regain access to your device within minutes, saving you from the frustration of being locked out of your phone for an extended period.
Dr.Fone - Screen Unlock is the first choice of many people because of the simple device unlock procedure. When you unlock your device with Dr.Fone, you don’t have to worry about damaging its software. Dr.Fone is the most efficient Itel P40+ pattern lock remove tool because it can unlock all old and new Itel P40+ devices. In addition to that, Dr.Fone also offers various other features like system repair, WhatsApp transfer, phone transfer, data backup and restore, data eraser, etc. Here is the guide to unlocking the Itel P40+ lock screen with Dr.Fone.

With Dr.Fone, you can remove the lock screen of any Itel P40+ mobile in four easy steps. Each step is easy to follow.
Step 1. Download Wondershare Dr.Fone from our official website and install it on your PC.
Step 2. Launch the Dr.Fone and navigate to the “Toolbox” > “Screen Unlock” > “Android” > “Unlock Android Screen”.

- Step 3. Click the “OPPO” icon and use a USB cable to connect your Itel P40+ phone and your PC. Dr.Fone will start to unlock Android screen after getting into the specific mode. There are various phone brands for you to choose, don’t make it wrong, otherwise, all rest processes won’t work well.


- Step 4. Once the unlock progress is over, you can access your Itel P40+ phone without any password or pattern.

Tool 2: Itel P40+ Password Unlock
Itel P40+ unlock tool is free software that enables users to unlock Itel P40+ devices without a password. The Itel P40+ password unlock tool can bypass screen lock, FRP, Google verification, DIAG, and ADB. It works for all Itel P40+ smartphones. It is the best tool for those who forgot their phone’s screen lock password. With Itel P40+ unlock tool, you don’t have to complete complex steps, and the method to unlock devices is simple. As an Itel P40+ user, you should be aware of the fact that Itel P40+ doesn’t allow password changes with a factory reset.
You can only reset your password using the Itel P40+ password unlock tool after a factory reset. This tool is compatible with all versions of Windows. It is a one for all solution for many Itel P40+ smartphone problems. You can use it to reset the hardware of your Itel P40+ phone and delete all data and settings. It features a simple and easy-to-use user interface, and you can get it at no cost. Here are the steps to remove the Itel P40+ lock screen with the Itel P40+ password unlock the program.
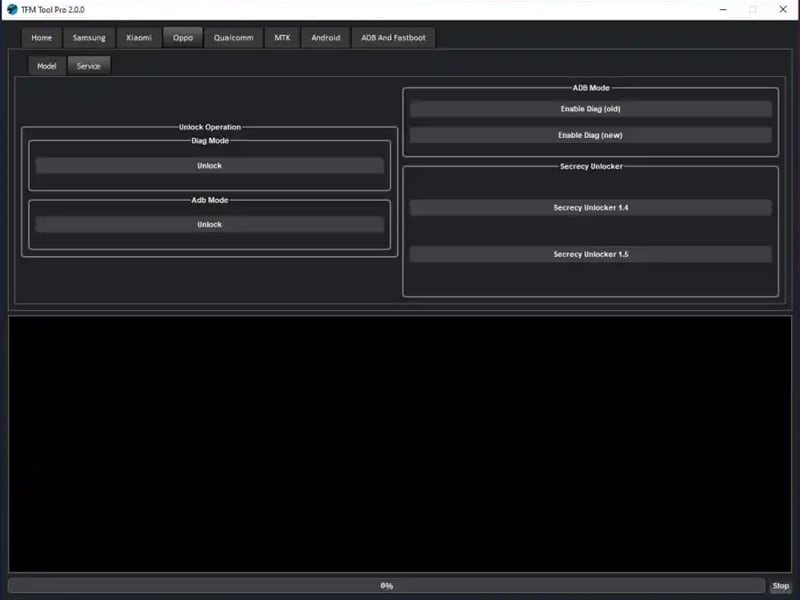
- Step 1. Download and Install the Itel P40+ unlock tool. Run the application and power off your smartphone. Select Itel P40+ from the brand list and determine the chipset of your device. It can either be MTK or Qualcomm.
- Step 2. For the MTK(MediaTek) chipset, all you need to do is set your MAC address from the network adaptor options and start the unlock process.
- Step 3. For the Qualcomm chipset, select your device model and click on the “Service” tab to enable DIAG mode.
- Step 4. Start the Itel P40+ device unlock process. Once the process is complete, your device will automatically boot up and format all data. There will be no screen lock or FRP lock.
Tool 3: iToolab - UnlockGo
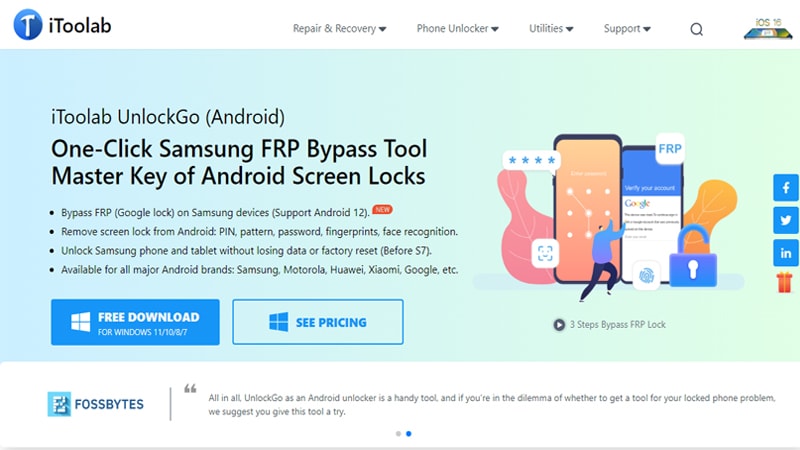
If you have the habit of changing your Itel P40+ smartphone frequently, then it is easy to forget your password. Changing your phone’s password is not a problem, but once you forget your phone’s password, things can get troublesome. Without your phone’s password, you might be able to call others, but you can’t unlock your device, use social media, or use any apps on your phone. Although it looks like a bug problem, you can easily deal with it using the proper tools. Instead of trying to unlock your locked Itel P40+ device using various unsafe methods, you can use iToolab - UnlockGo to remove its screen lock.
iToolab - UnlockGo is a simple Itel P40+ pattern remove tool that enables users to unlock privacy passwords and screen locks of their Itel P40+ smartphones. The only reason not to use this tool for Itel P40+ screen unlock is that you can lose all your data. Although lock screen removal without data loss is available in UnlockGo it only works for earlier Samsung devices. For Itel P40+ users, forgetting their phone’s password means losing all their data to unlock their device. Here are the steps to unlock Itel P40+ phones using iToolab - UnlockGo.
- Step 1. Install and launch iToolab - UnlockGo(Android) on your PC. Click on the “Unlock Screen lock” on the main interface.
- Step 2. Select your device brand from the drop-down list. In your case, select “OPPO” and click on the “Unlock” button.
- Step 3. If your device has a home button, press the home + volume up + power keys at the same time to enter recovery mode. If your device does not have the home button, press the volume down + power keys to enter recovery mode.
- Step 4. Once you enable the recovery mode, iToolab - UnlockGo will start the screen lock removal on your Itel P40+ device. You will get a notification once the unlock ends. Reboot your device and enter it without a password.
Bonus Tips: Have you ever found yourself locked out of your Itel P40+ phone due to the Google Factory Reset Protection (FRP) feature? If so, don’t worry, as there is a solution that can help you bypass this security measure. Easily bypass Google FRP on Itel P40+ Phone with Dr.Fone - Screen Unlock (Android). It effortlessly resolves issues like lost Google accounts, forgotten PIN codes, and unlocking used phones. Supported brands include Samsung , Xiaomi, Redmi , Oppo , Realme , and Vivo .
FAQs: Is Dr.Fone - Screen Unlock Safe for Your Itel P40+ Phone?
Dr.Fone - Screen Unlock is the safest and most efficient tool to unlock your Itel P40+ device without a password. It only removes the lock screen and doesn’t affect your device’s security. One of the advantages of using Dr.Fone is that it saves your phone’s warranty. When you unlock Itel P40+ phones with Dr.Fone, you don’t need your Google password or a factory reset. Dr.Fone also gives you the option to back up your data. You can also use it to repair software problems on your device, like screen stuck, volume problems, or device lag.
Dr.Fone - Screen Unlock (Android)
Unlock Your Itel P40+ Phone Hassle-Free
- Remove 4 screen lock types: pattern, PIN, password & fingerprints.
- Bypass Android FRP lock without a PIN or Google account.
- Work for Samsung, Xiaomi, Realme, OPPO, etc.
- No tech knowledge required, Simple, click-through, process.
3,981,454 people have downloaded it
Conclusion
These are the three best tools to unlock your Itel P40+ smartphone. Each of these tools can unlock your phone without a password. If we want to pick the best Itel P40+ password unlock tool, Dr.Fone - Screen Unlock (Android) is better than the other two for various reasons. With Dr.Fone, you get a simple user interface and an easy-to-follow procedure to unlock your device. The tool guides you to complete every step, and you can unlock your Itel P40+ smartphone within five minutes. And you also don’t have to worry about losing your phone’s warranty. Dr.Fone is a one-stop solution for Android problems.
How To Change Itel P40+ Lock Screen Password?
Setting up a lock screen is a crucial step in protecting your phone’s data. If you’re not sure how to create one on your Android™ phone, we’re here to help.
Your Android lock screen pin or password and your Google Account password are two passwords you use frequently. Keeping a good lock screen passcode is important.
Although you might not frequently enter your lock screen pin or password if you use a biometric unlocking method like fingerprint or facial recognition, it’s still important to be familiar with it.
You’ll need to reset your Google Account password if you forget it or become locked out for some other reason when you try to keep accessing all of your data. You might also need to change lock screen passcode from time to time.
How to Change/Set up Lock Screen Password
Select Screen Lock Type under Settings > Lock Screen. From there, you may select from a variety of lock screen options:
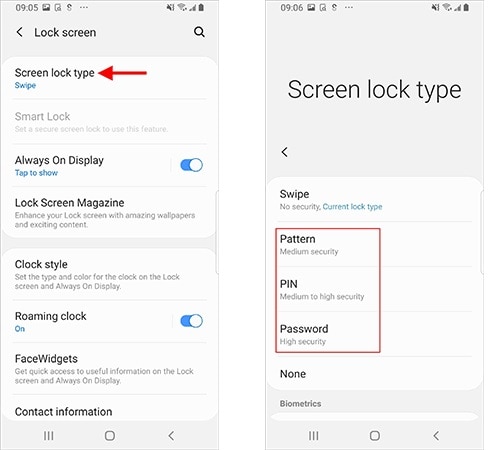
Swipe: This lock type allows you to swipe in any direction on your screen to unlock your phone.
Pattern: If you opt to unlock your phone in this manner, you must create a pattern on a 3-by-3-dot grid.
Pin: A PIN lock is a four-digit code. Make sure you select a set of numbers that you can quickly recall.
Password: Your phone’s highest level of security. Your password must be distinct, easily remembered, and include at least one letter and 7 characters.
Follow the setup instructions on-screen after selecting the security measure you prefer.
Additionally, you’ll notice options to enable fingerprint or face biometric recognition features. Iris Scanner (S8/S8+) or Intelligent Scan (S9/S9+) may also be available on some older Samsung® models.
Face recognition: By holding your face directly in front of your phone’s screen, you may unlock your phone and authenticate yourself in apps.
With fingerprints, you can quickly touch your finger to unlock your phone.
Iris: Check your eyes to make sure that only you can see the contents of your phone.
Intelligent Scan: A method of device unlocking that combines face and iris recognition technology.
Follow on-screen instructions if you decide to employ one of these sophisticated security technologies, or go to Settings > Biometrics and security for more customization choices.
How to look up saved passwords on my device?
The way that Google Chrome manages your usernames and passwords is excellent. But what if you want to log in to a particular website from another device but can’t recall your password, and the website won’t load the data for you? You may quickly obtain a list of all saved passwords by browsing through Chrome’s settings, then manually keying it in.
You may access the passwords saved in the Google Chrome app on a Mac or PC because the app is connected to your Google account. Any passwords saved on your Android phone can easily be removed via the Chrome app.
How to Change your Password when you forget it?
1. Google Find My Device
As you are likely aware, every Android device is connected to a Google account. As a result, if you’d like, you may use it to unlock Android as well. You’ll need to know your Google account login information for this. When you’re ready, use these instructions to find out how to unlock a phone password.
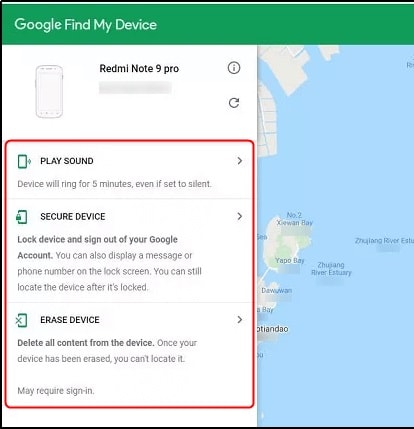
- Login in using your Google credentials by going to the official Google Find My Device website.
- You will see the gadgets connected to your Google account as you enter the interface, along with a map of where they are.
- To wipe the Itel P40+ device, click the ERASE DEVICE option on the left side panel. You will then be required for your password.
- Once more, select “Erase.” This will reset the Itel P40+ device and get rid of the forgot pattern lock.
2. Using Recovery Mode
Users of Android smartphones and tablets can troubleshoot various issues with their devices using a feature known as Android Recovery Mode. It might be helpful if you discover that your device is functioning strangely. Recovery Mode Android technically refers to a unique bootable partition with a recovery application installed inside it.
However, users can also use it to reset the android password if it is forgotten. The instructions for resetting android devices through recovery mode are different for every android device.
3. Forgot Password Feature (Android 4.4 and Lower)
In case you lose your pattern, PIN, or other passwords, older versions of Android, including Android 4.4 KitKat, have an integrated feature to let you continue using your device.
Enter an erroneous pattern or PIN five times on the lock screen to reveal this function. A button with the words “Forgot pattern,” “Forgot PIN,” or “Forgot password” will show up. Tap it. The username and password for the Google account connected to your Android smartphone will be required.
4. Using ADB
Launch Recovery mode and restart the phone. Turn off your phone. Then to access the Bootloader, simultaneously press the Power button and the Volume Down key. Then select Recovery mode.
Use USB to connect the phone. You must have ADB set up on your computer. (ADB is part of the Android Developer Bundle)
Use the shell’s following command to start
Rm /data/system/gesture.key using the adb shell
Turn the phone back on normally. Any pattern will unlock the screen, and you will be prompted to enter one.
Bonus Method: Dr.Fone - Screen Unlock
On most Android handsets, you can attempt Dr.Fone to unlock the screen lock easily. It allows you to delete the password, PIN, pattern, and fingerprint from an Android phone.
Step 1. Select Unlock Android Screen
Please select “Unlock Android Screen.”
Step 2. Select device model
On this page, please choose the option fitting your phone.

Only when you select the right phone brand so the unlock process will go with success.
Step 3. Enter into Recovery Mode
Then go with the instructions for getting the Android phone into Recovery Mode. Here we show you examples of Samsung phones.
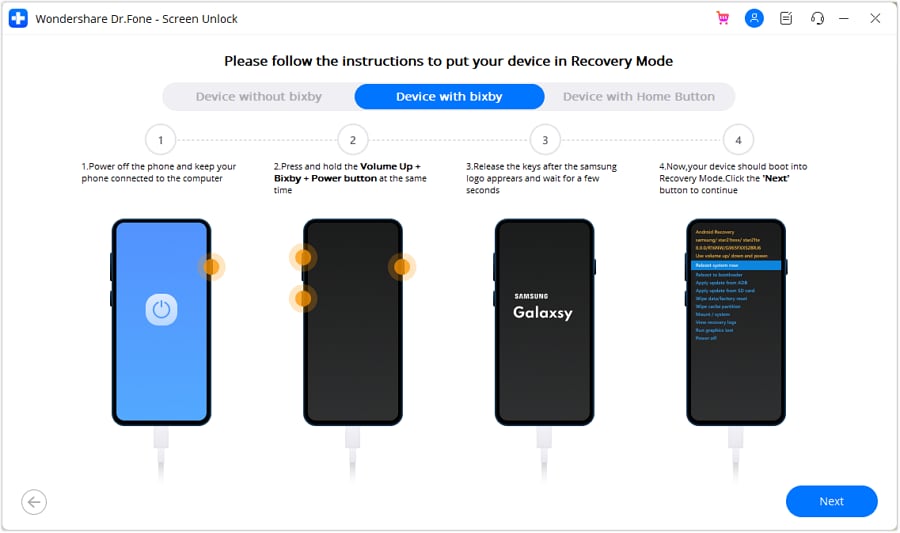
(Recovery Mode When the Samsung phone via Bixby)

(Recovery Mode When the Samsung phone via Bixby)
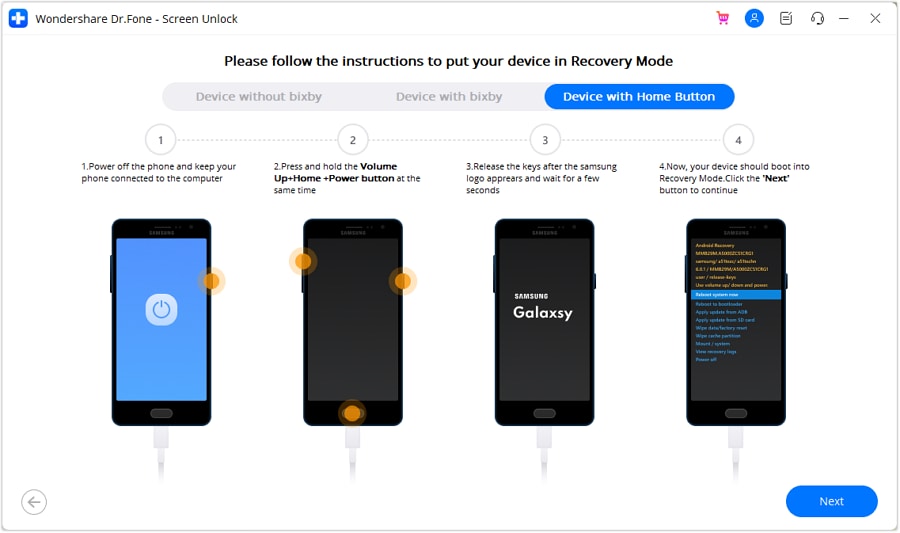
(Recovery Mode When the Samsung phone via Home button)
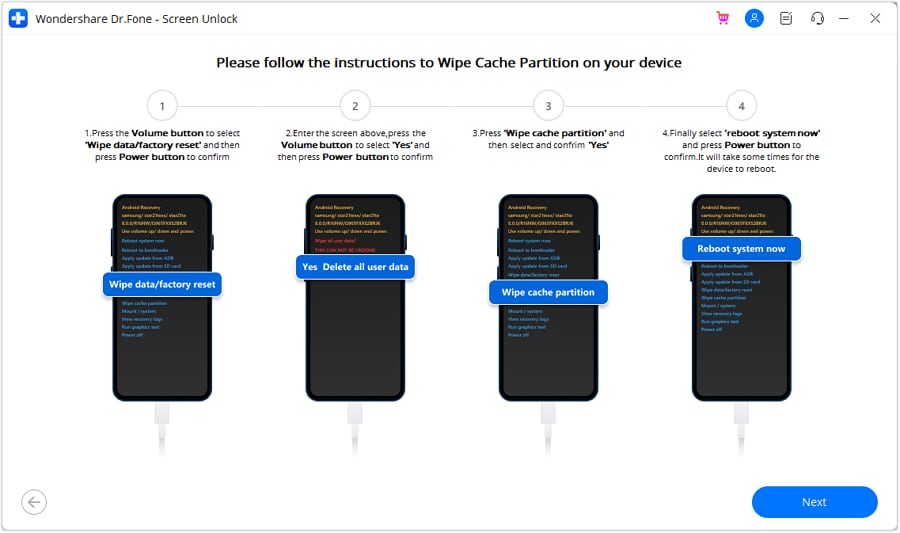
Step 4. Instructions to Wipe Cache Partition
On the page Recovery Mode, you’ll see this interface to continue your unlock process.
Now you can access your Android device without entering any password after the unlock process is well done.

Conclusion
Any of the aforementioned methods can be used to overcome the obstacle of using your Android handset. The best thing about this article is that you only need some simple unlock ways to complete the tasks. Dr.Fone - Screen Unlock is the easiest way of restoring your device if you have a stuck password or fingerprint.
Can I Bypass a Forgotten Phone Password Of Itel P40+?
Screen locks on smartphones are crucial for keeping the data in your phone hidden. Password for phone becomes necessary when you have critical data on your phone. However, there is a downside to it.
Many people forget their screen lock, and that’s normal. That can happen if you accidentally type a new lock screen password incorrectly. Apart from that, there are many other explanations too. In short, you can get locked out of your device, which is a terrible experience. It can waste your time if you need something stored in your phone.
Here we have mentioned solutions to let you bypass your lock screen password. All the solutions mentioned here are safe and will work almost 100% of the time.
Part 1: How Can I Set or Change My password?
- Open the Settings application and tap the Security choice.
- Under Device Security, tap Screen Lock.
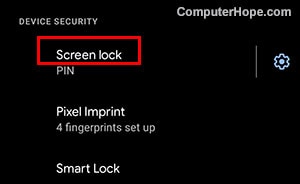
- Select a Screen lock option, i.e., Swipe, Example, PIN, Password, etc.

- When you pick your choice, follow the guidelines on the screen to set it. Enter your screen lock straightaway.
- Then redo your screen lock on the following screen, then, at that point, tap Confirm.
Part 2: 4 Simple Ways to Bypass Your Itel P40+ Phone Password
1. Google Find My Device
Our first approach to unlocking your device is to do a factory reset. That erases every one of the data on your phone too. You can perform this method if you have your Google account credentials and are ready. However, we want you to back up your data so you can sign once more after the reset and restore a ton of your data.
Since you’re locked out, you will have to utilize a technique to do the reset. The most straightforward way is to utilize Google’s Find My Device site. So, if the Find my Device option feature is enabled on your phone, you can tap the Erase device choice on this page to reset it.


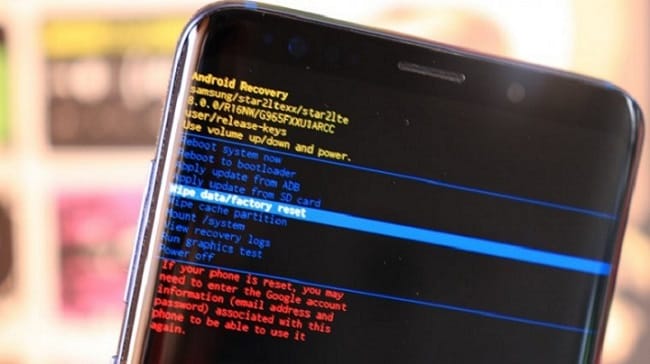
2. Enter Recovery Mode to Hard Reset
If you can’t use the Find my device feature, you’ll have to factory reset physically. To do as such:
- Power your device off.
- Hold the Volume (-) and power keys all the while after the screen goes dark to raise Android’s bootloader menu. This button blend might be different relying on your device model.
- Press the Volume down button two times to feature the Recovery Mode choice. Then, at that point, press the power button to choose it.
- Hold the power button and press the Volume up button to enter this mode.
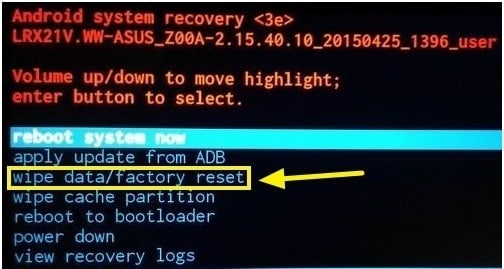
- Utilize the volume buttons to go to the Wipe data/Factory Reset choice. Continue with the steps to play out a factory reset.
3. Use ADB
This fix isn’t guaranteed to work; if you don’t watch out, it could damage your phone. Therefore, we suggest you back up everything on your Android before proceeding.
If your phone has USB debugging enabled, is connected to a PC, and is not encrypted, follow these steps:
- Connect your device to your PC through a USB connector.
- Open Command Prompt or Terminal window to your ADB installation registry.
- Type in adb shell rm/data/system/gesture.key and click the Enter key.
- Reboot your phone. When you do, the solid lock screen ought to be gone.
- That is not a permanent condition, so reset your PIN or password lock before you reboot your device once more. That’s how you reset password for phone.
4.Dr.Fone-Screen Unlock
If you want to unlock your phone without losing any data, we suggest Dr.Fone-Screen Unlock. Dr.Fone is a professional unlocking tool that can remove all types of screen locks in minutes. Dr.Fone is an all-in-one solution for all your iOS and Android needs. So, if you need a quick solution for your phone, download it now.
Step 1. Connect your Android telephone
Open the tool on your PC and select the “Screen Unlock” tool.
When the entire process is finished, you can access your Android device without entering any PIN and view all your data on the Itel P40+ device.
Step 2. Select Unlock Android Screen tool
We provide 2 options for you, and to unlock screen, you should select “Unlock Android Screen”.
Step 3. Select device model
There are still 2 buttons to choose, “100% Remove Screen Lock” is for most Android brands, but please back your device up before you pick it.
Check the brands list and make sure your unlock process keeps.
Step 4. Enter into Recovery Mode
Then follow the instructions on the program to get the Android phone into Recovery Mode. Here we take 3 different models of Samsung phones as example. (Note: Processes are different according to different brands).
Recovery Mode in Samsung Phone with Bixby
Recovery Mode in Samsung Phone without Bixby
Recovery Mode in Samsung Phone with Home Button
Step 5. Instructions to Erase Cache Partition
Steps in Recovery Mode are really important, find the correct options and your locked screen will be removed.
Now it’s a phone everyone can access without password or pattern.

Part 3: How to Back up My Itel P40+ Easily?
Dr.Fone-Phone Backup
As we all know, unlocking a lock screen password involves a hard reset, which can delete your user data. Therefore, you must back up your files before hard resetting.
There are several tools available to back up your files. You can use Google or your phone manufacturer’s cloud services to back up your file. However, none of them are secure enough. So, we suggest Dr.Fone-Phone Backup have a secure and reliable backup experience. Dr.Fone lets you choose the files you need and back them up. Moreover, you can restore those files to your phone once it gets unlocked.
The Bottom Line
Getting locked out of your phone can be frustrating, especially if you need an important file from it. However, there are solutions to get over this issue and unlock the password for phone. This article contains all you need to unlock your device and return it to be normal. Moreover, if you don’t want to lose your data, give Dr.Fone a try. It is currently the best unlocking and backup tool in the market.
- Title: Unlock Your Itel P40+ Phone with Ease The 3 Best Lock Screen Removal Tools
- Author: Marry
- Created at : 2024-07-18 16:16:33
- Updated at : 2024-07-19 16:16:33
- Link: https://unlock-android.techidaily.com/unlock-your-itel-p40plus-phone-with-ease-the-3-best-lock-screen-removal-tools-by-drfone-android/
- License: This work is licensed under CC BY-NC-SA 4.0.